Creating a containerized web application in AWS CDK using Docker
In this step, we will keep things as simple as we can. The aim is to get you going with coding your first CDK app as quickly as you can. So, let’s get started.
Open lib/chapter-1-introduction-to-iac-and-aws-cdk-stack.ts in your favorite editor. We’re using Visual Studio Code. You will see the following code already present in the file. CDK has pretty much wired up everything for us and is ready to go:
import  * as cdk from 'aws-cdk-lib';
import { Construct } from 'constructs';
// import * as sqs from 'aws-cdk-lib/aws-sqs';
export class Chapter1IntroductionToIacAndAwsCdkStack extends cdk.Stack {
  constructor(scope: Construct, id: string, props?: cdk.StackProps) {
    super(scope, id, props);
    // The code that defines your stack goes here
    // example resource
    // const queue = new sqs.Queue(this, 'Chapter1IntroductionToIacAndAwsCdkQueue', {
    //   visibilityTimeout: cdk.Duration.seconds(300)
    // });
  }
}
We could get rid of all the comments and start adding our code, but for the sake of simplicity, let’s delete all that and paste the following code instead into the file:
import { Stack, StackProps } from 'aws-cdk-lib';
import { ContainerImage } from 'aws-cdk-lib/aws-ecs';
import { ApplicationLoadBalancedFargateService } from 'aws-cdk-lib/aws-ecs-patterns';
import { Construct } from 'constructs';
export class Chapter1IntroductionToIacAndAwsCdkStack extends Stack {
  constructor(scope: Construct, id: string, props?: StackProps) {
    super(scope, id, props);
    new ApplicationLoadBalancedFargateService(this, 'MyWebServer', {
      taskImageOptions: {
        image: ContainerImage.fromRegistry('amazon/amazon-ecs-sample'),
      },
      publicLoadBalancer: true
    });
  }
}
Alright—save the file, open up the command line, cd into the working directory (the root of our cdk application), and run the following:
$ cdk bootstrap --profile cdk
This command will bootstrap the AWS environment, meaning it will create all the necessary AWS resources on the cloud to make CDK work properly.
Then, run the following command:
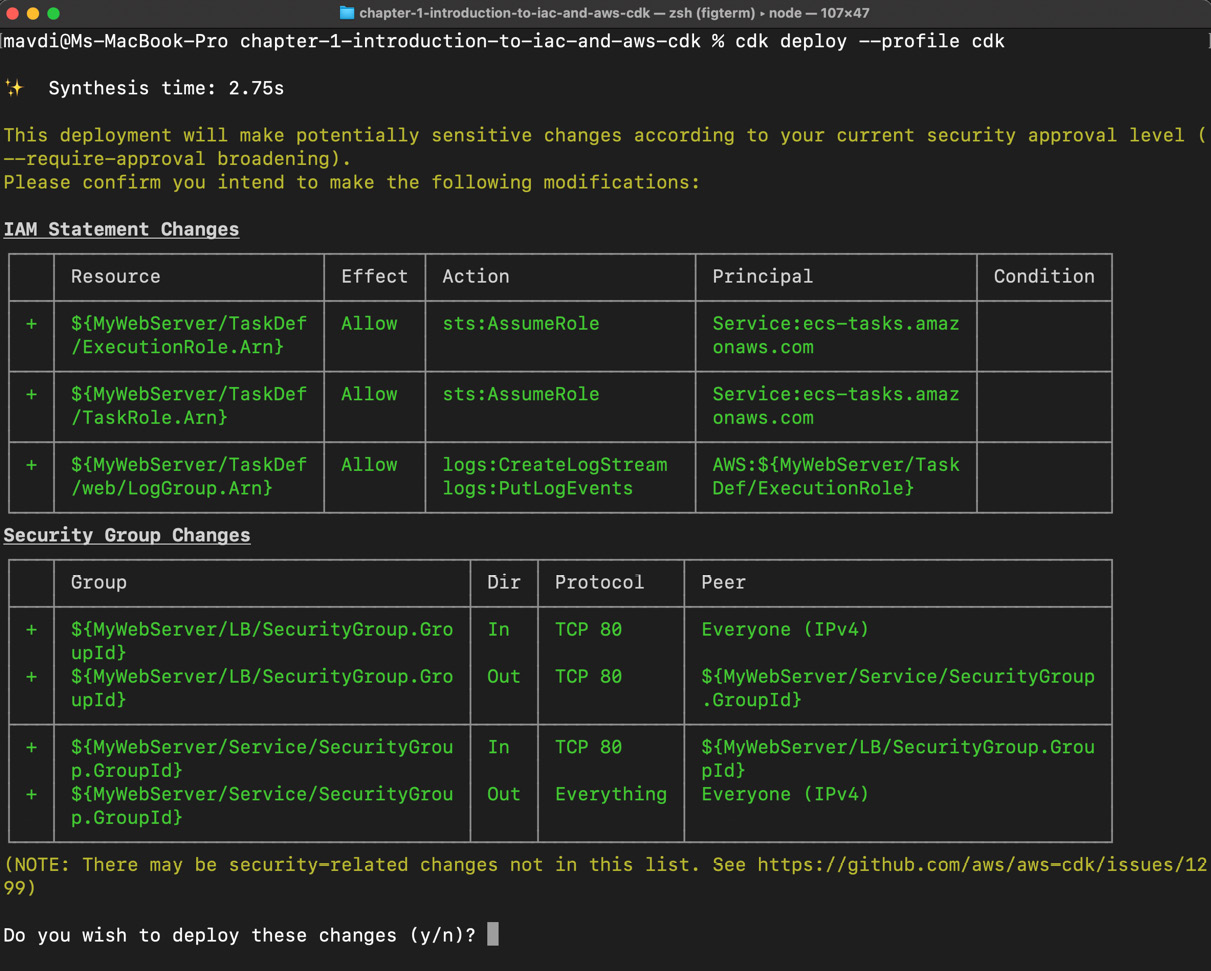
$ cdk deploy --profile cdk
If you’ve followed the instructions correctly so far, you will see a nice green-text screen. Let’s examine it:

Figure 1.8 – Deploying our first CDK stack
The preceding screen is first warning you that potentially sensitive changes are about to occur with this deployment; this is due to the IAM roles the stack creates. It’s fine for you to ignore this for now.
Next, it lists the names of AWS resources that are about to be created, categorized by service. The + sign and the green color of the text indicate that these resources are about to be added. Later, we will see resources that will be marked for destruction, which is logically indicated by a – sign at the beginning of the line and the color red.
Yes—you’ve earned it: go ahead and type y and press Enter.
Note
If you’re in the middle of a stack being created and are about to take a break or attend to another matter, destroy the stack with cdk destroy --profile cdk to avoid unnecessary costs.
CDK will create an AWS CloudFormation template (we will cover this later in the chapter) and continue to deploy the stack. It will also keep you informed of the progress. If your user has got the necessary permissions, CDK will succeed in deploying the stack; else, it will fail and automatically roll back the changes.
The process is complete; we see a bunch of information being outputted. Under the Outputs section, you will see two links:

Figure 1.9 – CloudFormation stack output links
Copy either of the links into your web browser and navigate to it. You should see a page load up:

Figure 1.10 – The output of the Elastic Container Service (ECS) server
Nice! You’ve successfully deployed your first CDK application. If you now go back to your AWS dashboard and go to ECS Service, you will see a new cluster of services has been spun up on your behalf.
If you click on the cluster name, which should be Chapter1IntroductionToIacAndAwsCdkStack-{some other random text}, then you will be able to see the service, tasks, metrics, logs, and all the rest. This is a containerized ECS Fargate application with a lot of built-in resiliency already spun up by you already. So many other good things are about to come.
Right—we’ve had our fun. Let’s now go ahead and destroy the stack before we do anything else. To destroy the stack—you guessed it—run the following:
$ cdk destroy --profile cdk
Confirm by entering y. AWS CDK will now go ahead and destroy our favorite PHP stack. Perhaps it’s for the best.
Going back to the dashboard and to the ECS Service root page, you will see that the cluster is no longer there. Neither is our simple PHP app. All gone. Clean.


