Building and executing your first PowerShell script
PowerShell is a great interface for acquiring and configure information about our servers. Most of us are familiar with creating some simple old-fashioned batch files that are driven by the Command Prompt, essentially programming out small tasks within these batch files to automate a series of commands. This saves time later as we do not have to type out the commands line by line, especially for common tasks or for items that we need to run during login.
PowerShell has a hugely increased level of functionality in this regard, but the ability to write out multiple lines of PowerShell into a script file is the most basic of them. We can then launch this script file as we would a batch file, automating tasks while taking advantage of the additional features that PowerShell brings to the table over the Command Prompt. These PowerShell scripts are put together inside .ps1 files; let's build a simple one together to get a feel for running these scripts.
Getting ready
Our work with PowerShell today will be accomplished from a Windows Server 2019 machine. PowerShell is installed by default with Windows, and there is nothing further that we need to install.
How to do it…
Follow these steps to build and execute your first PowerShell script:
- Open the Start menu, type
Windows PowerShell ISE, and click the desktop app to open it. Do not choose the one ending in (x86) – for some reason, Windows thinks this is a good choice. It isn't. You may need to look further down your Start menu to find the correct one. Windows PowerShell ISE is an editor for PowerShell scripts that is much more useful than opening a simple text editor such as Notepad in order to build our script:
Figure 1.32 – Locating Powershell ISE in the Start menu
- Navigate to File | New from the menus in order to open a blank
.ps1script file. - In your first line, type the following:
Write-Host "Hello! Here is the current date and time:"
- From the toolbar menu, click the green arrow that says Run Script. Alternatively, you can simply press the F5 button. When you run the script, the command and output are displayed in the lower portion of the ISE window:

Figure 1.33 – Using Windows PowerShell ISE
Cool? Not really. So far, it's pretty lame – it's just reflecting the text that we told it to echo, but it worked. It didn't even actually tell us what the time is. But that is the nice thing about using the ISE editing tool rather than a generic text editor – you have the ability to quickly test run scripts as you make modifications.
- Now, let's add some additional lines to our script so that we get the information we are looking for. You can see a list of available commands on the right-hand side of the screen (you may have to switch your Modules to All) if you would like to browse through what is available, but for our example, simply change your script so that it includes the following:
Write-Host "Hello! Here is the current date and time: $(Get-Date)"
Write-Host "The name of your computer is: $(hostname)"
- Press the Run Script button again to see the new output:

Figure 1.34 – Using Windows PowerShell ISE
- Now, navigate to File | Save and save your new
.ps1PowerShell script. - Let's test this script by launching it from within a real PowerShell command window. Go to your Start menu and run PowerShell.
- Browse to the location where you just saved your script file – you can use the old DOS cd commands for this. Then, launch the script by inputting
.\filename. In my case, I used.\GetTime.ps1.
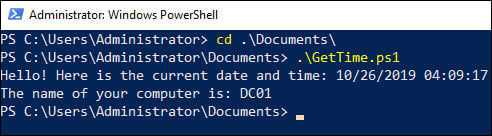
Figure 1.35 – Running the script file
Tip
The PowerShell ISE comes with Windows by default, but you can write PowerShell scripts in any code editor. Visual Studio Code is a free editor provided by Microsoft that is cross-platform and has excellent support for PowerShell scripting. I have written tens of thousands of lines of PowerShell in Visual Studio Code. Check it out on your Windows 10 machine at https://aka.ms/vscode.
How it works…
In this recipe, we created a very simple PowerShell script and saved it on our server for execution. While, in practice, getting time and date information from your server may come faster by using the standalone Get-Date cmdlet, we provided this recipe to give you a small taste of the ISE and to get your scripting juices flowing. Expanding upon the ideas presented here will start to save you valuable time and keystrokes as you identify more and more ways to automate the tasks and information gathering processes that are part of your daily routines. The possibilities of PowerShell are practically limitless, so make sure that you open it up and start becoming familiar with the interfaces and tools associated with it right away!
Tip
Windows Server 2019 comes with PowerShell 5, which only works on Windows. However, if you upgrade to PowerShell 6 or 7, these run on Linux and OSX as well – so if you wanted to, you can have PowerShell on all your servers, not just your Windows ones! Be careful, though: if you have existing scripts, some things have changed in PowerShell 6 and above, so you will want to check that they still work. With Visual Studio Code and PowerShell 6 or above, you can write and run PowerShell from Windows, Mac, or Linux.