Building images with Docker Compose
To demonstrate how to build a Docker image using Docker Compose, we need a small application. Proceed as follows:
- In the chapter’s folder (
ch11
), create a subfolder,step2
, and navigate to it:mkdir step2 && cd step2
- From the previous exercise, copy the
db
folder containing the database initialization script to thestep2
folder and also copy thedocker-compose.yml
file:$ cp -r ../step1/db . $ cp ../docker-compose.yml .
- Create a folder called
web
in thestep2
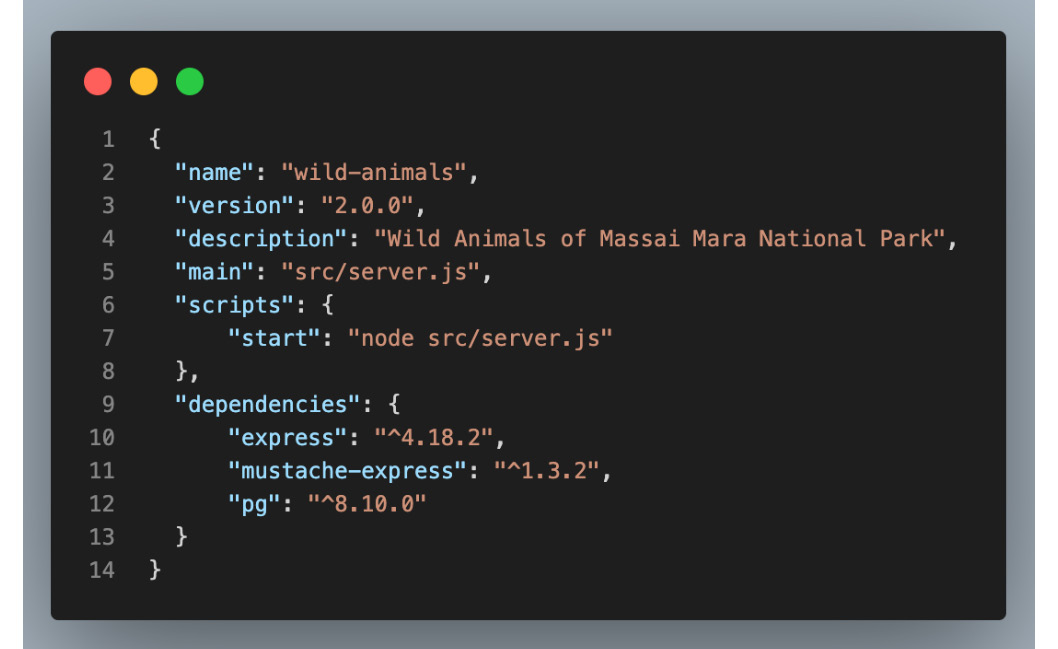
folder. This folder will contain a simple Express.js web application. - Add a file called
package.json
to the folder with this content:
Figure 11.8 – The package.json file of the sample web application
Note
If you prefer not to type yourself, you can always download the files from the sample solution: https://github.com/PacktPublishing/The-Ultimate-Docker-Container-Book/tree/main/sample-solutions/ch11/step2.
- Create a folder called
src
inside theweb
folder. - Add a file called
server.js
to thesrc
folder with this content:
Figure 11.9 – The server.js file of the sample web application
This file contains the complete logic for our simple web application. Of interest is specifically the logic for the /animal
endpoint on lines 32 to 40. Also note how we connect to the PostgreSQL database using a constant pool
of type Pool
(lines 15 to 21). The username, password, and database name should match the ones we define for the database.
- Add another file called
index.html
to thesrc
folder with this content:
Figure 11.10 – The index.html file of the sample web application
This file serves as a template to display the image of a wild animal.
- Add a folder called
public/css
to theweb
folder:mkdir -p public/css
- Add a file called
main.css
to thispublic/css
folder, which we will use to style our sample web application. Add this content to the file:
Figure 11.11 – The main.css file of the sample web application
- Now we need some real images to display. The easiest way is to copy our sample images from GitHub:
- Create a folder called
images
in thepublic
folder. - Then, download all images into this
images
folder, which you can find here: https://github.com/PacktPublishing/The-Ultimate-Docker-Container-Book/tree/main/sample-solutions/ch11/step2/web/public/images.
- Create a folder called
- We now need to make a small addition to the
docker-compose.yml
file that we have copied from thestep1
folder. Locate thedocker-compose.yml
file in thestep2
folder, open it, and after line 4, add this snippet:ports: - 5432:5432
The result should look like this:
Figure 11.12 – Add host port mapping to the db service
This way, we can actually access the database from any application running on the host. We will use this possibility in the coming steps.
- Now, we are ready to run and test this application:
- Run the database using the docker-compose file and this command:
$ docker compose up db --detach
We are telling Docker Compose to only start the db service and to run it in
detach
mode, indicated by the--
detach
parameter.- Navigate to the
web
folder:
$ cd web
- Install all dependencies with the following:
$ npm install
- Run the application using the following:
$ npm run start
You should see this:
Figure 11.13 – Running the web application natively
- Open a browser tab and navigate to http://localhost:3000/animal and you should see something like this:
Figure 11.14 – The web application running and displaying a wild animal
- Refresh the browser a few times and notice that each time, a new random animal is displayed.
- Before you leave, make sure to stop the web application and stop the other containers with
docker
compose down
.
Great, now we can move on to the next step, where we will Dockerize the web application and use Docker Compose to build the image:
- Add a file called
Dockerfile
to theweb
folder and add this snippet:
Figure 11.15 – Dockerfile for the web application
Analyze this Dockerfile and try to understand what it does exactly. Refer to what you learned in Chapter 4, Creating and Managing Container Images, if needed.
- Open the
docker-compose.yml
file from thestep2
folder and add the definition of theweb
service, right after thedb
andpgadmin
services and before thevolumes
section (that is, after line 24). The snippet to add should look like this:
Figure 11.16 – Defining the service called web in the docker-compose.yml file
Make sure that on line 2, you replace the gnschenker
username with your own Docker Hub username.
- Build the image using this command:
$ docker compose build web
The preceding command assumes that you are in the
step2
folder and that there is adocker-compose.yml
file located in that folder.
When building the image, Docker looks for and uses a Dockerfile in the web
folder, as instructed by the build: web
instruction on line 3 in the preceding snippet.
To build images using Docker Compose, use the following instructions:
- Open a terminal window.
- Make sure that you are in the
ch11/step2
subfolder of theThe-Ultimate-Docker-Container-Book
folder:$ cd ~/ The-Ultimate-Docker-Container-Book/ch11/step2
- Then, build the images:
$ docker compose build
If we enter the preceding command, then the tool will assume that there must be a file in the current directory called
docker-compose.yml
and it will use that one to run. In our case, this is indeed the case, and the tool will build the images. - Observe the output in your terminal window. You should see something like this:
Figure 11.17 – Building the Docker image for the web service
In the preceding screenshot, you can see that docker-compose first downloads the base image, node:19.7-alpine
, for the web
image we’re building from Docker Hub. Subsequently, it uses the Dockerfile found in the web
folder to build the image and names it gnschenker/ch11-web:2.0
.
After building the Docker image for the web
service, we are ready to use Docker Compose to run the whole multi-service application.