IntelliJ and Kotlin
Coding using Vim/nano is not everyone's first choice; working without the help of an IDE with its code completion, intelli-sense, shortcuts for adding files, or refactoring code can prove challenging the more complex the project is.
For a while now, in the JVM world, people's first choice when it comes to their integrated development environment has been IntelliJ. The tool is made by the same company that created Kotlin: JetBrains. Given the integration between the two of them, it would be my first choice of IDE to use, but, as we will see in the next section it is not the only option.
IntelliJ comes in two versions: Ultimate and Community (free). For the code we will be using in the course of this book, the free version is enough. If you don't have it already installed, you can download it from https://www.jetbrains.com/idea/download.
From version 15.0, IntelliJ comes bundled with Kotlin, but if you have an older version you can still get support for the language by installing the plugin. Just go to Settings|Plugins| Install IntelliJ plugins and type Kotlin in the search.
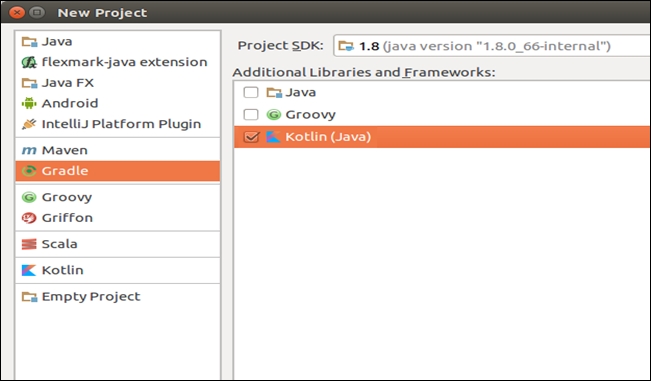
We are going to use the IDE to create a Gradle project with Kotlin enabled, just as we did in the previous section. Once you have started IntelliJ, you will have to choose Create new project. You will get a dialog window from which you should select Gradle from the left-hand side section; check the Kotlin(Java) option from the right-hand side. As you can see here:

Selecting a project type
You should already have the system variable JAVA_HOME set up for the tool to pick it up automatically (see the Project SDK at the top of the screenshot). If this isn't the case, choose the New button and navigate to where your Java JDK is. Once you have selected it, you are ready to go to the next step by clicking on the Next button available on the bottom right-hand side of the screen.
The next window presented to you is asking you to provide the Group Id and Artifact Id. Let's go with com.programming.kotlin and chapter01 respectively. Once you have completed the fields, you can move to the next step of the process where you tick the Use auto-import flag as well as Create directories for empty directory roots automatically. Now carry on to the next step, where you are asked where you wish to store the project on your machine. Set the project location, expand More Settings, type chapter01 for the Module name, and hit the Finish button.
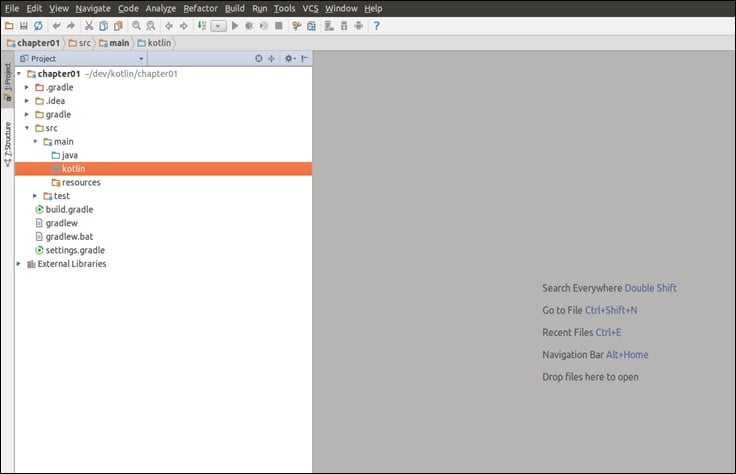
IntelliJ will go on and create the project, and you should have the outcome shown in the following screenshot:

Hello World! basic project
On the selected kotlin folder, right-click and choose the New | Package option, and type com.programming.kotlin.chapter01:

Setting up the package name
Below the kotlin folder, you should see a new one appear, matching what was typed earlier. Right click on that, choose New | Kotlin File/Class, and type Program.kt:

Creating Program.kt file
We are now ready to start typing our Hello World! Use the same code we created earlier in the chapter. You should notice the Kotlin brand icon on the left-hand side of the file editor. If you click on it, you will get the option to run the code, and if you look at the bottom of your IntelliJ window you should see the text Hello World! printed out:

Hello World! program
Well done! You have written your first Kotlin program. It was easy and quick to set up the project and code, and to run the program. If you prefer, you can have a Maven rather than a Gradle project. When you choose New | Project, you have to select Maven from the left-hand side and check Create from archetype while choosing org.jetbrains.kotlin:kotlin-archetype-jvm from the list presented:

Maven project


