Components of Kinect for Windows
Kinect is a horizontal device with depth sensors, color camera, and a set of microphones with everything secured inside a small, flat box. The flat box is attached to a small motor working as the base that enables the device to be tilted in a horizontal direction. The Kinect sensor includes the following key components:
Color camera
Infrared (IR) emitter
IR depth sensor
Tilt motor
Microphone array
LED
Apart from the previously mentioned components, the Kinect device also has a power adapter for external power supply and a USB adapter to connect with a computer. The following figure shows the different components of a Kinect sensor:
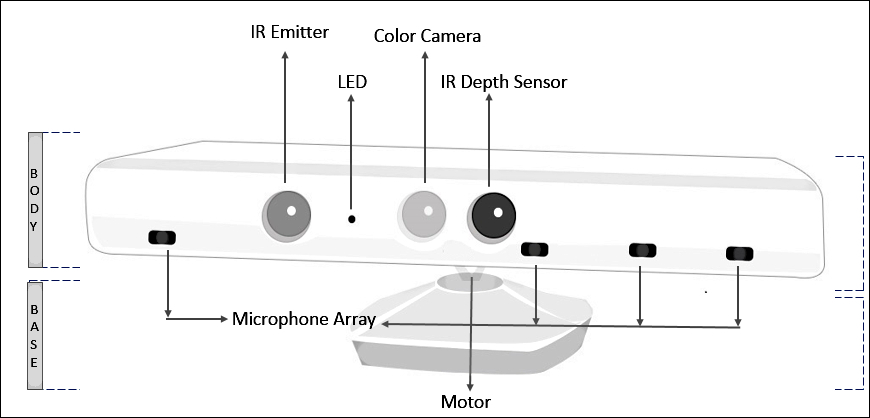
Inside the Kinect sensor
From the outside, the Kinect sensor appears to be a plastic case with three cameras visible, but it has very sophisticated components, circuits, and algorithms embedded. If you remove the black plastic cover from the Kinect device, what will you see? The hardware components that make the Kinect sensor work.
The following image shows a front view of a Kinect sensor that's been unwrapped from its black case. Take a look (from left to right) at its IR emitter, color camera, and IR depth sensor:

Let's move further and discuss about component.
The color camera
This color camera is responsible for capturing and streaming the color video data. Its function is to detect the red, blue, and green colors from the source. The stream of data returned by the camera is a succession of still image frames. The Kinect color stream supports a speed of 30 frames per second (FPS) at a resolution of 640 x 480 pixels, and a maximum resolution of 1280 x 960 pixels at up to 12 FPS. The value of frames per second can vary depending on the resolution used for the image frame.
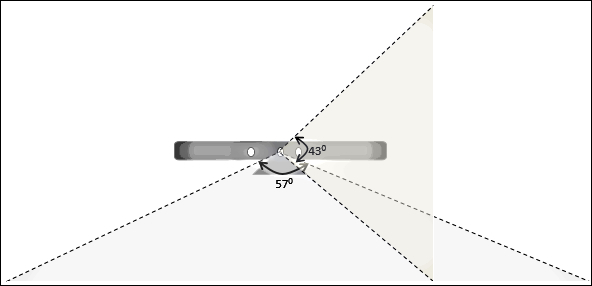
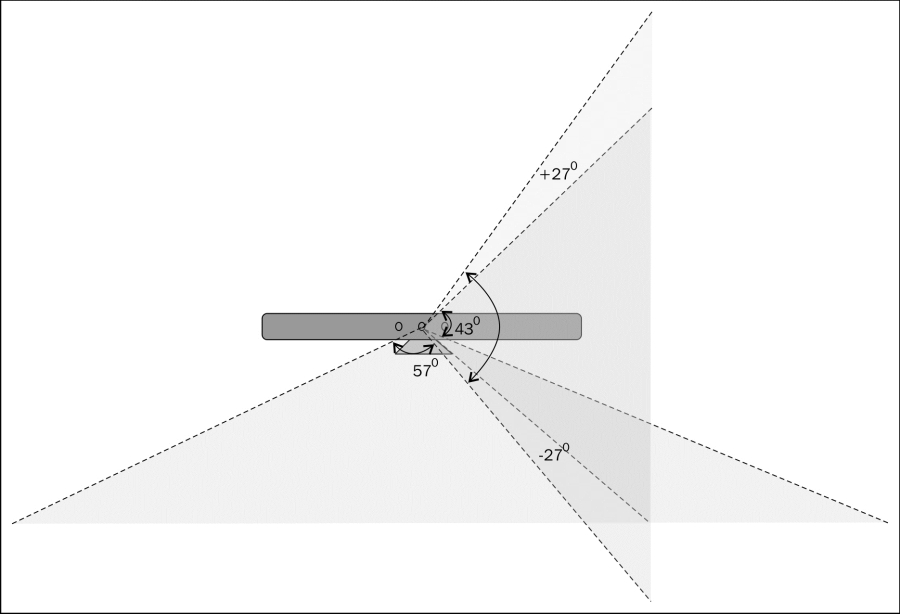
The viewable range for the Kinect cameras is 43 degrees vertical by 57 degrees horizontal. The following figure shows an illustration of the viewable range of the Kinect camera:
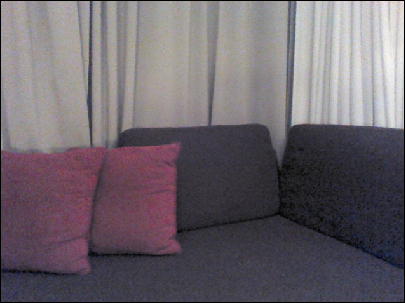
The following image shows a color image that was captured using Kinect color sensors with a resolution of 640 x 480 pixels:
IR emitter and IR depth sensor
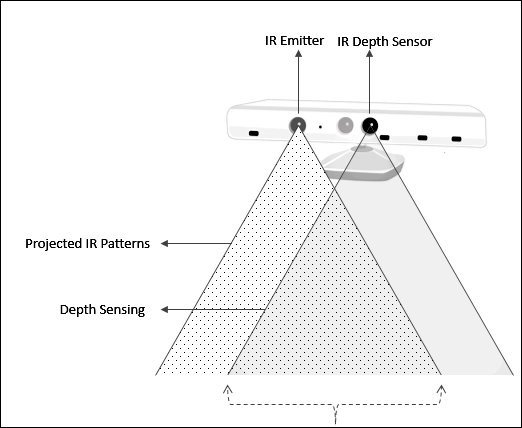
Kinect depth sensors consist of an IR emitter and an IR depth sensor. Both of them work together to make things happen. The IR emitter may look like a camera from the outside, but it's an IR projector that constantly emits infrared light in a "pseudo-random dot" pattern over everything in front of it. These dots are normally invisible to us, but it is possible to capture their depth information using an IR depth sensor. The dotted light reflects off different objects, and the IR depth sensor reads them from the objects and converts them into depth information by measuring the distance between the sensor and the object from where the IR dot was read. The following figure shows how the overall depth sensing looks:
Note
It is quite fun and entertaining to know that these infrared dots can be seen by you. All we need is a night vision camera or goggles.
The depth data stream supports a resolution of 640 x 480 pixels, 320 x 240 pixels, and 80 x 60 pixels, and the sensor viewable range remains the same as the color camera.
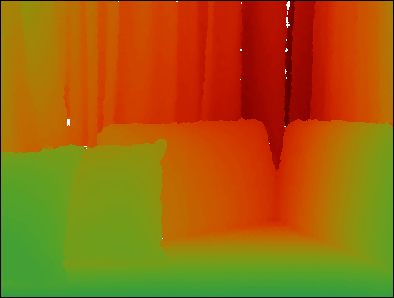
The following image shows depth images that are captured from the depth image stream:
How depth data processing works
The Kinect sensor has the ability to capture a raw, 3D view of the objects in front of it, regardless of the lighting conditions of the room. It uses an infrared (IR) emitter and an IR depth sensor that is a monochrome CMOS (Complimentary Metal-Oxide-Semiconductor) sensor. The backbone behind this technology is from PrimeSense, and the following diagram shows how this works:
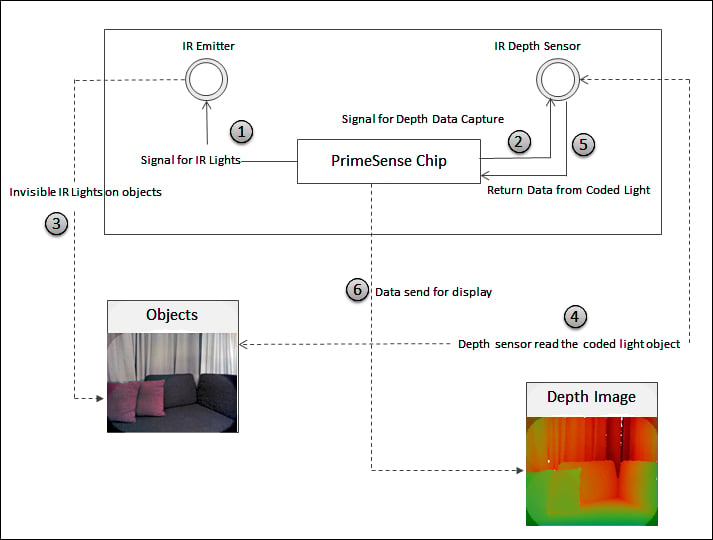
The sequence explained in the diagram is as follows:
When there is a need to capture depth data, the PrimeSense chip sends a signal to the infrared emitter to turn on the infrared light (1), and sends another signal to the IR depth sensor to initiate depth data capture from the current viewable range of the sensor (2). The IR emitter meanwhile starts sending an infrared light invisible to human eyes (3) to the objects in front of the device. The IR depth sensor starts reading the inferred data from the object based on the distance of the individual light points of reflection (4) and passes it to the PrimeSense chip (5). The PrimeSense chip then analyzes the captured data, and creates a per-frame depth image and passes it to the output depth stream as a depth image (6).
Note
The IR emitter emits an electromagnetic radiation. The wavelengths of the radiations are longer than the wavelength of the visible light, which makes the sensor's IR lights invisible. The wavelengths need to be consistent to minimize the noise within the captured data. Heat generated by the laser diode when the Kinect sensor is running can impact the wavelength. The Kinect sensor has a small, inbuilt fan to normalize the temperature and ensure that the wavelengths are consistent.
Tilt motor
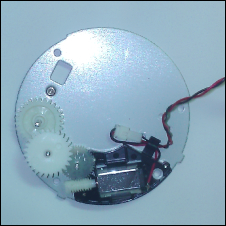
The base and body part of the sensor are connected by a tiny motor. It is used to change the camera and sensor's angles, to get the correct position of the human skeleton within the room. The following image shows the motor along with three gears that enable the sensor to tilt at a specified range of angles:
The motor can be tilted vertically up to 27 degrees, which means that the Kinect sensor's angles can be shifted upwards or downwards by 27 degrees. The following figure shows an illustration of the angle being changed when the motor is tilted:
Note
Do not physically force the device into a specific angle. The Kinect for Windows SDK has a few specific APIs that can help us control the sensor's motor tilting. Do not tilt the Kinect motor frequently; use this as few times as possible and only when it's required.
Microphone array
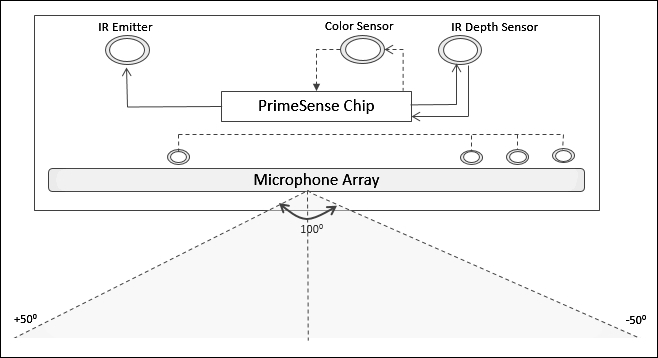
The Kinect device exhibits great support for audio with the help of a microphone array. The microphone array consists of four different microphones that are placed in a linear order (three of them are spread on the right side and the other one is placed on the left side, as shown in the following image) at the bottom of the Kinect sensor:

The purpose of the microphone array is not just to let the Kinect device capture the sound but to also locate the direction of the audio wave. The main advantages of having an array of microphones over a single microphone are that capturing and recognizing the voice is done more effectively with enhanced noise suppression, echo cancellation, and beam-forming technology. This enables Kinect to be a highly bidirectional microphone that can identify the source of the sound and recognize the voice irrespective of the noise and echo present in the environment:
LED
An LED is placed in between the camera and the IR projector. It is used for indicating the status of the Kinect device. The green color of the LED indicates that the Kinect device drivers have loaded properly. If you are plugging Kinect into a computer, the LED will start with a green light once your system detects the device; however for full functionality of your device, you need to plug the device into an external power source.


