Using a custom or newer CryENGINE installation
This section helps out the readers who choose to use custom or newer builds of the engine. If you are unsure of this process, we recommend reading the Downloading the book's CryENGINE sample installation section in this chapter.
Verifying that the build is functional
Before starting, you should verify that your version of CryENGINE is functional so that you can use it for running and creating code based on this book's chapters.
Note
Note that if you are using an older or newer version of the engine, certain chapters may provide examples and information on changed systems. Keep this in mind, and refer to the sample mentioned previously for the optimal learning experience.
A good way to check this is by starting the Editor and Launcher applications and checking whether the engine behaves as expected.
Integrating CryMono (C# support)
If you're interested in using the sample code and chapter contents written with C# in mind, you'll need to integrate the third-party CryMono plugin into your CryENGINE installation.
Note
Note that CryMono is integrated by default in the sample we created specifically for this book.
To begin integrating CryMono, open the Code folder present in the engine root folder. We'll be placing the source files here, inside a subfolder called CryMono/.
To download the source code, visit https://github.com/inkdev/CryMono and click on Download Zip (or Clone in Desktop if you prefer using your Git revision control client).
Once downloaded, copy the contents into the Code/CryMono folder we mentioned earlier. If the folder does not exist, create it first.
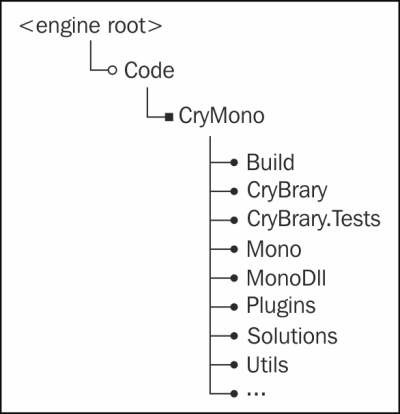
When the files have been successfully moved, your folder structure should look similar to this:

Compiling the CryMono project
Now that we have the CryMono source code, we'll need to compile it.
To start, open Code/CryMono/Solutions/CryMono.sln using Visual Studio.
Note
Make sure to use CryMono.sln and not CryMono Full.sln. The latter is only used when you need to rebuild the entire Mono runtime, which ships precompiled with the CryMono repository.
Before we compile, we'll need to modify the engine's SSystemGlobalEnvironment struct (this is exposed using the global gEnv pointer).
To do so, open ISystem.h in the Code/CryEngine/CryCommon/ folder. Find the struct's definition by searching for the struct SSystemGlobalEnvironment.
Then add the following code to the very end of the struct's members and functions:
struct IMonoScriptSystem*
  pMonoScriptSystem;
Note
Modifying interfaces is not recommended if you do not have full engine source, as other engine modules have been compiled with the default interfaces in mind. However, appending to the end of this struct is mostly harmless.
Once done, open up the instance of Visual Studio where you opened CryMono.sln and start compiling.
Note
The automated post-build step in the project should automatically move the compiled files to your build's Bin32 folder following a successful compilation pass.
To verify that CryMono was compiled successfully, search for CryMono.dll in your Bin32 folder.
Loading and initializing CryMono via the CryGame.dll library
Now that we have the CryMono binaries present in our Bin32 folder, we'll just have to load it during game startup. This is done via the CryGame project, via the CGameStartup class.
To start, open your CryEngine or CryGame solution file (.sln) present in Code/Solutions/.
Including the CryMono interface folder
Before we modify the game startup code, we'll need to tell the compiler where to find the CryMono interfaces.
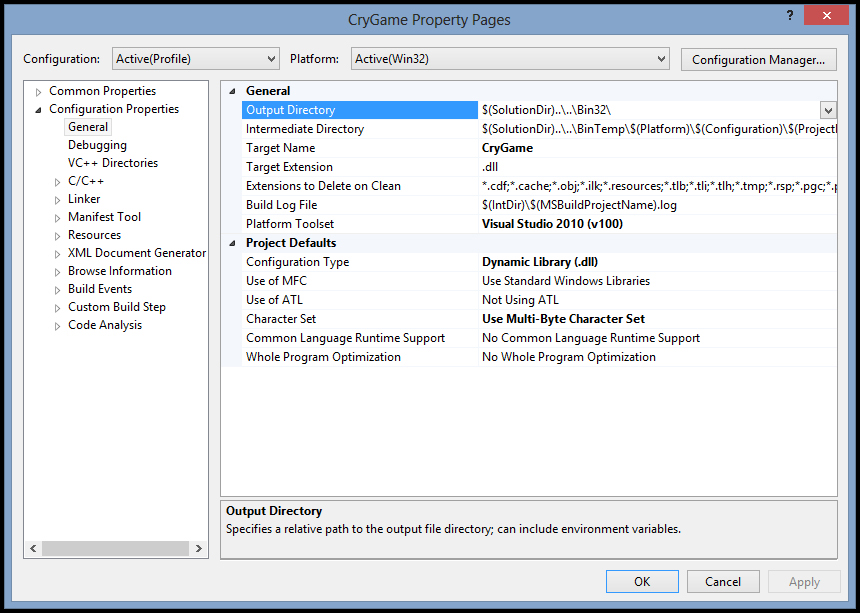
Start by right-clicking on the CryGame project in Visual Studio's Solution Explorer and select Properties. This should bring up the following CryGame Property Pages window:

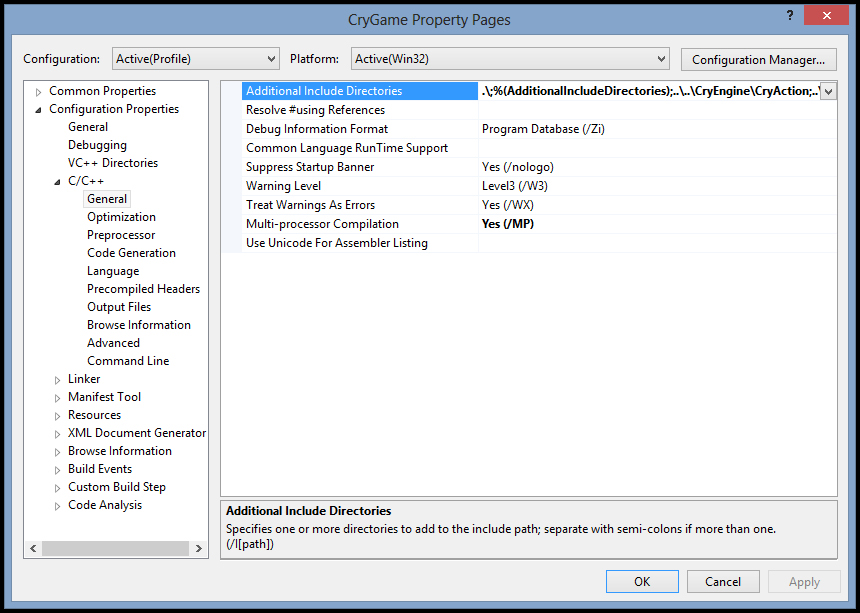
Now, click on C/C++ and select General. This will bring up a screen of general compiler settings, which we'll use to add an additional include folder as shown in the following screenshot:

Now all we have to do is add ..\..\CryMono\MonoDll\Headers to the Additional Include Directories menu. This will tell the compiler to search CryMono's Headers folder when the #include macro is used, allowing us to find the CryMono C++ interfaces.
Initializing CryMono at start up
Open GameStartup.h in the CryGame project and add the following to the bottom of the class declaration:
static HMODULE
m_cryMonoDll;
Then open GameStartup.cpp and add the following before the CGameStartup constructor:
HMODULE CGameStartup::m_cryMonoDll = 0;
Now navigate to the CGameStartup destructor and add the following code:
if(m_cryMonoDll)
{
  CryFreeLibrary(m_cryMonoDll);
  m_cryMonoDll = 0;
}
Now navigate to the CGameStartup::Init function declaration, and add the following prior to the REGISTER_COMMAND("g_loadMod", RequestLoadMod,VF_NULL,""); snippet:
m_cryMonoDll = CryLoadLibrary("CryMono.dll");
if(!m_cryMonoDll)
{
  CryFatalError("Could not locate CryMono DLL! %i", GetLastError());
  return false;
}

auto InitMonoFunc = (IMonoScriptSystem::TEntryFunction)CryGetProcAddress(m_cryMonoDll, "InitCryMono");
if(!InitMonoFunc)
{
  CryFatalError("Specified CryMono DLL is not valid!");
  return false;
}

InitMonoFunc(gEnv->pSystem, m_pFramework);
Now all we have to do is compile CryGame in order to have CryMono loaded and initialized at startup.
Registering flow nodes
Due to a recent change in the flow system, flow nodes have to be registered at a certain point during game startup. To make sure that our C# nodes are registered, we'll need to call IMonoScriptSysetm::RegisterFlownodes from IGame::RegisterGameFlowNodes.
To do this, open Game.cpp and add the following inside the CGame::RegisterGameFlowNodes function:
GetMonoScriptSystem()->RegisterFlownodes();
Now, after compiling, all managed flow nodes should appear in the Flowgraph Editor.


