Deploying a BPEL process
This recipe describes how a BPEL process can be deployed in Oracle SOA Suite. We will show the deployment of the BPEL process from a GUI tool as well as from the command line.
Getting ready
We have to set up a BPEL engine and a proper development environment. For the BPEL engine, we use the BPEL Process Manager from Oracle SOA Suite 11g. We also use JDeveloper as the development environment.
Tip
The installation notes and packages can easily be accessed from the Oracle web page at http://www.oracle.com/technetwork/middleware/soasuite/downloads/index.html. An Oracle web account is required in order to access downloads.
We will start with the HelloWorld example from the Oracle SOA Suite examples and will add additional functionality in the later recipes. For this recipe, we will unzip the HelloWorld example to our hard drive.
Note
For this recipe, we use the example from the https://java.net/projects/oraclesoasuite11g/pages/BPEL address.
How to do it…
In the following steps, we will cover the actions we need to perform in order to deploy a BPEL process to the Oracle SOA Suite server:
- To deploy the BPEL process, we first open JDeveloper and select Default Role. Depending on the role we choose, JDeveloper enables technologies available inside IDE. We choose the default role, which has the BPEL support enabled. We click on Open Application…, select the folder with the HelloWorld sample, and point to the
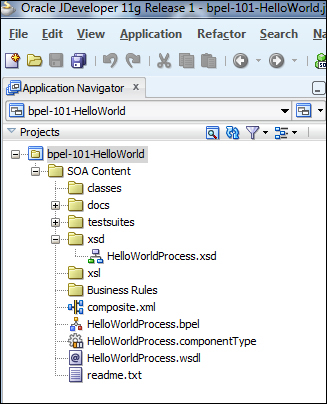
bpel-101-HelloWorld.jwsfile. The project structure in JDeveloper is as shown in the following screenshot:
- We see the
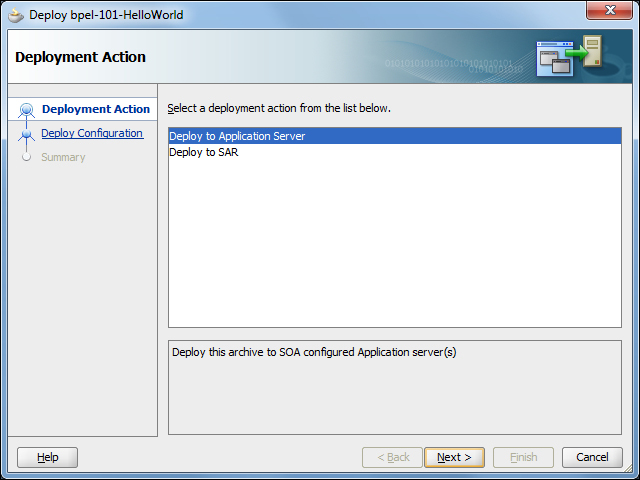
HelloWorldProcess.xsdfile, which contains the XML data type and the XML element structures for the input and output messages that are utilized by the BPEL process. At the top level of the project, we see theHelloWorldProcess.bpelfile, which contains the BPEL process definition, andHelloWorldProcess.wsdlthat contains the definition of the BPEL process partner links. - To deploy the BPEL process, we right-click on the top-level project in the Application Navigator, click on Deploy, and select the BPEL process. We select Deploy to Application Server and click on Next.

- For the deployment configuration, we don't change anything; just click on Next. At this point, we have to select the application server on which we want to deploy the BPEL process. We click on the plus (+) sign and enter the name of the connection in the Connection Name field. Then, we click on Next and enter the username and password for the application server.
Note
When we follow the default installation notes from Oracle, the default username is
weblogicand password iswelcome1. - Next, we need to configure the
connectionparameters to the Oracle Weblogic Domain. The name of the Oracle Weblogic Domain can be obtained from the Oracle Weblogic management console.Note
By default, we can access the Oracle Weblogic management console at the following address:
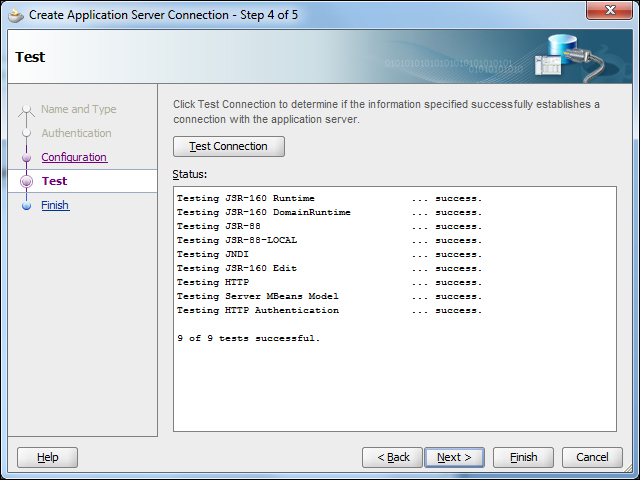
http://<weblogic_server>:7001/console/. - We leave the other parameters unchanged. We then test the connection to the Oracle Weblogic Domain by clicking on the Test Connection button.

- Next, we click on Finish. Now, we select the newly defined BPEL server and click on Next. We can see various information such as the name of the SOA server, the partition to which we want to deploy the BPEL process, the status of the SOA server, and the URL of the server.

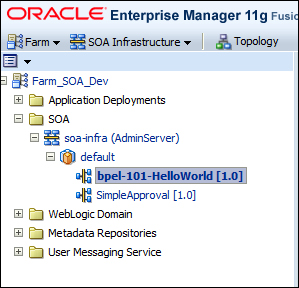
- We then click on Next and Finish. The deployment process starts. When the deployment process finishes, we check if the process was successfully registered with the SOA server. We check this via the Oracle Enterprise Manager Console.

Also, we check to see if there was no error reported in JDeveloper. If deployment was successful, we will see a message in the JDeveloper deployment log as follows:
[10:05:55 PM] Successfully deployed archive sca_bpel-101-HelloWorld_rev1.0.jar to partition "default" on server AdminServer [http://medion:7001]
Note
By default, we access the Oracle Enterprise Manager Console at the following address:
http://<weblogic_server>:7001/em/ - If our
HelloWorldprocess appears in the Oracle Enterprise Manager Console, we succeeded in deploying the BPEL process; otherwise, we need to examine the error and respond accordingly. In case of an error, we need to first check the JDeveloper messages log, and then the Oracle SOA Suite console log. Theobe a useful source of information about the file.
There's more…
After preparing the package for deployment with JDeveloper, we can deploy the BPEL process with the ant scripts. The scripts comes handy for continuous integration tasks in staging and production environments, where various testing and deployment tasks are performed automatically. A set of ant scripts comes with Oracle SOA Suite in order to compile, build, deploy/undeploy, and test the BPEL processes.
We first open the command prompt and change the directory to the example project home. For the deployment, we execute the ant script as shown in the following screenshot:

The command with which we started the deployment is as follows:
ant -f %Middleware_Home%\%SOA_Suite_Home%\bin\ant-sca-deploy.xml
  -DserverURL=http://localhost:7001
  -DsarLocation=.\deploy\sca_bpel-101-HelloWorld_rev1.0.jar
  -Doverwrite=true
  -DforceDefault=true
Tip
You can download the example code files for all Packt books you have purchased from your account at http://www.packtpub.com. If you purchased this book elsewhere, you can visit http://www.packtpub.com/support and register to have the files e-mailed directly to you.
The ant script parameters have the following meanings:
-f: It is the location of the deployment script-DserverURL: It is the base URL of the Oracle SOA Suite server-DsarLocation: It is the location of the deployment package-Doverwrite: If the BPEL process with the same version is already deployed, we can overwrite it-DforceDefault: The force to deploy the package to the default domain
Before the deployment starts, we have to enter the username and password of the BPEL server. Again, we open the Oracle Enterprise Manager Console in order to check whether the BPEL process was successfully deployed.


