Using NuGet Package Manager to download jQuery
NuGet is a package manager available with Visual Studio. It simplifies the process of installing and upgrading packages. This recipe demonstrates the use of NuGet to download the jQuery library.
Getting ready
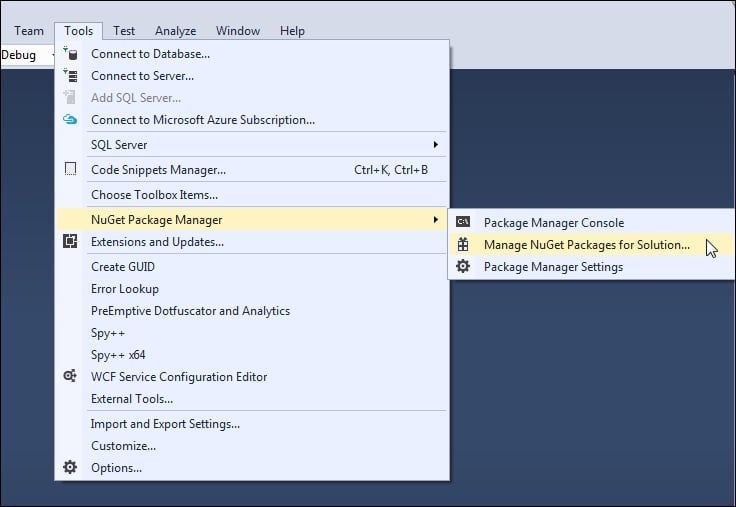
To launch NuGet for a particular project, go to Tools | NuGet Package Manager | Manage NuGet Packages for Solution... as shown in the following screenshot:

Alternatively, right-click on the project in the Solution Explorer tab, and select Manage NuGet Packages.
How to do it…
Perform the following steps to download jQuery using NuGet Manager:
- In the NuGet Package Manager, as shown in the following screenshot, select the jQuery package from the left-hand side panel. In the right-hand side panel, select the Version that you would like to use in your web project from the drop-down menu. Click on the Install button:

Tip
Searching for packages in NuGet
If jQuery is not visible in the left-hand side panel, you need to search for it by keying in
jQueryin the search box in the top left corner of the NuGet Manager screen. - Click on OK when prompted for confirmation in order to make the required changes to the solution.
How it works…
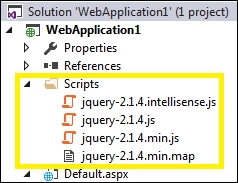
The NuGet Package Manager downloads the selected version of jQuery in the Scripts folder. Any other version existing in the Scripts folder is deleted. The Scripts folder will look like the following screenshot:

The files downloaded by NuGet are as follows (the version numbers may change in the future):
- The Intellisense file: jquery-2.1.4.intellisense.js
- The debug version : jquery-2.1.4.js
- The release version: jquery-2.1.4.min.js
- The map file: jquery-2.1.4.min.map
See also
The Downloading jQuery from jQuery.com recipe


