(For more resources related to this topic, see here.)
Shaping with Meshmixer
Meshmixer was designed to provide a modeling interface that frees the user from working directly with the geometry of the mesh. In most cases, the intent of the program succeeds, but in some cases, it's good to see how the underlying mesh works.
We'll use some brush tools to make our model better, thereby taking a look at how this affects the mesh structure.
Getting ready
We'll use a toy block scanned with 123D Catch.
How to do it...
We will proceed as follows:
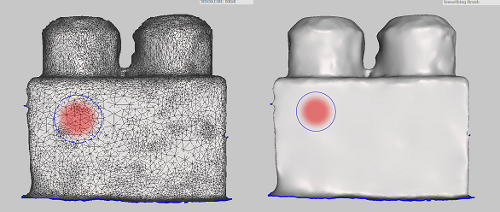
- Let's take a look at the model's mesh by positioning the model with a visible large surface. Go to the menu and select View. Scroll down and select Toggle Wireframe (W).
- Choose Sculpt. From the pop-up toolbox, choose Brushes. Go to the menu and select ShrinkSmooth. Adjust your settings in the Properties section. Keep the size as 60 and its strength as 25. Use the smooth tool slowly across the model, watching the change it makes to the mesh. In the following example, the keyboard shortcut W is used to toggle between mesh views:

- Repeat using the RobustSmooth and Flatten brushes. Use these combinations of brushes to flatten one side of the toy block.
- Rotate your model to an area where there's heavy distortion. Make sure your view is in the wireframe mode. Go back to Brushes and select Pinch.
- Adjust the Strength to 85, Size to 39, Depth to -17, and Lazyness to 95. Keep everything else at default values. If you are uncertain of the default values, left-click on the small cogwheel icon next to the Properties heading. Choose Reset to Defaults.
- We're going to draw a line across a distorted area of the toy block to see how it affects the mesh. Using the pinch brush, draw a line across the model. Save your work and then select Undo/back from the Actions menu (Ctrl+ Z).
- Now, select your entire model. Go to the toolbox and select Edit. Scroll down and select Remesh (R). You'll see an even distribution of polygons in the mesh. Keep the defaults in the pop up and click on Accept.
- Now, go back and choose Clear Selection. Select the pinch brush again and draw a line across the model as you did before. Compare it to the other model with the unrefined mesh.
- Let's finish cleaning up the toy block. Click on Undo/back (Ctrl+ Z) to the pinch brush line that you drew.
- Now, use the pinch tool to refine the edges of the model. Work around it and sharpen all the edges.
- Finish smoothing the planes on the block and click on Save.

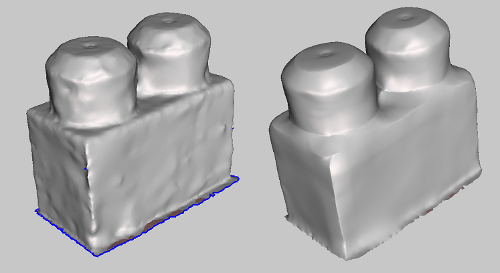
- We can see the results clearly as we compare the original toy block model to our modified model in the preceding image.
How it works...
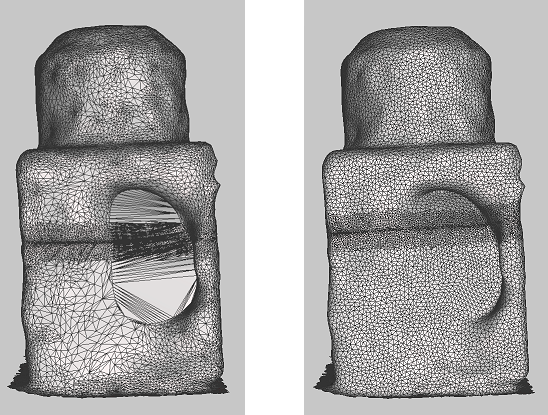
Meshmixer works by using a mesh with a high definition of polygons. When a sculpting brush such as pinch is used to manipulate the surface, it rapidly increases the polygon count in the surrounding area. When the pinch tool crosses an area that has fewer and larger polygons, the interpolation of the area becomes distorted. We can see this in the following example when we compare the original and remeshed model in the wireframe view:

Unlock access to the largest independent learning library in Tech for FREE!
Get unlimited access to 7500+ expert-authored eBooks and video courses covering every tech area you can think of.
Renews at £16.99/month. Cancel anytime
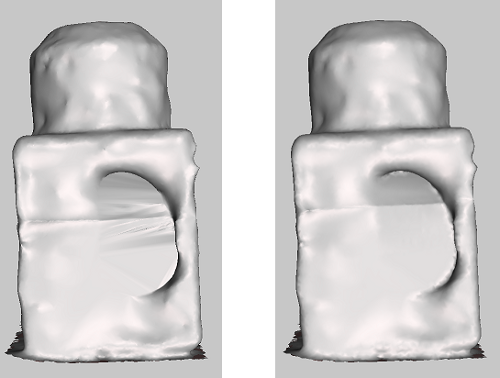
In the following image, when we hide the wireframe, we can see how the distortion in the mesh has given the model on the left some undesirable texture along the pinch line:

It may be a good idea to examine a model's mesh before sculpting it. Meshmixer works better with a dense polygon count that is consistent in size. By using the Remesh edit, a variety of mesh densities can be achieved by making changes in Properties.
Experiment with the various settings and the sculpting brushes while in the wireframing stage. This will help you gain a better understanding of how mesh surface modeling works.
Let's print!
When we 3D print a model, we have the option of controlling how solid the interior will be and what kind of structure will fill it. How we choose between the options is easily determined by answering the following questions:
- Will it need to be structurally strong? If it's going to be used as a mechanical part or an item that will be heavily handled, then it does.
- Will it be a prototype? If it's a temporary object for examination purposes or strictly for display, then a fragile form may suffice.
Depending on the use of a model, you'll have to decide how the object falls within these two extremes.
 United States
 Great Britain
 India
India
 Germany
 France
 Canada
 Russia
 Spain
Spain
 Brazil
 Australia
 Singapore
 Hungary
 Ukraine
 Luxembourg
 Estonia
 Lithuania
 South Korea
 Turkey
 Switzerland
 Colombia
 Taiwan
 Chile
Chile
 Norway
 Ecuador
 Indonesia
 New Zealand
 Cyprus
 Denmark
 Finland
 Poland
 Malta
Malta
 Czechia
 Austria
 Sweden
 Italy
Italy
 Egypt
Egypt
 Belgium
 Portugal
 Slovenia
 Ireland
 Romania
 Greece
 Argentina
 Netherlands
 Bulgaria
 Latvia
 South Africa
 Malaysia
 Japan
Japan
 Slovakia
 Philippines
 Mexico
 Thailand


