Search icon CANCEL
Subscription
0
Cart icon
Your Cart (0 item)
Close icon
You have no products in your basket yet
Save more on your purchases! discount-offer-chevron-icon
Savings automatically calculated. No voucher code required.
Arrow left icon
Explore Products
Best Sellers
New Releases
Books
Videos
Audiobooks
Learning Hub
Newsletter Hub
Free Learning
Arrow right icon
timer SALE ENDS IN
0 Days
:
00 Hours
:
00 Minutes
:
00 Seconds
Vulkan Cookbook
Vulkan Cookbook

Vulkan Cookbook: Work through recipes to unlock the full potential of the next generation graphics API—Vulkan

eBook
€8.99 €32.99
Paperback
€41.99
Subscription
Free Trial
Renews at €18.99p/m

What do you get with a Packt Subscription?

Free for first 7 days. €18.99 p/m after that. Cancel any time!
Product feature icon Unlimited ad-free access to the largest independent learning library in tech. Access this title and thousands more!
Product feature icon 50+ new titles added per month, including many first-to-market concepts and exclusive early access to books as they are being written.
Product feature icon Innovative learning tools, including AI book assistants, code context explainers, and text-to-speech.
Product feature icon Thousands of reference materials covering every tech concept you need to stay up to date.
Subscribe now
View plans & pricing
Table of content icon View table of contents Preview book icon Preview Book

Vulkan Cookbook

Instance and Devices

In this chapter, we will cover the following recipes:

  • Downloading Vulkan SDK
  • Enabling validation layers
  • Connecting with a Vulkan Loader library
  • Preparing for loading Vulkan API functions
  • Loading function exported from a Vulkan Loader library
  • Loading global-level functions
  • Checking available Instance extensions
  • Creating a Vulkan Instance
  • Loading instance-level functions
  • Enumerating available physical devices
  • Checking available device extensions
  • Getting features and properties of a physical device
  • Checking available queue families and their properties
  • Selecting the index of a queue family with the desired capabilities
  • Creating a logical device
  • Loading device-level functions
  • Getting a device queue
  • Creating a logical device with geometry shaders and graphics and compute queues
  • Destroying a logical device
  • Destroying a Vulkan Instance
  • Releasing a Vulkan Loader library

Introduction

Vulkan is a new graphics API developed by the Khronos Consortium. It is perceived as a successor to the OpenGL: it is open source and cross-platform. However, as it is possible to use Vulkan on different types of devices and operating systems, there are some differences in the basic setup code we need to create in order to use Vulkan in our application.

In this chapter, we will cover topics that are specific to using Vulkan on Microsoft Windows and Ubuntu Linux operating systems. We will learn Vulkan basics such as downloading the Software Development Kit (SDK) and setting validation layers, which enable us to debug the applications that use the Vulkan API. We will start using the Vulkan Loader library, load all the Vulkan API functions, create a Vulkan Instance, and select the device our work will be executed on.

Downloading Vulkan's SDK

To start developing applications using the Vulkan API, we need to download a SDK and use some of its resources in our application.

Vulkan's SDK can be found at https://vulkan.lunarg.com.

Getting ready

Before we can execute any application that uses the Vulkan API, we also need to install a graphics drivers that supports the Vulkan API. These can be found on a graphics hardware vendor's site.

How to do it...

On the Windows operating system family:

  1. Go to https://vulkan.lunarg.com.
  2. Scroll to the bottom of the page and choose WINDOWS operating system.
  3. Download and save the SDK installer file.
  1. Run the installer and select the destination at which you want to install the SDK. By default, it is installed to a C:\VulkanSDK\<version>\ folder.
  2. When the installation is finished, open the folder in which the Vulkan SDK was installed and then open the RunTimeInstaller sub-folder. Execute VulkanRT-<version>-Installer file. This will install the latest version of the Vulkan Loader.
  3. Once again, go to the folder in which the SDK was installed and open the Include\vulkan sub-folder. Copy the vk_platform.h and vulkan.h header files to the project folder of the application you want to develop. We will call these two files Vulkan header files.

On the Linux operating system family:

  1. Update system packages by running the following commands:
       sudo apt-get update
       sudo apt-get dist-upgrade
  1. To be able to build and execute Vulkan samples from the SDK, install additional development packages by running the following command:
       sudo apt-get install libglm-dev graphviz libxcb-dri3-0 
       libxcb-present0 libpciaccess0 cmake libpng-dev libxcb-dri3-
       dev libx11-dev
  1. Go to https://vulkan.lunarg.com.
  2. Scroll to the bottom of the page and choose LINUX operating system.
  3. Download the Linux package for the SDK and save it in the desired folder.
  4. Open Terminal and change the current directory to the folder to which the SDK package was downloaded.
  5. Change the access permissions to the downloaded file by executing the following command:
       chmod ugo+x vulkansdk-linux-x86_64-<version>.run
  1. Run the downloaded SDK package installer file with the following command:
       ./vulkansdk-linux-x86_64-<version>.run
  1. Change the current directory to the VulkanSDK/<version> folder that was created by the SDK package installer.
  1. Set up environment variables by executing the following command:
      sudo su
      VULKAN_SDK=$PWD/x86_64
      echo export PATH=$PATH:$VULKAN_SDK/bin >> /etc/environment
      echo export VK_LAYER_PATH=$VULKAN_SDK/etc/explicit_layer.d >> 
      /etc/environment
      echo $VULKAN_SDK/lib >> /etc/ld.so.conf.d/vulkan.conf
      ldconfig
  1. Change the current directory to the x86_64/include/vulkan folder.
  2. Copy vk_platform.h and vulkan.h header files to the project folder of the application you want to develop. We will call these two files Vulkan header files.
  3. Restart the computer for the changes to take effect.

How it works...

The SDK contains resources needed to create applications using the Vulkan API. Vulkan header files (the vk_platform.h and vulkan.h files) need to be included in the source code of our application so we can use the Vulkan API functions, structures, enumerations, and so on, inside the code.

The Vulkan Loader (vulkan-1.dll file on Windows, libvulkan.so.1 file on Linux systems) is a dynamic library responsible for exposing Vulkan API functions and forwarding them to the graphics driver. We connect with it in our application and load Vulkan API functions from it.

See also

The following recipes in this chapter:

  • Enabling validation layers
  • Connecting with a Vulkan Loader library
  • Releasing a Vulkan Loader library

Enabling validation layers

The Vulkan API was designed with performance in mind. One way to increase its performance is to lower state and error checking performed by the driver. This is one of the reasons Vulkan is called a "thin API" or "thin driver," it is a minimal abstraction of the hardware, which is required for the API to be portable across multiple hardware vendors and device types (high-performance desktop computers, mobile phones, and integrated and low-power embedded systems).

However, this approach makes creating applications with the Vulkan API much more difficult, compared to the traditional high-level APIs such as OpenGL. It's because very little feedback is given to developers by the driver, as it expects that programmers will correctly use the API and abide by rules defined in the Vulkan specification.

To mitigate this problem, Vulkan was also designed to be a layered API. The lowest layer, the core, is the Vulkan API itself, which communicates with the Driver, allowing us to program the Hardware (as seen in the preceding diagram). On top of it (between the Application and the Vulkan API), developers can enable additional layers, to ease the debugging process.

How to do it...

On the Windows operating system family:

  1. Go to the folder in which the SDK was installed and then open the Config sub-directory.
  2. Copy the vk_layer_settings.txt file into the directory of the executable you want to debug (into a folder of an application you want to execute).
  3. Create an environment variable named VK_INSTANCE_LAYERS:
    1. Open the command-line console (Command Prompt/cmd.exe).
    2. Type the following:
              setx VK_INSTANCE_LAYERS 
              VK_LAYER_LUNARG_standard_validation

3. Close the console.

  1. Re-open the command prompt once again.
  2. Change the current directory to the folder of the application you want to execute.
  3. Run the application; potential warnings or errors will be displayed in the standard output of the command prompt.

On the Linux operating system family:

  1. Go to the folder in which the SDK was installed and then open the Config sub-directory.
  2. Copy the vk_layer_settings.txt file into the directory of the executable you want to debug (into a folder of an application you want to execute).
  3. Create an environment variable named VK_INSTANCE_LAYERS:
    1. Open the Terminal window.
    2. Type the following:
              export
              VK_INSTANCE_LAYERS=VK_LAYER_LUNARG_standard_validation
  1. Run the application; potential warnings or errors will be displayed in the standard output of the Terminal window.

How it works...

Vulkan validation layers contain a set of libraries which help find potential problems in created applications. Their debugging capabilities include, but are not limited to, validating parameters passed to Vulkan functions, validating texture and render target formats, tracking Vulkan objects and their lifetime and usage, and checking for potential memory leaks or dumping (displaying/printing) Vulkan API function calls. These functionalities are enabled by different validation layers, but most of them are gathered into a single layer called VK_LAYER_LUNARG_standard_validation which is enabled in this recipe. Examples of names of other layers include VK_LAYER_LUNARG_swapchain, VK_LAYER_LUNARG_object_tracker, VK_LAYER_GOOGLE_threading, or VK_LAYER_LUNARG_api_dump, among others. Multiple layers can be enabled at the same time, in a similar way as presented here in the recipe. Just assign the names of the layers you want to activate to the VK_INSTANCE_LAYERS environment variable. If you are a Windows OS user, remember to separate them with a semicolon, as in the example:

setx VK_INSTANCE_LAYERS VK_LAYER_LUNARG_api_dump;VK_LAYER_LUNARG_core_validation

If you are a Linux OS user, separate them with a colon. Here is an example:

export VK_INSTANCE_LAYERS=VK_LAYER_LUNARG_api_dump:VK_LAYER_LUNARG _core_validation

The environment variable named VK_INSTANCE_LAYERS can be also set with other OS specific ways such as, advanced operating system settings on Windows or /etc/environment on Linux.

The preceding examples enable validation layers globally, for all applications, but they can also be enabled only for our own application, in its source code during Instance creation. However, this approach requires us to recompile the whole program every time we want to enable or disable different layers. So, it is easier to enable them using the preceding recipe. This way, we also won't forget to disable them when we want to ship the final version of our application. To disable validation layers, we just have to delete VK_INSTANCE_LAYERS environment variable.

Validation layers should not be enabled in the released (shipped) version of the applications as they may drastically decrease performance.

For a full list of available validation layers, please refer to the documentation, which can be found in the Documentation sub-folder of the directory in which the Vulkan SDK was installed.

See also

The following recipes in this chapter:

  • Downloading Vulkan's SDK
  • Connecting with a Vulkan Loader library
  • Releasing a Vulkan Loader library

Connecting with a Vulkan Loader library

Support for the Vulkan API is implemented by the graphics-hardware vendor and provided through graphics drivers. Each vendor can implement it in any dynamic library they choose, and can even change it with the driver update.

That's why, along with the drivers, Vulkan Loader is also installed. We can also install it from the folder in which the SDK was installed. It allows developers to access Vulkan API entry points, through a vulkan-1.dll library on Windows OS or libvulkan.so.1 library on Linux OS, no matter what driver, from what vendor, is installed.

Vulkan Loader is responsible for transmitting Vulkan API calls to an appropriate graphics driver. On a given computer, there may be more hardware components that support Vulkan, but with Vulkan Loader, we don't need to wonder which driver we should use, or which library we should connect with to be able to use Vulkan. Developers just need to know the name of a Vulkan library: vulkan-1.dll on Windows or libvulkan.so.1 on Linux. When we want to use Vulkan in our application, we just need to connect with it in our code (load it).

On Windows OS, Vulkan Loader library is called vulkan-1.dll.
On Linux OS, Vulkan Loader library is called libvulkan.so.1.

How to do it...

On the Windows operating system family:

  1. Prepare a variable of type HMODULE named vulkan_library.
  2. Call LoadLibrary( "vulkan-1.dll" ) and store the result of this operation in a vulkan_library variable.
  3. Confirm that this operation has been successful by checking if a value of a vulkan_library variable is different than nullptr.

On the Linux operating system family:

  1. Prepare a variable of type void* named vulkan_library.
  2. Call dlopen( "libvulkan.so.1", RTLD_NOW ) and store the result of this operation in a vulkan_library variable.
  3. Confirm that this operation has been successful by checking if a value of a vulkan_library variable is different than nullptr.

How it works...

LoadLibrary() is a function available on Windows operating systems. dlopen() is a function available on Linux operating systems. They both load (open) a specified dynamic-link library into a memory space of our application. This way we can load (acquire pointers of) functions implemented and exported from a given library and use them in our application.

In the case of a function exported from a Vulkan API, in which we are, of course, most interested, we load a vulkan-1.dll library on Windows or libvulkan.so.1 library on Linux as follows:

#if defined _WIN32 
vulkan_library = LoadLibrary( "vulkan-1.dll" ); 
#elif defined __linux 
vulkan_library = dlopen( "libvulkan.so.1", RTLD_NOW ); 
#endif 

if( vulkan_library == nullptr ) { 
  std::cout << "Could not connect with a Vulkan Runtime library." << std::endl; 
  return false; 
} 
return true;

After a successful call, we can load a Vulkan-specific function for acquiring the addresses of all other Vulkan API procedures.

See also

The following recipes in this chapter:

  • Downloading Vulkan SDK
  • Enabling validation layers
  • Releasing a Vulkan Loader library

Preparing for loading Vulkan API functions

When we want to use Vulkan API in our application, we need to acquire procedures specified in the Vulkan documentation. In order to do that, we can add a dependency to the Vulkan Loader library, statically link with it in our project, and use function prototypes defined in the vulkan.h header file. The second approach is to disable the function prototypes defined in the vulkan.h header file and load function pointers dynamically in our application.

The first approach is little bit easier, but it uses functions defined directly in the Vulkan Loader library. When we perform operations on a given device, Vulkan Loader needs to redirect function calls to the proper implementation based on the handle of the device we provide as an argument. This redirection takes some time, and thus impacts performance.

The second option requires more work on the application side, but allows us to skip the preceding redirection (jump) and save some performance. It is performed by loading functions directly from the device we want to use. This way, we can also choose only the subset of Vulkan functions if we don't need them all.

In this book, the second approach is presented, as this gives developers more control over the things that are going in their applications. To dynamically load functions from a Vulkan Loader library, it is convenient to wrap the names of all Vulkan API functions into a set of simple macros and divide declarations, definitions and function loading into multiple files.

How to do it...

  1. Define the VK_NO_PROTOTYPES preprocessor definition in the project: do this in the project properties (when using development environments such as Microsoft Visual Studio or Qt Creator), or by using the #define VK_NO_PROTOTYPES preprocessor directive just before the vulkan.h file is included in the source code of our application.
  2. Create a new file, named ListOfVulkanFunctions.inl.
  3. Type the following contents into the file:
      #ifndef EXPORTED_VULKAN_FUNCTION 
      #define EXPORTED_VULKAN_FUNCTION( function ) 
      #endif 

      #undef EXPORTED_VULKAN_FUNCTION 
      // 
      #ifndef GLOBAL_LEVEL_VULKAN_FUNCTION 
      #define GLOBAL_LEVEL_VULKAN_FUNCTION( function ) 
      #endif 

      #undef GLOBAL_LEVEL_VULKAN_FUNCTION 
      // 
      #ifndef INSTANCE_LEVEL_VULKAN_FUNCTION 
      #define INSTANCE_LEVEL_VULKAN_FUNCTION( function ) 
      #endif 

      #undef INSTANCE_LEVEL_VULKAN_FUNCTION 
      // 
      #ifndef INSTANCE_LEVEL_VULKAN_FUNCTION_FROM_EXTENSION 
      #define INSTANCE_LEVEL_VULKAN_FUNCTION_FROM_EXTENSION( function,       extension ) 
      #endif 

      #undef INSTANCE_LEVEL_VULKAN_FUNCTION_FROM_EXTENSION 
      // 
      #ifndef DEVICE_LEVEL_VULKAN_FUNCTION 
      #define DEVICE_LEVEL_VULKAN_FUNCTION( function ) 
      #endif 

      #undef DEVICE_LEVEL_VULKAN_FUNCTION 
      // 
      #ifndef DEVICE_LEVEL_VULKAN_FUNCTION_FROM_EXTENSION 
      #define DEVICE_LEVEL_VULKAN_FUNCTION_FROM_EXTENSION( function,
      extension ) 
      #endif 
       
      #undef DEVICE_LEVEL_VULKAN_FUNCTION_FROM_EXTENSION
  1. Create a new header file, named VulkanFunctions.h.
  2. Insert the following contents into the file:
      #include "vulkan.h" 

      namespace VulkanCookbook { 

      #define EXPORTED_VULKAN_FUNCTION( name ) extern PFN_##name name; 
      #define GLOBAL_LEVEL_VULKAN_FUNCTION( name ) extern PFN_##name 
      name; 
      #define INSTANCE_LEVEL_VULKAN_FUNCTION( name ) extern PFN_##name 
      name; 
      #define INSTANCE_LEVEL_VULKAN_FUNCTION_FROM_EXTENSION( name,
      extension ) extern PFN_##name name; 
      #define DEVICE_LEVEL_VULKAN_FUNCTION( name ) extern PFN_##name 
      name; 
      #define DEVICE_LEVEL_VULKAN_FUNCTION_FROM_EXTENSION( name, 
      extension ) extern PFN_##name name; 

      #include "ListOfVulkanFunctions.inl" 

      } // namespace VulkanCookbook
  1. Create a new file with a source code named VulkanFunctions.cpp.
  2. Insert the following contents into the file:
      #include "VulkanFunctions.h" 

      namespace VulkanCookbook { 

      #define EXPORTED_VULKAN_FUNCTION( name ) PFN_##name name; 
      #define GLOBAL_LEVEL_VULKAN_FUNCTION( name ) PFN_##name name; 
      #define INSTANCE_LEVEL_VULKAN_FUNCTION( name ) PFN_##name name; 
      #define INSTANCE_LEVEL_VULKAN_FUNCTION_FROM_EXTENSION( name, 
      extension ) PFN_##name name; 
      #define DEVICE_LEVEL_VULKAN_FUNCTION( name ) PFN_##name name; 
      #define DEVICE_LEVEL_VULKAN_FUNCTION_FROM_EXTENSION( name, 
      extension ) PFN_##name name; 

      #include "ListOfVulkanFunctions.inl" 

      } // namespace VulkanCookbook

How it works...

The preceding set of files may seem unnecessary, or even overwhelming, at first. VulkanFunctions.h and VulkanFunctions.cpp files are used to declare and define variables in which we will store pointers to Vulkan API functions. Declarations and definitions are done through a convenient macro definition and an inclusion of a ListOfVulkanFunctions.inl file. We will update this file and add the names of many Vulkan functions, from various levels. This way, we don't need to repeat the names of functions multiple times, in multiple places, which helps us avoid making mistakes and typos. We can just write the required names of Vulkan functions only once, in the ListOfVulkanFunctions.inl file, and include it when it's needed.

How do we know the types of variables for storing pointers to Vulkan API functions? It's quite simple. The type of each function's prototype is derived directly from the function's name. When a function is named <name>, its type is PFN_<name>. For example, a function that creates an image is called vkCreateImage(), so the type of this function is PFN_vkCreateImage. That's why macros defined in the presented set of files have just one parameter for function name, from which the type can be easily derived.

Last, but not least, remember that declarations and definitions of variables, in which we will store addresses of the Vulkan functions, should be placed inside a namespace, a class, or a structure. This is because, if they are made global, this could lead to problems on some operating systems. It's better to remember about namespaces and increase the portability of our code.

Place declarations and definitions of variables containing Vulkan API function pointers inside a structure, class, or namespace.

Now that we are prepared, we can start loading Vulkan functions.

See also

The following recipes in this chapter:

  • Loading function exported from a Vulkan Loader library
  • Loading global-level functions
  • Loading instance-level functions
  • Loading device-level functions

Loading functions exported from a Vulkan Loader library

When we load (connect with) a Vulkan Loader library, we need to load its functions to be able to use the Vulkan API in our application. Unfortunately, different operating systems have different ways of acquiring the addresses of functions exported from dynamic libraries (.dll files on Windows or .so files on Linux). However, the Vulkan API strives to be portable across many operating systems. So, to allow developers to load all functions available in the API, no matter what operating system they are targeting, Vulkan introduced a function which can be used to load all other Vulkan API functions. However, this one single function can only be loaded in an OS specific way.

How to do it...

On the Windows operating system family:

  1. Create a variable of type PFN_vkGetInstanceProcAddr named vkGetInstanceProcAddr.
  2. Call GetProcAddress( vulkan_library, "vkGetInstanceProcAddr" ), cast the result of this operation onto a PFN_vkGetInstanceProcAddr type, and store it in the vkGetInstanceProcAddr variable.
  3. Confirm that this operation succeeded by checking if a value of the vkGetInstanceProcAddr variable does not equal to nullptr.

On the Linux operating system family:

  1. Create a variable of type PFN_vkGetInstanceProcAddr named vkGetInstanceProcAddr.
  2. Call dlsym( vulkan_library, "vkGetInstanceProcAddr" ), cast the result of this operation onto a PFN_vkGetInstanceProcAddr type, and store it in the vkGetInstanceProcAddr variable.
  3. Confirm that this operation succeeded by checking if a value of the vkGetInstanceProcAddr variable does not equal to nullptr.

How it works...

GetProcAddress() is a function available on Windows operating systems. dlsym() is a function available on Linux operating systems. They both acquire an address of a specified function from an already loaded dynamic-link library. The only function that must be publicly exported from all Vulkan implementations is called vkGetInstanceProcAddr(). It allows us to load any other Vulkan function in a way that is independent of the operating system we are working on.

To ease and automate the process of loading multiple Vulkan functions, and to lower the probability of making mistakes, we should wrap the processes of declaring, defining, and loading functions into a set of convenient macro definitions, as described in the Preparing for loading Vulkan API functions recipe. This way, we can keep all Vulkan API functions in just one file which contains a list of macro-wrapped names of all Vulkan functions. We can then include this single file in multiple places and get use of the C/C++ preprocessor. By redefining macros, we can declare and define the variables in which we will store function pointers, and we can also load all of them.

Here is the updated fragment of the ListOfVulkanFunctions.inl file:

#ifndef EXPORTED_VULKAN_FUNCTION 
#define EXPORTED_VULKAN_FUNCTION( function ) 
#endif 

EXPORTED_VULKAN_FUNCTION( vkGetInstanceProcAddr ) 

#undef EXPORTED_VULKAN_FUNCTION

The rest of the files (VulkanFunctions.h and VulkanFunctions.h) remain unchanged. Declarations and definitions are automatically performed with preprocessor macros. However, we still need to load functions exported from the Vulkan Loader library. The implementation of the preceding recipe may look as follows:

#if defined _WIN32 
#define LoadFunction GetProcAddress 
#elif defined __linux 
#define LoadFunction dlsym 
#endif 

#define EXPORTED_VULKAN_FUNCTION( name )                          \
name = (PFN_##name)LoadFunction( vulkan_library, #name );         \
if( name == nullptr ) {                                           \
  std::cout << "Could not load exported Vulkan function named: "  \
    #name << std::endl;                                           \
  return false;                                                   \
} 

#include "ListOfVulkanFunctions.inl" 

return true;

First we define a macro that is responsible for acquiring an address of a vkGetInstanceProcAddr() function. It gets it from the library represented by the vulkan_library variable, casts the result of this operation onto a PFN_kGetInstanceProcAddr type, and stores it in a variable named vkGetInstanceProcAddr. After that, the macro checks whether the operation succeeded, and displays the proper message on screen in the case of a failure.

All the preprocessor "magic" is done when the ListOfVulkanFunctions.inl file is included and the preceding operations are performed for each function defined in this file. In this case, it is performed for only the vkGetInstanceProcAddr() function, but the same behavior is achieved for functions from other levels.

Now, when we have a function loading function, we can acquire pointers to other Vulkan procedures in an OS-independent way.

See also

The following recipes in this chapter:

  • Connecting with a Vulkan Loader library
  • Preparing for loading Vulkan API functions
  • Loading global-level functions
  • Loading instance-level functions
  • Loading device-level functions

Loading global-level functions

We have acquired a vkGetInstanceProcAddr() function, through which we can load all other Vulkan API entry points in an OS-independent way.

Vulkan functions can be divided into three levels, which are global, instance, and device. Device-level functions are used to perform typical operations such as drawing, shader-modules creation, image creation, or data copying. Instance-level functions allow us to create logical devices. To do all this, and to load device and instance-level functions, we need to create an Instance. This operation is performed with global-level functions, which we need to load first.

How to do it...

  1. Create a variable of type PFN_vkEnumerateInstanceExtensionProperties named vkEnumerateInstanceExtensionProperties.
  2. Create a variable of type PFN_vkEnumerateInstanceLayerProperties named vkEnumerateInstanceLayerProperties.
  3. Create a variable of type PFN_vkCreateInstance named vkCreateInstance.
  4. Call vkGetInstanceProcAddr( nullptr, "vkEnumerateInstanceExtensionProperties" ), cast the result of this operation onto the PFN_vkEnumerateInstanceExtensionProperties type, and store it in a vkEnumerateInstanceExtensionProperties variable.
  5. Call vkGetInstanceProcAddr( nullptr, "vkEnumerateInstanceLayerProperties" ), cast the result of this operation onto the PFN_vkEnumerateInstanceLayerProperties type, and store it in a vkEnumerateInstanceLayerProperties variable.
  6. Call vkGetInstanceProcAddr( nullptr, "vkCreateInstance" ), cast the result of this operation onto a PFN_vkCreateInstance type, and store it in the vkCreateInstance variable.
  7. Confirm that the operation succeeded by checking whether, values of all the preceding variables are not equal to nullptr.

How it works...

In Vulkan, there are only three global-level functions: vkEnumerateInstanceExtensionProperties(), vkEnumerateInstanceLayerProperties(), and vkCreateInstance(). They are used during Instance creation to check, what instance-level extensions and layers are available and to create the Instance itself.

The process of acquiring global-level functions is similar to the loading function exported from the Vulkan Loader. That's why the most convenient way is to add the names of global-level functions to the ListOfVulkanFunctions.inl file as follows:

#ifndef GLOBAL_LEVEL_VULKAN_FUNCTION 
#define GLOBAL_LEVEL_VULKAN_FUNCTION( function ) 
#endif 

GLOBAL_LEVEL_VULKAN_FUNCTION( vkEnumerateInstanceExtensionProperties ) 
GLOBAL_LEVEL_VULKAN_FUNCTION( vkEnumerateInstanceLayerProperties ) 
GLOBAL_LEVEL_VULKAN_FUNCTION( vkCreateInstance ) 

#undef GLOBAL_LEVEL_VULKAN_FUNCTION

We don't need to change the VulkanFunctions.h and VulkanFunctions.h files, but we still need to implement the preceding recipe and load global-level functions as follows:

#define GLOBAL_LEVEL_VULKAN_FUNCTION( name )                      \
name = (PFN_##name)vkGetInstanceProcAddr( nullptr, #name );       \
if( name == nullptr ) {                                           \
  std::cout << "Could not load global-level function named: "     \
    #name << std::endl;                                           \
  return false;                                                   \
} 

#include "ListOfVulkanFunctions.inl" 

return true;

A custom GLOBAL_LEVEL_VULKAN_FUNCTION macro takes the function name and provides it to a vkGetInstanceProcAddr() function. It tries to load the given function and, in the case of a failure, returns nullptr. Any result returned by the vkGetInstanceProcAddr() function is cast onto a PFN_<name> type and stored in a proper variable.

In the case of a failure, a message is displayed so the user knows which function couldn't be loaded.

See also

The following recipes in this chapter:

  • Preparing for loading Vulkan API functions
  • Loading function exported from a Vulkan Loader library
  • Loading instance-level functions
  • Loading device-level functions

Checking available Instance extensions

Vulkan Instance gathers per application state and allows us to create a logical device on which almost all operations are performed. Before we can create an Instance object, we should think about the instance-level extensions we want to enable. An example of one of the most important instance-level extensions are swapchain related extensions, which are used to display images on screen.

Extensions in Vulkan, as opposed to OpenGL, are enabled explicitly. We can't create a Vulkan Instance and request extensions that are not supported, because the Instance creation operation will fail. That's why we need to check which extensions are supported on a given hardware platform.

How to do it...

  1. Prepare a variable of type uint32_t named extensions_count.
  2. Call vkEnumerateInstanceExtensionProperties( nullptr, &extensions_count, nullptr ). All parameters should be set to nullptr, except for the second parameter, which should point to the extensions_count variable.
  3. If a function call is successful, the total number of available instance-level extensions will be stored in the extensions_count variable.
  4. Prepare a storage for the list of extension properties. It must contain elements of type VkExtensionProperties. The best solution is to use a std::vector container. Call it available_extensions.
  5. Resize the vector to be able to hold at least the extensions_count elements.
  1. Call vkEnumerateInstanceExtensionProperties( nullptr, &extensions_count, &available_extensions[0] ). The first parameter is once again set to nullptr; the second parameter should point to the extensions_count variable; the third parameter must point to an array of at least extensions_count elements of type VkExtensionProperties. Here, in the third parameter, provide an address of the first element of the available_extensions vector.
  2. If the function returns successfully, the available_extensions vector variable will contain a list of all extensions supported on a given hardware platform.

How it works...

Code that acquires instance-level extensions can be divided into two stages. First we get the total number of available extensions as follows:

uint32_t extensions_count = 0; 
VkResult result = VK_SUCCESS; 

result = vkEnumerateInstanceExtensionProperties( nullptr, &extensions_count, nullptr ); 
if( (result != VK_SUCCESS) || 
    (extensions_count == 0) ) { 
  std::cout << "Could not get the number of Instance extensions." << std::endl; 
  return false; 
}

When called with the last parameter set to nullptr, the vkEnumerateInstanceExtensionProperties() function stores the number of available extensions in the variable pointed to in the second parameter. This way, we know how many extensions are on a given platform and how much space we need to be able to store parameters for all of them.

When we are ready to acquire extensions' properties, we can call the same function once again. This time the last parameter should point to the prepared space (an array of VkExtensionProperties elements, or a vector, in our case) in which these properties will be stored:

available_extensions.resize( extensions_count ); 
result = vkEnumerateInstanceExtensionProperties( nullptr, &extensions_count, &available_extensions[0] ); 
if( (result != VK_SUCCESS) || 
    (extensions_count == 0) ) { 
  std::cout << "Could not enumerate Instance extensions." << std::endl; 
  return false; 
} 

return true;
The pattern of calling the same function twice is common in Vulkan. There are multiple functions, which store the number of elements returned in the query when their last argument is set to nullptr. When their last element points to an appropriate variable, they return the data itself.

Now that we have the list, we can look through it and check whether the extensions we would like to enable are available on a given platform.

See also

  • The following recipes in this chapter:
    • Checking available device extensions
  • The following recipe in Chapter 2, Image Presentation:
    • Creating a Vulkan Instance with WSI extensions enabled

Creating a Vulkan Instance

A Vulkan Instance is an object that gathers the state of an application. It encloses information such as an application name, name and version of an engine used to create an application, or enabled instance-level extensions and layers.

Through the Instance, we can also enumerate available physical devices and create logical devices on which typical operations such as image creation or drawing are performed. So, before we proceed with using the Vulkan API, we need to create a new Instance object.

How to do it...

  1. Prepare a variable of type std::vector<char const *> named desired_extensions. Store the names of all extensions you want to enable in the desired_extensions variable.
  2. Create a variable of type std::vector<VkExtensionProperties> named available_extensions. Acquire the list of all available extensions and store it in the available_extensions variable (refer to the Checking available Instance extensions recipe).
  1. Make sure that the name of each extension from the desired_extensions variable is also present in the available_extensions variable.
  2. Prepare a variable of type VkApplicationInfo named application_info. Assign the following values for members of the application_info variable:
    1. VK_STRUCTURE_TYPE_APPLICATION_INFO value for sType.
    2. nullptr value for pNext.
    3. Name of your application for pApplicationName.
    4. Version of your application for the applicationVersion structure member; do that by using VK_MAKE_VERSION macro and specifying major, minor, and patch values in it.
    5. Name of the engine used to create an application for pEngineName.
    6. Version of the engine used to create an application for engineVersion; do that by using VK_MAKE_VERSION macro.
    7. VK_MAKE_VERSION( 1, 0, 0 ) for apiVersion.
  3. Create a variable of type VkInstanceCreateInfo named instance_create_info. Assign the following values for members of the instance_create_info variable:
    1. VK_STRUCTURE_TYPE_INSTANCE_CREATE_INFO value for sType.
    2. nullptr value for pNext.
    3. 0 value for flags.
    4. Pointer to the application_info variable in pApplicationInfo.
    5. 0 value for enabledLayerCount.
    6. nullptr value for ppEnabledLayerNames.
    7. Number of elements of the desired_extensions vector for enabledExtensionCount.
    8. Pointer to the first element of the desired_extensions vector (or nullptr if is empty) for ppEnabledExtensionNames.
  4. Create a variable of type VkInstance named instance.
  5. Call the vkCreateInstance( &instance_create_info, nullptr, &instance ) function. Provide a pointer to the instance_create_info variable in the first parameter, a nullptr value in the second, and a pointer to the instance variable in the third parameter.
  6. Make sure the operation was successful by checking whether the value returned by the vkCreateInstance() function call is equal to VK_SUCCESS.

How it works...

To create an Instance, we need to prepare some information. First, we need to create an array of names of instance-level extensions that we would like to enable. Next, we need to check if they are supported on a given hardware. This is done by acquiring the list of all available instance-level extensions and checking if it contains the names of all the extensions we want to enable:

std::vector<VkExtensionProperties> available_extensions; 
if( !CheckAvailableInstanceExtensions( available_extensions ) ) { 
  return false; 
} 

for( auto & extension : desired_extensions ) { 
  if( !IsExtensionSupported( available_extensions, extension ) ) { 
    std::cout << "Extension named '" << extension << "' is not supported." << std::endl; 
    return false; 
  } 
}

Next, we need to create a variable in which we will provide information about our application, such as its name and version, the name and version of an engine used to create an application, and the version of a Vulkan API we want to use (right now only the first version is supported by the API):

VkApplicationInfo application_info = { 
  VK_STRUCTURE_TYPE_APPLICATION_INFO, 
  nullptr, 
  application_name, 
  VK_MAKE_VERSION( 1, 0, 0 ), 
  "Vulkan Cookbook", 
  VK_MAKE_VERSION( 1, 0, 0 ), 
  VK_MAKE_VERSION( 1, 0, 0 ) 
};

The pointer to the application_info variable in the preceding code sample is provided in a second variable with the actual parameters used to create an Instance. In it, apart from the previously mentioned pointer, we provide information about the number and names of extensions we want to enable, and also the number and names of layers we want to enable. Neither extensions nor layers are required to create a valid Instance object and we can skip them. However, there are very important extensions, without which it will be hard to create a fully functional application, so it is recommended to use them. Layers may be safely omitted. Following is the sample code preparing a variable used to define Instance parameters:

VkInstanceCreateInfo instance_create_info = { 
  VK_STRUCTURE_TYPE_INSTANCE_CREATE_INFO, 
  nullptr, 
  0, 
  &application_info, 
  0, 
  nullptr, 
  static_cast<uint32_t>(desired_extensions.size()), 
  desired_extensions.size() > 0 ? &desired_extensions[0] : nullptr 
};

Finally, when we have prepared the preceding data, we can create an Instance object. This is done with the vkCreateInstance() function. Its first parameter must point to the variable of type VkInstanceCreateInfo. The third parameter must point to a variable of type VkInstance. The created Instance handle will be stored in it. The second parameter is very rarely used: It may point to a variable of type VkAllocationCallbacks, in which allocator callback functions are defined. These functions control the way host memory is allocated and are mainly used for debugging purposes. Most of the time, the second parameter defining allocation callbacks can be set to nullptr:

VkResult result = vkCreateInstance( &instance_create_info, nullptr, &instance ); 
if( (result != VK_SUCCESS) || 
    (instance == VK_NULL_HANDLE) ) { 
  std::cout << "Could not create Vulkan Instance." << std::endl; 
  return false; 
} 

return true;

See also

  • The following recipes in this chapter:
    • Checking available Instance extensions
    • Destroying a Vulkan Instance
  • The following recipe in Chapter 2, Image Presentation:
    • Creating a Vulkan Instance with WSI extensions enabled

Loading instance-level functions

We have created a Vulkan Instance object. The next step is to enumerate physical devices, choose one of them, and create a logical device from it. These operations are performed with instance-level functions, of which we need to acquire the addresses.

How to do it...

  1. Take the handle of a created Vulkan Instance. Provide it in a variable of type VkInstance named instance.
  2. Choose the name (denoted as <function name>) of an instance-level function you want to load.
  3. Create a variable of type PFN_<function name> named <function name>.
  4. Call vkGetInstanceProcAddr( instance, "<function name>" ). Provide a handle for the created Instance in the first parameter and a function name in the second. Cast the result of this operation onto a PFN_<function name> type and store it in a <function name> variable.
  5. Confirm that this operation succeeded by checking if a value of a <function name> variable is not equal to nullptr.

How it works...

Instance-level functions are used mainly for operations on physical devices. There are multiple instance-level functions, with vkEnumeratePhysicalDevices(), vkGetPhysicalDeviceProperties(), vkGetPhysicalDeviceFeatures(), vkGetPhysicalDeviceQueueFamilyProperties(), vkCreateDevice(), vkGetDeviceProcAddr(), vkDestroyInstance() or vkEnumerateDeviceExtensionProperties() among them. However, this list doesn't include all instance-level functions.

How can we tell if a function is instance- or device-level? All device-level functions have their first parameter of type VkDevice, VkQueue, or VkCommandBuffer. So, if a function doesn't have such a parameter and is not from the global level, it is from an instance level. As mentioned previously, instance-level functions are used for manipulating with physical devices, checking their properties, abilities and, creating logical devices.

Remember that extensions can also introduce new functions. You need to add their functions to the function loading code in order to be able to use the extension in the application. However, you shouldn't load functions introduced by a given extension without enabling the extension first during Instance creation. If these functions are not supported on a given platform, loading them will fail (it will return a null pointer).

So, in order to load instance-level functions, we should update the ListOfVulkanFunctions.inl file as follows:

#ifndef INSTANCE_LEVEL_VULKAN_FUNCTION 
#define INSTANCE_LEVEL_VULKAN_FUNCTION( function ) 
#endif 

INSTANCE_LEVEL_VULKAN_FUNCTION( vkEnumeratePhysicalDevices ) 
INSTANCE_LEVEL_VULKAN_FUNCTION( vkGetPhysicalDeviceProperties ) 
INSTANCE_LEVEL_VULKAN_FUNCTION( vkGetPhysicalDeviceFeatures ) 
INSTANCE_LEVEL_VULKAN_FUNCTION( vkCreateDevice ) 
INSTANCE_LEVEL_VULKAN_FUNCTION( vkGetDeviceProcAddr ) 
//... 

#undef INSTANCE_LEVEL_VULKAN_FUNCTION 

// 

#ifndef INSTANCE_LEVEL_VULKAN_FUNCTION_FROM_EXTENSION 
#define INSTANCE_LEVEL_VULKAN_FUNCTION_FROM_EXTENSION( function, extension ) 
#endif 

INSTANCE_LEVEL_VULKAN_FUNCTION_FROM_EXTENSION( vkGetPhysicalDeviceSurfaceSupportKHR, VK_KHR_SURFACE_EXTENSION_NAME ) 
INSTANCE_LEVEL_VULKAN_FUNCTION_FROM_EXTENSION( vkGetPhysicalDeviceSurfaceCapabilitiesKHR, VK_KHR_SURFACE_EXTENSION_NAME ) 
INSTANCE_LEVEL_VULKAN_FUNCTION_FROM_EXTENSION( vkGetPhysicalDeviceSurfaceFormatsKHR, VK_KHR_SURFACE_EXTENSION_NAME ) 

#ifdef VK_USE_PLATFORM_WIN32_KHR 
INSTANCE_LEVEL_VULKAN_FUNCTION_FROM_EXTENSION( vkCreateWin32SurfaceKHR, VK_KHR_WIN32_SURFACE_EXTENSION_NAME ) 
#elif defined VK_USE_PLATFORM_XCB_KHR 
INSTANCE_LEVEL_VULKAN_FUNCTION_FROM_EXTENSION( vkCreateXcbSurfaceKHR, VK_KHR_XLIB_SURFACE_EXTENSION_NAME ) 
#elif defined VK_USE_PLATFORM_XLIB_KHR 
INSTANCE_LEVEL_VULKAN_FUNCTION_FROM_EXTENSION( vkCreateXlibSurfaceKHR, VK_KHR_XCB_SURFACE_EXTENSION_NAME ) 
#endif 

#undef INSTANCE_LEVEL_VULKAN_FUNCTION_FROM_EXTENSION

In the preceding code, we added the names of several (but not all) instance-level functions. Each of them is wrapped into an INSTANCE_LEVEL_VULKAN_FUNCTION or an INSTANCE_LEVEL_VULKAN_FUNCTION_FROM_EXTENSION macro, and is placed between #ifndef and the #undef preprocessor definitions.

To implement the instance-level functions loading recipe using the preceding macros, we should write the following code:

#define INSTANCE_LEVEL_VULKAN_FUNCTION( name )                        \  
name = (PFN_##name)vkGetInstanceProcAddr( instance, #name );          \ 
if( name == nullptr ) {                                               \ 
  std::cout << "Could not load instance-level Vulkan function named: "\
    #name << std::endl;                                               \ 
  return false;                                                       \ 
} 

#include "ListOfVulkanFunctions.inl" 

return true;

The preceding macro calls a vkGetInstanceProcAddr() function. It's the same function used to load global-level functions, but this time, the handle of a Vulkan Instance is provided in the first parameter. This way, we can load functions that can work properly only when an Instance object is created.

This function returns a pointer to the function whose name is provided in the second parameter. The returned value is of type void*, which is why it is then cast onto a type appropriate for a function we acquire the address of.

The type of a given function's prototype is defined based on its name, with a PFN_ before it. So, in the example, the type of the vkEnumeratePhysicalDevices() function's prototype will be defined as PFN_vkEnumeratePhysicalDevices.

If the vkGetInstanceProcAddr() function cannot find an address of the requested procedure, it returns nullptr. That's why we should perform a check and log the appropriate message in case of any problems.

The next step is to load functions that are introduced by extensions. Our function loading code acquires pointers of all functions that are specified with a proper macro in the ListOfVulkanFunctions.inl file, but we can't provide extension-specific functions in the same way, because they can be loaded only when appropriate extensions are enabled. When we don't enable any extension, only the core Vulkan API functions can be loaded. That's why we need to distinguish core API functions from extension-specific functions. We also need to know which extensions are enabled and which function comes from which extension. That's why a separate macro is used for functions introduced by extensions. Such a macro specifies a function name, but also the name of an extension in which a given function is specified. To load such functions, we can use the following code:

#define INSTANCE_LEVEL_VULKAN_FUNCTION_FROM_EXTENSION( name, extension )                                                                 \
for( auto & enabled_extension : enabled_extensions ) {            \
  if( std::string( enabled_extension ) == std::string( extension ) ) 
{                                                                 \  
    name = (PFN_##name)vkGetInstanceProcAddr( instance, #name );  \
    if( name == nullptr ) {                                       \
      std::cout << "Could not load instance-level Vulkan function named: "                                                          \
        #name << std::endl;                                       \
      return false;                                               \
    }                                                             \
  }                                                               \
} 

#include "ListOfVulkanFunctions.inl" 

return true;

enabled_extensions is a variable of type std::vector<char const *>, which contains the names of all enabled instance-level extensions. We iterate over all its elements and check whether the name of a given extension matches the name of an extension that introduces the provided function. If it does, we load the function in the same way as a normal core API function. Otherwise, we skip the pointer-loading code. If we don't enable the given extension, we can't load functions introduced by it.

See also

The following recipes in this chapter:

  • Preparing for loading Vulkan API functions
  • Loading function exported from a Vulkan Loader library
  • Loading global-level functions
  • Loading device-level functions

Enumerating available physical devices

Almost all the work in Vulkan is performed on logical devices: we create resources on them, manage their memory, record command buffers created from them, and submit commands for processing to their queues. In our application, logical devices represent physical devices for which a set of features and extensions were enabled. To create a logical device, we need to select one of the physical devices available on a given hardware platform. How do we know how many and what physical devices are available on a given computer? We need to enumerate them.

How to do it...

  1. Take the handle of a created Vulkan Instance. Provide it through a variable of type VkInstance named instance.
  2. Prepare a variable of type uint32_t named devices_count.
  3. Call vkEnumeratePhysicalDevices( instance, &devices_count, nullptr ). In the first parameter, provide a handle of the Vulkan Instance; in second, provide a pointer to the devices_count variable, and leave the third parameter set to nullptr right now.
  1. If a function call is successful, the devices_count variable will contain the total number of available physical devices.
  2. Prepare storage for the list of physical devices. The best solution is to use a variable of type std::vector with elements of type VkPhysicalDevice. Call it available_devices.
  3. Resize the vector to be able to hold at least the devices_count elements.
  4. Call vkEnumeratePhysicalDevices( instance, &devices_count, &available_devices[0] ). Again, the first parameter should be set to the handle of a Vulkan Instance object, the second parameter should still point to the extensions_count variable, and the third parameter must point to an array of at least devices_count elements of type VkPhysicalDevice. Here, in the third parameter, provide an address of the first element of an available_devices vector.
  5. If the function returns successfully, the available_devices vector will contain a list of all physical devices installed on a given hardware platform that supports a Vulkan API.

How it works...

Enumerating the available physical devices operation is divided into two stages: First, we check how many physical devices are available on any given hardware. This is done by calling the vkEnumeratePhysicalDevices() function with the last parameter set to nullptr, as follows:

uint32_t devices_count = 0; 
VkResult result = VK_SUCCESS; 

result = vkEnumeratePhysicalDevices( instance, &devices_count, nullptr ); 
if( (result != VK_SUCCESS) || 
    (devices_count == 0) ) { 
  std::cout << "Could not get the number of available physical devices." << std::endl; 
  return false; 
}

This way, we know how many devices are supporting Vulkan and how much storage we need to prepare for their handles. When we are ready and have prepared enough space, we can go to the second stage and get the actual handles of physical devices. This is done with the call of the same vkEnumeratePhysicalDevices() function, but this time, the last parameter must point to an array of VkPhysicalDevice elements:

available_devices.resize( devices_count ); 
result = vkEnumeratePhysicalDevices( instance, &devices_count, &available_devices[0] ); 
if( (result != VK_SUCCESS) || 
    (devices_count == 0) ) { 
  std::cout << "Could not enumerate physical devices." << std::endl; 
  return false; 
} 

return true;

When the call is successful, the prepared storage is filled with the handles of physical devices installed on any computer on which our application is executed.

Now that we have the list of devices, we can look through it and check the properties of each device, check operations we can perform on it, and see what extensions are supported by it.

See also

The following recipes in this chapter:

  • Loading instance-level functions
  • Checking available device extensions
  • Checking available queue families and their properties
  • Creating a logical device

Checking available device extensions

Some Vulkan features we would like to use, require us to explicitly enable certain extensions (contrary to OpenGL, in which extensions were automatically/implicitly enabled). There are two kinds, or two levels, of extensions: Instance-level and device-level. Like Instance extensions, device extensions are enabled during logical device creation. We can't ask for a device extension if it is not supported by a given physical device or we won't be able to create a logical device for it. So, before we start creating a logical device, we need to make sure that all requested extensions are supported by a given physical device, or we need to search for another device that supports them all.

How to do it...

  1. Take one of the physical device handles returned by the vkEnumeratePhysicalDevices() function and store it in a variable of type VkPhysicalDevice called physical_device.
  2. Prepare a variable of type uint32_t named extensions_count.
  3. Call vkEnumerateDeviceExtensionProperties( physical_device, nullptr, &extensions_count, nullptr ). In the first parameter, provide the handle of a physical device available on a given hardware platform: the physical_device variable; the second and last parameters should be set to nullptr, and the third parameter should point to the extensions_count variable.
  4. If a function call is successful, the extensions_count variable will contain the total number of available device-level extensions.
  5. Prepare the storage for the list of extension properties. The best solution is to use a variable of type std::vector with elements of type VkExtensionProperties. Call it available_extensions.
  6. Resize the vector to be able to hold at least the extensions_count elements.
  7. Call vkEnumerateDeviceExtensionProperties( physical_device, nullptr, &extensions_count, &available_extensions[0] ). However, this time, replace the last parameter with a pointer to the first element of an array with elements of type VkExtensionProperties. This array must have enough space to contain at least extensions_count elements. Here, provide a pointer to the first element of the available_extensions variable.
  8. If the function returns successfully, the available_extensions vector will contain a list of all extensions supported by a given physical device.

How it works...

The process of acquiring the list of supported device-level extensions can be divided into two stages: Firstly, we check how many extensions are supported by a given physical device. This is done by calling a function named vkEnumerateDeviceExtensionProperties() and setting its last parameter to nullptr as follows:

uint32_t extensions_count = 0; 
VkResult result = VK_SUCCESS; 

result = vkEnumerateDeviceExtensionProperties( physical_device, nullptr, &extensions_count, nullptr ); 
if( (result != VK_SUCCESS) || 
    (extensions_count == 0) ) { 
  std::cout << "Could not get the number of device extensions." << std::endl; 
  return false; 
}

Secondly, we need to prepare an array that will be able to store enough elements of type VkExtensionProperties. In the example, we create a vector variable and resize it so it has the extensions_count number of elements. In the second vkEnumerateDeviceExtensionProperties() function call, we provide an address of the first element of the available_extensions variable. When the call is successful, the variable will be filled with properties (names and versions) of all extensions supported by a given physical device.

available_extensions.resize( extensions_count ); 
result = vkEnumerateDeviceExtensionProperties( physical_device, nullptr, &extensions_count, &available_extensions[0] ); 
if( (result != VK_SUCCESS) || 
    (extensions_count == 0) ) { 
  std::cout << "Could not enumerate device extensions." << std::endl; 
  return false; 
} 

return true;

Once again, we can see the pattern of calling the same function twice: The first call (with the last parameter set to nullptr) informs us of the number of elements returned by the second call. The second call (with the last parameter pointing to an array of VkExtensionProperties elements) returns the requested data, in this case device extensions, which we can iterate over and check whether the extensions we are interested in are available on a given physical device.

See also

  • The following recipes in this chapter:
    • Checking available Instance extensions
    • Enumerating available physical devices
  • The following recipe in Chapter 2, Image Presentation:
    • Creating a logical device with WSI extensions enabled

Getting features and properties of a physical device

When we create a Vulkan-enabled application, it can be executed on many different devices. It may be a desktop computer, a notebook, or a mobile phone. Each such device may have a different configuration, and may contain different graphics hardware that provide different performance, or, more importantly, different capabilities. A given computer may have more than one graphics card installed. So, in order to find a device that suits our needs, and is able to perform operations we want to implement in our code, we should check not only how many devices there are, but also, to be able to properly choose one of them, we need to check what the capabilities of each device are.

How to do it...

  1. Prepare the handle of the physical device returned by the vkEnumeratePhysicalDevices() function. Store it in a variable of type VkPhysicalDevice named physical_device.
  2. Create a variable of type VkPhysicalDeviceFeatures named device_features.
  3. Create a second variable of type VkPhysicalDeviceProperties named device_properties.
  4. To get the list of features supported by a given device ,call vkGetPhysicalDeviceFeatures( physical_device, &device_features ). Set the handle of the physical device returned by the
    vkEnumeratePhysicalDevices() function for the first parameter. The second parameter must point to the device_features variable.
  1. To acquire the properties of a given physical device call the vkGetPhysicalDeviceProperties( physical_device, &device_properties ) function. Provide the handle of the physical device in the first argument. This handle must have been returned by the vkEnumeratePhysicalDevices() function. The second parameter must be a pointer to a device_properties variable.

How it works...

Here you can find an implementation of the preceding recipe:

vkGetPhysicalDeviceFeatures( physical_device, &device_features ); 

vkGetPhysicalDeviceProperties( physical_device, &device_properties );

This code, while short and simple, gives us much information about the graphics hardware on which we can perform operations using the Vulkan API.

The VkPhysicalDeviceProperties structure contains general information about a given physical device. Through it, we can check the name of the device, the version of a driver, and a supported version of a Vulkan API. We can also check the type of a device: Whether it is an integrated device (built into a main processor) or a discrete (dedicated) graphics card, or maybe even a CPU itself. We can also read the limitations (limits) of a given hardware, for example, how big images (textures) can be created on it, how many buffers can be used in shaders, or we can check the upper limit of vertex attributes used during drawing operations.

The VkPhysicalDeviceFeatures structure lists additional features that may be supported by the given hardware, but are not required by the core Vulkan specification. Features include items such as geometry and tessellation shaders, depth clamp and bias, multiple viewports, or wide lines. You may wonder why geometry and tessellation shaders are on the list. Graphics hardware has supported these features for many years now. However, don't forget that the Vulkan API is portable and can be supported on many different hardware platforms, not only high-end PCs, but also mobile phones or even dedicated, portable devices, which should be as power efficient as possible. That's why these performance-hungry features are not in the core specification. This allows for some driver flexibility and, more importantly, power efficiency and lower memory consumption.

There is one additional thing you should know about the physical device features. Like extensions, they are not enabled by default and can't be used just like that. They must be implicitly enabled during the logical device creation. We can't request all features during this operation, because if there is any feature that is not supported, the logical device creation process will fail. If we are interested in a specific feature, we need to check if it is available and specify it during the creation of a logical device. If the feature is not supported, we can't use such a feature on this device and we need to look for another device that supports it.

If we want to enable all features supported by a given physical device, we just need to query for the available features and provide the acquired data during logical device creation.

See also

The following recipes in this chapter:

  • Creating a logical device
  • Creating a logical device with geometry shaders, graphics, and compute queues

Checking available queue families and their properties

In Vulkan, when we want to perform operations on hardware, we submit them to queues. The operations within a single queue are processed one after another, in the same order they were submitted--that's why it's called a queue. However, operations submitted to different queues are processed independently (if we need, we can synchronize them):

Different queues may represent different parts of the hardware, and thus may support different kinds of operations. Not all operations may be performed on all queues.

Queues with the same capabilities are grouped into families. A device may expose any number of queue families, and each family may contain one or more queues. To check what operations can be performed on the given hardware, we need to query the properties of all queue families.

How to do it...

  1. Take one of the physical device handles returned by the vkEnumeratePhysicalDevices() function and store it in a variable of type VkPhysicalDevice called physical_device.
  2. Prepare a variable of type uint32_t named queue_families_count.
  3. Call vkGetPhysicalDeviceQueueFamilyProperties( physical_device, &queue_families_count, nullptr ). Provide the handle of a physical device in the first parameter; the second parameter should point to the queue_families_count variable, and the final parameter should be set to nullptr.
  4. After the successful call, the queue_families_count variable will contain the number of all queue families exposed by a given physical device.
  5. Prepare a storage for the list of queue families and their properties. A very convenient solution is to use a variable of type std::vector. Its elements must be of type VkQueueFamilyProperties. Call the variable queue_families.
  6. Resize the vector to be able to hold at least the queue_families_count elements.
  7. Call vkGetPhysicalDeviceQueueFamilyProperties( physical_device, &queue_families_count, &queue_families[0] ). The first and second argument should be the same as in the previous call; the last parameter should point to the first element of the queue_families vector.
  8. To be sure that everything went okay, check that the queue_families_count variable is greater than zero. If successful, the properties of all queue families will be stored in the queue_families vector.

How it works...

The implementation of the preceding recipe, similarly to other queries, can be divided into two stages: Firstly, we acquire information about the total number of queue families available on a given physical device. This is done by calling a vkGetPhysicalDeviceQueueFamilyProperties() function, with the last argument set to nullptr:

uint32_t queue_families_count = 0; 

vkGetPhysicalDeviceQueueFamilyProperties( physical_device, &queue_families_count, nullptr ); 
if( queue_families_count == 0 ) { 
  std::cout << "Could not get the number of queue families." << std::endl; 
  return false; 
}

Secondly, when we know how many queue families there are, we can prepare sufficient memory to be able to store the properties of all of them. In the presented example, we create a variable of type std::vector with VkQueueFamilyProperties elements and resize it to the value returned by the first query. After that, we perform a second vkGetPhysicalDeviceQueueFamilyProperties() function call, with the last parameter pointing to the first element of the created vector. In this vector, the parameters of all available queue families will be stored.

queue_families.resize( queue_families_count ); 
vkGetPhysicalDeviceQueueFamilyProperties( physical_device, &queue_families_count, &queue_families[0] ); 
if( queue_families_count == 0 ) { 
  std::cout << "Could not acquire properties of queue families." << std::endl; 
  return false; 
} 

return true;

The most important information we can get from properties is the types of operations that can be performed by the queues in a given family. Types of operations supported by queues are divided into:

  • Graphics: For creating graphics pipelines and drawing
  • Compute: For creating compute pipelines and dispatching compute shaders
  • Transfer: Used for very fast memory-copying operations
  • Sparse: Allows for additional memory management features

Queues from the given family may support more than one type of operation. There may also be a situation where different queue families support exactly the same types of operation.

Family properties also inform us about the number of queues that are available in the given family, about the timestamp support (for time measurements), and the granularity of image transfer operations (how small parts of image can be specified during copy/blit operations).

With the knowledge of the number of queue families, their properties, and the available number of queues in each family, we can prepare for logical device creation. All this information is needed, because we don't create queues by ourselves. We just request them during logical device creation, for which we must specify how many queues are needed and from which families. When a device is created, queues are created automatically along with it. We just need to acquire the handles of all requested queues.

See also

  • The following recipes in this chapter:
    • Selecting index of a queue family with desired capabilities
    • Creating a logical device
    • Getting a device queue
    • Creating a logical device with geometry shaders, graphics, and compute queues
  • The following recipe in Chapter 2, Image Presentation:
    • Selecting a queue family that supports presentation to a given surface

Selecting the index of a queue family with the desired capabilities

Before we can create a logical device, we need to think about what operations we want to perform on it, because this will affect our choice of a queue family (or families) from which we want to request queues.

For simple use cases, a single queue from a family that supports graphics operations should be enough. More advanced scenarios will require graphics and compute operations to be supported, or even an additional transfer queue for very fast memory copying.

In this recipe, we will look at how to search for a queue family that supports the desired type of operations.

How to do it...

  1. Take one of the physical device handles returned by the vkEnumeratePhysicalDevices() function and store it in a variable of type VkPhysicalDevice called physical_device.
  2. Prepare a variable of type uint32_t named queue_family_index. In it, we will store an index of a queue family that supports selected types of operations.
  3. Create a bit field variable of type VkQueueFlags named desired_capabilities. Store the desired types of operations in the desired_capabilities variables--it can be a logical OR operation of any of the VK_QUEUE_GRAPHICS_BIT, VK_QUEUE_COMPUTE_BIT, VK_QUEUE_TRANSFER_BIT or VK_QUEUE_SPARSE_BINDING_BIT values.
  4. Create a variable of type std::vector with VkQueueFamilyProperties elements named queue_families.
  5. Check the number of available queue families and acquire their properties as described in the Checking available queue families and their properties recipe. Store the results of this operation in the queue_families variable.
  6. Loop over all elements of the queue_families vector using a variable of type uint32_t named index.
  7. For each element of the queue_families variable:
    1. Check if the number of queues (indicated by the queueCount member) in the current element is greater than zero.
    2. Check if the logical AND operation of the desired_capabilities variable and the queueFlags member of the currently iterated element is not equal to zero.
    3. If both checks are positive, store the value of an index variable (current loop iteration) in the queue_family_index variable, and finish iterating.
  8. Repeat steps from 7.1 to 7.3 until all elements of the queue_families vector are viewed.

How it works...

First, we acquire the properties of queue families available on a given physical device. This is the operation described in the Checking available queue families and their properties recipe. We store the results of the query in the queue_families variable, which is of std::vector type with VkQueueFamilyProperties elements:

std::vector<VkQueueFamilyProperties> queue_families; 
if( !CheckAvailableQueueFamiliesAndTheirProperties( physical_device, queue_families ) ) { 
  return false; 
}

Next, we start inspecting all elements of a queue_families vector:

for( uint32_t index = 0; index < static_cast<uint32_t>(queue_families.size()); ++index ) { 
  if( (queue_families[index].queueCount > 0) && 
      (queue_families[index].queueFlags & desired_capabilities ) ) { 
    queue_family_index = index; 
    return true; 
  } 
} 
return false;

Each element of the queue_families vector represents a separate queue family. Its queueCount member contains the number of queues available in a given family. The queueFlags member is a bit field, in which each bit represents a different type of operation. If a given bit is set, it means that the corresponding type of operation is supported by the given queue family. We can check for any combination of supported operations, but we may need to search for separate queues for every type of operation. This solely depends on the hardware support and the Vulkan API driver.

To be sure that the data we have acquired is correct, we also check if each family exposes at least one queue.

More advanced real-life scenarios would require us to store the total number of queues exposed in each family. This is because we may want to request more than one queue, but we can't request more queues than are available in a given family. In simple use cases, one queue from a given family is enough.

See also

  • The following recipes in this chapter:
    • Checking available queue families and their properties
    • Creating a logical device
    • Getting a device queue
    • Creating a logical device with geometry shader, graphics, and compute queues
  • The following recipe in Chapter 2, Image Presentation:
    • Selecting a queue family that supports the presentation to a given surface

Creating a logical device

The logical device is one the most important objects created in our application. It represents real hardware, along with all the extensions and features enabled for it and all the queues requested from it:

The logical device allows us to perform almost all the work typically done in rendering applications, such as creating images and buffers, setting the pipeline state, or loading shaders. The most important ability it gives us is recording commands (such as issuing draw calls or dispatching computational work) and submitting them to queues, where they are executed and processed by the given hardware. After such execution, we acquire the results of the submitted operations. These can be a set of values calculated by compute shaders, or other data (not necessarily an image) generated by draw calls. All this is performed on a logical device, so now we will look at how to create one.

Getting ready

In this recipe, we will use a variable of a custom structure type. The type is called QueueInfo and is defined as follows:

struct QueueInfo { 
  uint32_t           FamilyIndex; 
  std::vector<float> Priorities; 
};

In a variable of this type, we will store information about the queues we want to request for a given logical device. The data contains an index of a family from which we want the queues to be created, the total number of queues requested from this family, and the list of priorities assigned to each queue. As the number of priorities must be equal to the number of queues requested from a given family, the total number of queues we request from a given family is equal to the number of elements in the Priorities vector.

How to do it...

  1. Based on the features, limits, available extensions and supported types of operations, choose one of the physical devices acquired using the vkEnumeratePhysicalDevices() function call (refer to Enumerating available physical devices recipe). Take its handle and store it in a variable of type VkPhysicalDevice called physical_device.
  2. Prepare a list of device extensions you want to enable. Store the names of the desired extensions in a variable of type std::vector<char const *> named desired_extensions.
  1. Create a variable of type std::vector<VkExtensionProperties> named available_extensions. Acquire the list of all available extensions and store it in the available_extensions variable (refer to Checking available device extensions recipe).
  2. Make sure that the name of each extension from the desired_extensions variable is also present in the available_extensions variable.
  3. Create a variable of type VkPhysicalDeviceFeatures named desired_features.
  4. Acquire a set of features supported by a physical device represented by the physical_device handle and store it in the desired_features variable (refer to Getting features and properties of a physical device recipe).
  5. Make sure that all the required features are supported by a given physical device represented by the physical_device variable. Do that by checking if the corresponding members of the acquired desired_features structure are set to one. Clear the rest of the desired_features structure members (set them to zero).
  6. Based on the properties (supported types of operations), prepare a list of queue families, from which queues should be requested. Prepare a number of queues that should be requested from each selected queue family. Assign a priority for each queue in a given family: A floating point value from 0.0f to 1.0f (multiple queues may have the same priority value). Create a std::vector variable named queue_infos with elements of a custom type QueueInfo. Store the indices of queue families and a list of priorities in the queue_infos vector, the size of Priorities vector should be equal to the number of queues from each family.
  7. Create a variable of type std::vector<VkDeviceQueueCreateInfo> named queue_create_infos. For each queue family stored in the queue_infos variable, add a new element to the queue_create_infos vector. Assign the following values for members of a new element:
    1. VK_STRUCTURE_TYPE_DEVICE_QUEUE_CREATE_INFO value for sType.
    2. nullptr value for pNext.
    3. 0 value for flags.
    4. Index of a queue family for queueFamilyIndex.
    5. Number of queues requested from a given family for queueCount.
    6. Pointer to the first element of a list of priorities of queues from a given family for pQueuePriorities.
  1. Create a variable of type VkDeviceCreateInfo named device_create_info. Assign the following values for members of a device_create_info variable:
    1. VK_STRUCTURE_TYPE_DEVICE_CREATE_INFO value for sType.
    2. nullptr value for pNext.
    3. 0 value for flags.
    4. Number of elements of the queue_create_infos vector variable for queueCreateInfoCount.
    5. Pointer to the first element of the queue_create_infos vector variable in pQueueCreateInfos.
    6. 0 value for enabledLayerCount.
    7. nullptr value for ppEnabledLayerNames.
    8. Number of elements of the desired_extensions vector variable in enabledExtensionCount.
    9. Pointer to the first element of the desired_extensions vector variable (or nullptr if it is empty) in ppEnabledExtensionNames.
    10. Pointer to the desired_features variable in pEnabledFeatures.
  2. Create a variable of type VkDevice named logical_device.
  3. Call vkCreateDevice( physical_device, &device_create_info, nullptr, &logical_device ). Provide a handle of the physical device in the first argument, a pointer to the device_create_info variable in the second argument, a nullptr value in the third argument, and a pointer to the logical_device variable in the final argument.
  4. Make sure the operation succeeded by checking that the value returned by the vkCreateDevice() function call is equal to VK_SUCCESS.

How it works...

To create a logical device, we need to prepare a considerable amount of data. First we need to acquire the list of extensions that are supported by a given physical device, and then we need check that all the extensions we want to enable can be found in the list of supported extensions. Similar to Instance creation, we can't create a logical device with extensions that are not supported. Such an operation will fail:

std::vector<VkExtensionProperties> available_extensions; 
if( !CheckAvailableDeviceExtensions( physical_device, available_extensions ) ) { 
  return false; 
} 

for( auto & extension : desired_extensions ) { 
  if( !IsExtensionSupported( available_extensions, extension ) ) { 
    std::cout << "Extension named '" << extension << "' is not supported by a physical device." << std::endl; 
    return false; 
  } 
}

Next we prepare a vector variable named queue_create_infos that will contain information about queues and queue families we want to request for a logical device. Each element of this vector is of type VkDeviceQueueCreateInfo. The most important information it contains is an index of the queue family and the number of queues requested for that family. We can't have two elements in the vector that refer to the same queue family.

In the queue_create_infos vector variable, we also provide information about queue priorities. Each queue in a given family may have a different priority: A floating-point value between 0.0f and 1.0f, with higher values indicating higher priority. This means that hardware will try to schedule operations performed on multiple queues based on this priority, and may assign more processing time to queues with higher priorities. However, this is only a hint and it is not guaranteed. It also doesn't influence queues from other devices:

std::vector<VkDeviceQueueCreateInfo> queue_create_infos; 

for( auto & info : queue_infos ) { 
  queue_create_infos.push_back( { 
    VK_STRUCTURE_TYPE_DEVICE_QUEUE_CREATE_INFO, 
    nullptr, 
    0, 
    info.FamilyIndex, 
    static_cast<uint32_t>(info.Priorities.size()), 
    info.Priorities.size() > 0 ? &info.Priorities[0] : nullptr 
  } ); 
};

The queue_create_infos vector variable is provided to another variable of type VkDeviceCreateInfo. In this variable, we store information about the number of different queue families from which we request queues for a logical device, number and names of enabled layers, and extensions we want to enable for a device, and also features we want to use.

Layers and extensions are not required for the device to work properly, but there are quite useful extensions, which must be enabled if we want to display Vulkan-generated images on screen.

Features are also not necessary, as the core Vulkan API gives us plenty of features to be able to generate beautiful images or perform complicated calculations. If we don't want to enable any feature, we can provide a nullptr value for the pEnabledFeatures member, or provide a variable filled with zeros. However, if we want to use more advanced features, such as geometry or tessellation shaders, we need to enable them by providing a pointer to a proper variable, previously acquiring the list of supported features, and making sure the ones we need are available. Unnecessary features can (and even should) be disabled, because there are some features that may impact performance. This situation is very rare, but it's good to bear this in mind. In Vulkan, we should do and use only those things that need to be done and used:

VkDeviceCreateInfo device_create_info = { 
  VK_STRUCTURE_TYPE_DEVICE_CREATE_INFO, 
  nullptr, 
  0, 
  static_cast<uint32_t>(queue_create_infos.size()), 
  queue_create_infos.size() > 0 ? &queue_create_infos[0] : nullptr, 
  0, 
  nullptr, 
  static_cast<uint32_t>(desired_extensions.size()), 
  desired_extensions.size() > 0 ? &desired_extensions[0] : nullptr, 
  desired_features 
};

The device_create_info variable is provided to the vkCreateDevice() function, which creates a logical device. To be sure that the operation succeeded, we need to check that the value returned by the vkCreateDevice() function call is equal to VK_SUCCESS. If it is, the handle of a created logical device is stored in the variable pointed to by the final argument of the function call:

VkResult result = vkCreateDevice( physical_device, &device_create_info, nullptr, &logical_device ); 
if( (result != VK_SUCCESS) || 
    (logical_device == VK_NULL_HANDLE) ) { 
  std::cout << "Could not create logical device." << std::endl; 
  return false; 
} 

return true;

See also

The following recipes in this chapter:

  • Enumerating available physical devices
  • Checking available device extensions
  • Getting features and properties of a physical device
  • Checking available queue families and their properties
  • Selecting the index of a queue family with the desired capabilities
  • Destroying a logical device

Loading device-level functions

We have created a logical device on which we can perform any desired operations, such as rendering a 3D scene, calculating collisions of objects in a game, or processing video frames. These operations are performed with device-level functions, but they are not available until we acquire them.

How to do it...

  1. Take the handle of a created logical device object. Store it in a variable of type VkDevice named logical_device.
  2. Choose the name (denoted as <function name>) of a device-level function you want to load.
  3. For each device-level function that will be loaded, create a variable of type PFN_<function name> named <function name>.
  4. Call vkGetDeviceProcAddr( device, "<function name>" ), in which you provide the handle of created logical device in the first argument and the name of the function in the second argument. Cast the result of this operation onto a PFN_<function name> type and store it in a <function name> variable.
  5. Confirm that the operation succeeded by checking that the value of a <function name> variable is not equal to nullptr.

How it works...

Almost all the typical work done in 3D rendering applications is performed using device-level functions. They are used to create buffers, images, samplers, or shaders. We use device-level functions to create pipeline objects, synchronization primitives, framebuffers, and many other resources. And, most importantly, they are used to record operations that are later submitted (using device-level functions too) to queues, where these operations are processed by the hardware. This all is done with device-level functions.

Device-level functions, like all other Vulkan functions, can be loaded using the vkGetInstanceProcAddr() function, but this approach is not optimal. Vulkan is designed to be a flexible API. It gives the option to perform operations on multiple devices in a single application, but when we call the vkGetInstanceProcAddr() function, we can't provide any parameter connected with the logical device. So, the function pointer returned by this function can't be connected with the device on which we want to perform the given operation. This device may not even exist at the time the vkGetInstanceProcAddr() function is called. That's why the vkGetInstanceProcAddr() function returns a dispatch function which, based on its arguments, calls the implementation of a function, that is proper for a given logical device. However, this jump has a performance cost: It's very small, but it nevertheless takes some processor time to call the right function.

If we want to avoid this unnecessary jump and acquire function pointers corresponding directly to a given device, we should do that by using a vkGetDeviceProcAddr(). This way, we can avoid the intermediate function call and improve the performance of our application. Such an approach also has some drawbacks: We need to acquire function pointers for each device created in an application. If we want to perform operations on many different devices, we need a separate list of function pointers for each logical device. We can't use functions acquired from one device to perform operations on a different device. But using C++ language's preprocessor, it is quite easy to acquire function pointers specific to a given device:
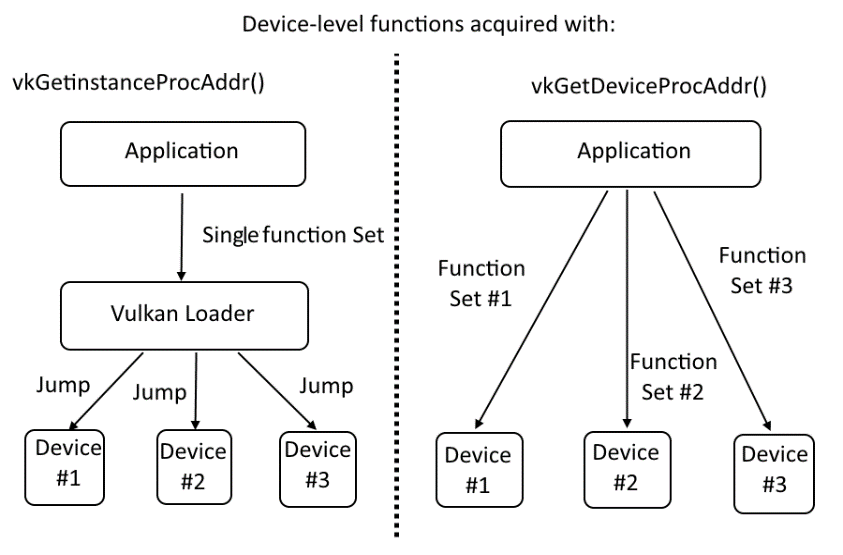
How do we know if a function is from the device-level and not from the global or instance-level? The first argument of device-level functions is of type VkDevice, VkQueue, or VkCommandBuffer. Most of the functions that will be introduced from now on are from the device level.

To load device-level functions, we should update the ListOfVulkanFunctions.inl file as follows:

#ifndef DEVICE_LEVEL_VULKAN_FUNCTION 
#define DEVICE_LEVEL_VULKAN_FUNCTION( function ) 
#endif 

DEVICE_LEVEL_VULKAN_FUNCTION( vkGetDeviceQueue ) 
DEVICE_LEVEL_VULKAN_FUNCTION( vkDeviceWaitIdle ) 
DEVICE_LEVEL_VULKAN_FUNCTION( vkDestroyDevice ) 

DEVICE_LEVEL_VULKAN_FUNCTION( vkCreateBuffer ) 
DEVICE_LEVEL_VULKAN_FUNCTION( vkGetBufferMemoryRequirements ) 
// ... 

#undef DEVICE_LEVEL_VULKAN_FUNCTION 

// 

#ifndef DEVICE_LEVEL_VULKAN_FUNCTION_FROM_EXTENSION 
#define DEVICE_LEVEL_VULKAN_FUNCTION_FROM_EXTENSION( function, extension ) 
#endif 

DEVICE_LEVEL_VULKAN_FUNCTION_FROM_EXTENSION( vkCreateSwapchainKHR, VK_KHR_SWAPCHAIN_EXTENSION_NAME ) 
DEVICE_LEVEL_VULKAN_FUNCTION_FROM_EXTENSION( vkGetSwapchainImagesKHR, VK_KHR_SWAPCHAIN_EXTENSION_NAME ) 
DEVICE_LEVEL_VULKAN_FUNCTION_FROM_EXTENSION( vkAcquireNextImageKHR, VK_KHR_SWAPCHAIN_EXTENSION_NAME ) 
DEVICE_LEVEL_VULKAN_FUNCTION_FROM_EXTENSION( vkQueuePresentKHR, VK_KHR_SWAPCHAIN_EXTENSION_NAME ) 
DEVICE_LEVEL_VULKAN_FUNCTION_FROM_EXTENSION( vkDestroySwapchainKHR, VK_KHR_SWAPCHAIN_EXTENSION_NAME ) 

#undef DEVICE_LEVEL_VULKAN_FUNCTION_FROM_EXTENSION

In the preceding code, we added, names of multiple device-level functions. Each of them is wrapped into a DEVICE_LEVEL_VULKAN_FUNCTION macro (if it is defined in the core API) or a DEVICE_LEVEL_VULKAN_FUNCTION_FROM_EXTENSION macro (if it is introduced by an extension), and is placed between proper #ifndef and #undef preprocessor directives. The list is, of course, incomplete, as there are too many functions to present them all here.

Remember that we shouldn't load functions introduced by a given extension without first enabling the extension during the logical device creation. If an extension is not supported, its functions are not available and the operation of loading them will fail. That's why, similarly to loading instance-level functions, we need to divide function-loading code into two blocks.

First, to implement the device-level core API functions loading using the preceding macros, we should write the following code:

#define DEVICE_LEVEL_VULKAN_FUNCTION( name )                      \
name = (PFN_##name)vkGetDeviceProcAddr( device, #name );          \
if( name == nullptr ) {                                           \
  std::cout << "Could not load device-level Vulkan function named: " #name << std::endl;                                      \
  return false;                                                   \
} 

#include "ListOfVulkanFunctions.inl" 

return true;

In this code sample, we create a macro that, for each occurrence of a DEVICE_LEVEL_VULKAN_FUNCTION() definition found in the ListOfVulkanFunctions.inl file, calls a vkGetDeviceProcAddr() function and provides the name of a procedure we want to load. The result of this operation is cast onto an appropriate type and stored in a variable with exactly the same name as the name of the acquired function. Upon failure, any additional information is displayed on screen.

Next, we need to load functions introduced by extensions. These extensions must have been enabled during logical device creation:

#define DEVICE_LEVEL_VULKAN_FUNCTION_FROM_EXTENSION( name, 
extension )                                                         \         
for( auto & enabled_extension : enabled_extensions ) {              \         
  if( std::string( enabled_extension ) == std::string( extension )
 ) {                                                                \  
    name = (PFN_##name)vkGetDeviceProcAddr( logical_device, #name );\                                                          
    if( name == nullptr ) {                                         \        
      std::cout << "Could not load device-level Vulkan function named: "                                                                   \  
        #name << std::endl;                                         \         
      return false;                                                 \         
    }                                                               \         
  }                                                                 \         
} 

#include "ListOfVulkanFunctions.inl" 

return true;

In the preceding code, we define the macro which iterates over all enabled extensions. They are defined in a variable of type std::vector<char const *> named enabled_extensions. In each loop iteration, the name of the enabled extension from the vector is compared with the name of an extension specified for a given function. If they match, the function pointer is loaded; if not, the given function is skipped as we can't load functions from un-enabled extensions.

See also

The following recipes in this chapter:

  • Preparing for loading Vulkan API functions
  • Loading function exported from a Vulkan Loader library
  • Loading global-level functions
  • Loading instance-level functions

Getting a device queue

In Vulkan, in order to harness the processing power of a given device, we need to submit operations to the device's queues. Queues are not created explicitly by an application. They are requested during device creation: We check what families are available and how many queues each family contains. We can ask only for the subset of available queues from existing queue families, and we can't request more queues than the given family exposes.

Requested queues are created automatically along with the logical device. We don't manage them and create them explicitly. We can't destroy them either; they are also destroyed with a logical device. To use them and to be able to submit any work to the device's queues, we just need to acquire their handles.

How to do it...

  1. Take the handle of a created logical device object. Store it in a variable of type VkDevice named logical_device.
  1. Take the index of one of the queue families that was provided during the logical device creation in a queueFamilyIndex member of a structure of type VkDeviceQueueCreateInfo. Store it in a variable of type uint32_t named queue_family_index.
  2. Take the index of one of the queues requested for a given queue family: The index must be smaller than the total number of queues requested for a given family in a queueCount member of the VkDeviceQueueCreateInfo structure. Store the index in a variable of type uint32_t named queue_index.
  3. Prepare a variable of type VkQueue named queue.
  4. Call vkGetDeviceQueue( logical_device, queue_family_index, queue_index, &queue ). Provide a handle to the created logical device in the first argument; the second argument must be equal to the selected queue family index; the third argument must contain a number of one of the queues requested for a given family; then, in the final parameter, provide a pointer to the queue variable. A handle to the device queue will be stored in this variable.
  5. Repeat steps 2 to 5 for all queues requested from all queue families.

How it works...

Code that acquires the handle of a given queue is very simple:

vkGetDeviceQueue( logical_device, queue_family_index, queue_index, &queue );

We provide a handle to the created logical device, an index of the queue family, and an index of the queue requested for a given family. We must provide one of the family indices that were provided during logical device creation. This means that we can't acquire the handle of a queue from a family that wasn't specified during the logical device creation. Similarly, we can only provide an index of a queue that is smaller than the total number of queues requested from a given family.

Let's imagine the following situation: A given physical device supports five queues in the queue family No. 3. During logical device creation, we request only two queues from this queue family No. 3. So here, when we call the vkGetDeviceQueue() function, we must provide the value 3 as the queue family index. For the queue index, we can provide only values 0 and 1.

The handle of the requested queue is stored in a variable to which we provide a pointer in the final argument of the vkGetDeviceQueue() function call. We can ask for a handle of the same queue multiple times. This call doesn't create queues--they are created implicitly during logical device creation. Here, we just ask for the handle of an existing queue, so we can do it multiple times (although it may not make much sense to do so).

See also

The following recipes in this chapter:

  • Checking available queue families and their properties
  • Selecting the index of a queue family with the desired capabilities
  • Creating a logical device
  • Creating a logical device with geometry shaders, graphics, and compute queues

Creating a logical device with geometry shaders, graphics, and compute queues

In Vulkan, when we create various objects, we need to prepare many different structures that describe the creation process itself, but they may also require other objects to be created.

A logical device is no different: We need to enumerate physical devices, check their properties and supported queue families, and prepare a VkDeviceCreateInfo structure that requires much more information.

To organize these operations, we will present a sample recipe that creates a logical device from one of the available physical devices that support geometry shaders, and both graphics and compute queues.

How to do it...

  1. Prepare a variable of type VkDevice named logical_device.
  2. Create two variables of type VkQueue, one named graphics_queue and one named compute_queue.
  1. Create a variable of type std::vector<VkPhysicalDevice> named physical_devices.
  2. Get the list of all physical devices available on a given platform and store it in the physical_devices vector (refer to the Enumerating available physical devices recipe).
  3. For each physical device from the physical_devices vector:
    1. Create a variable of type VkPhysicalDeviceFeatures named device_features.
    2. Acquire the list of features supported by a given physical device and store it in the device_features variable.
    3. Check whether the geometryShader member of the device_features variable is equal to VK_TRUE (is not 0). If it is, reset all the other members of the device_features variable (set their values to zero); if it is not, start again with another physical device.
    4. Create two variables of type uint32_t named graphics_queue_family_index and compute_queue_family_index.
    5. Acquire indices of queue families that support graphics and compute operations, and store them in the graphics_queue_family_index and compute_queue_family_index variables, respectively (refer to the Selecting index of a queue family with desired capabilities recipe). If any of these operations is not supported, search for another physical device.
    6. Create a variable of type std::vector with elements of type QueueInfo (refer to Creating a logical device recipe). Name this variable requested_queues.
    7. Store the graphics_queue_family_index variable and one-element vector of floats with a 1.0f value in the requested_queues variable. If a value of the compute_queue_family_index variable is different than the value of the graphics_queue_family_index variable, add another element to the requested_queues vector, with the compute_queue_family_index variable and a one-element vector of floats with 1.0f value.
    8. Create a logical device using the physical_device, requested_queues, device_features and logical_device variables (refer to the Creating a logical device recipe). If this operation failed, repeat the preceding operations with another physical device.
    1. If the logical device was successfully created, load the device-level functions (refer to the Loading device-level functions recipe). Get the handle of the queue from the graphics_queue_family_index family and store it in the graphics_queue variable. Get the queue from the compute_queue_family_index family and store it in the compute_queue variable.

How it works...

To start the process of creating a logical device, we need to acquire the handles of all physical devices available on a given computer:

std::vector<VkPhysicalDevice> physical_devices; 
EnumerateAvailablePhysicalDevices( instance, physical_devices );

Next we need to loop through all available physical devices. For each such device, we need to acquire its features. This will give us the information about whether a given physical device supports geometry shaders:

for( auto & physical_device : physical_devices ) { 
  VkPhysicalDeviceFeatures device_features; 
  VkPhysicalDeviceProperties device_properties; 
  GetTheFeaturesAndPropertiesOfAPhysicalDevice( physical_device, device_features, device_properties ); 

  if( !device_features.geometryShader ) { 
    continue; 
  } else { 
    device_features = {}; 
    device_features.geometryShader = VK_TRUE; 
  }

If geometry shaders are supported, we can reset all the other members of a returned list of features. We will provide this list during the logical device creation, but we don't want to enable any other feature. In this example, geometry shaders are the only additional feature we want to use.

Next we need to check if a given physical device exposes queue families that support graphics and compute operations. This may be just one single family or two separate families. We acquire the indices of such queue families:

  uint32_t graphics_queue_family_index; 
  if( !SelectIndexOfQueueFamilyWithDesiredCapabilities( physical_device, VK_QUEUE_GRAPHICS_BIT, graphics_queue_family_index ) ) { 
    continue; 
  } 

  uint32_t compute_queue_family_index; 
  if( !SelectIndexOfQueueFamilyWithDesiredCapabilities( physical_device, VK_QUEUE_COMPUTE_BIT, compute_queue_family_index ) ) { 
    continue; 
  }

Next, we need to prepare a list of queue families, from which we want to request queues. We also need to assign priorities to each queue from each family:

  std::vector<QueueInfo> requested_queues = { { graphics_queue_family_index, { 1.0f } } }; 
  if( graphics_queue_family_index != compute_queue_family_index ) { 
    requested_queues.push_back( { compute_queue_family_index, { 1.0f } } ); 
  }

If graphics and compute queue families have the same index, we request only one queue from one queue family. If they are different, we need to request two queues: One from the graphics family and one from the compute family.

We are ready to create a logical device for which we provide the prepared data. Upon success, we can the load device-level functions and acquire the handles of the requested queues:

  if( !CreateLogicalDevice( physical_device, requested_queues, {}, &device_features, logical_device ) ) { 
    continue; 
  } else { 
    if( !LoadDeviceLevelFunctions( logical_device, {} ) ) { 
      return false; 
    } 
    GetDeviceQueue( logical_device, graphics_queue_family_index, 0, graphics_queue ); 
    GetDeviceQueue( logical_device, compute_queue_family_index, 0, compute_queue ); 
    return true; 
  } 
} 
return false;

See also

The following recipes in this chapter:

  • Enumerating available physical devices
  • Getting features and properties of a physical device
  • Selecting the index of a queue family with the desired capabilities
  • Creating a logical device
  • Loading device-level functions
  • Getting a device queue
  • Destroying a logical device

Destroying a logical device

After we have finished and we want to quit the application, we should clean up after ourselves. Despite the fact that all the resources should be destroyed automatically by the driver when the Vulkan Instance is destroyed, we should also do this explicitly in the application to follow good programming guidelines. The order of destroying resources should be opposite to the order in which they were created.

Resources should be released in the reverse order to the order of their creation.

In this chapter, the logical device was the last created object, so it will be destroyed first.

How to do it...

  1. Take the handle of the logical device that was created and stored in a variable of type VkDevice named logical_device.
  2. Call vkDestroyDevice( logical_device, nullptr ); provide the logical_device variable in the first argument, and a nullptr value in the second.
  3. For safety reasons, assign the VK_NULL_HANDLE value to the logical_device variable.

How it works...

The implementation of the logical device-destroying recipe is very straightforward:

if( logical_device ) { 
  vkDestroyDevice( logical_device, nullptr ); 
  logical_device = VK_NULL_HANDLE; 
}

First, we need to check if the logical device handle is valid, because, we shouldn't destroy objects that weren't created. Then, we destroy the device with the vkDestroyDevice() function call and we assign the VK_NULL_HANDLE value to the variable in which the logical device handle was stored. We do this just in case--if there is a mistake in our code, we won't destroy the same object twice.

Remember that, when we destroy a logical device, we can't use device-level functions acquired from it.

See also

  • The recipe Creating a logical device in this chapter

Destroying a Vulkan Instance

After all the other resources are destroyed, we can destroy the Vulkan Instance.

How to do it...

  1. Take the handle of the created Vulkan Instance object stored in a variable of type VkInstance named instance.
  2. Call vkDestroyInstance( instance, nullptr ), provide the instance variable as the first argument and a nullptr value as the second argument.
  3. For safety reasons, assign the VK_NULL_HANDLE value to the instance variable.

How it works...

Before we close the application, we should make sure that all the created resources are released. The Vulkan Instance is destroyed with the following code:

if( instance ) { 
  vkDestroyInstance( instance, nullptr ); 
  instance = VK_NULL_HANDLE; 
}

See also

  • The recipe Creating a Vulkan Instance in this chapter

Releasing a Vulkan Loader library

Libraries that are loaded dynamically must be explicitly closed (released). To be able to use Vulkan in our application, we opened the Vulkan Loader (a vulkan-1.dll library on Windows, or libvulkan.so.1 library on Linux). So, before we can close the application, we should free it.

How to do it...

On the Windows operating system family:

  1. Take the variable of type HMODULE named vulkan_library, in which the handle of a loaded Vulkan Loader was stored (refer to the Connecting with a Vulkan Loader library recipe).
  2. Call FreeLibrary( vulkan_library ) and provide the vulkan_library variable in the only argument.
  3. For safety reasons, assign the nullptr value to the vulkan_library variable.

On the Linux operating system family:

  1. Take the variable of type void* named vulkan_library in which the handle of a loaded Vulkan Loader was stored (refer to Connecting with a Vulkan Loader library recipe).
  2. Call dlclose( vulkan_library ), provide the vulkan_library variable in the only argument.
  3. For safety reasons, assign the nullptr value to the vulkan_library variable.

How it works...

On the Windows operating system family, dynamic libraries are opened using the LoadLibrary() function. Such libraries must be closed (released) by calling the FreeLibrary() function to which the handle of a previously opened library must be provided.

On the Linux operating system family, dynamic libraries are opened using the dlopen() function. Such libraries must be closed (released) by calling the dlclose() function, to which the handle of a previously opened library must be provided:

#if defined _WIN32 
FreeLibrary( vulkan_library ); 
#elif defined __linux 
dlclose( vulkan_library ); 
#endif 
vulkan_library = nullptr;

See also

  • The recipe Connecting with a Vulkan Loader library in this chapter
Left arrow icon Right arrow icon
Download code icon Download Code

Key benefits

  • This book explores a wide range of modern graphics programming techniques and GPU compute methods to make the best use of the Vulkan API
  • Learn techniques that can be applied to a wide range of platforms desktop, smartphones, and embedded devices
  • Get an idea on the graphics engine with multi-platform support and learn exciting imaging processing and post-processing techniques

Description

Vulkan is the next generation graphics API released by the Khronos group. It is expected to be the successor to OpenGL and OpenGL ES, which it shares some similarities with such as its cross-platform capabilities, programmed pipeline stages, or nomenclature. Vulkan is a low-level API that gives developers much more control over the hardware, but also adds new responsibilities such as explicit memory and resources management. With it, though, Vulkan is expected to be much faster. This book is your guide to understanding Vulkan through a series of recipes. We start off by teaching you how to create instances in Vulkan and choose the device on which operations will be performed. You will then explore more complex topics such as command buffers, resources and memory management, pipelines, GLSL shaders, render passes, and more. Gradually, the book moves on to teach you advanced rendering techniques, how to draw 3D scenes, and how to improve the performance of your applications. By the end of the book, you will be familiar with the latest advanced techniques implemented with the Vulkan API, which can be used on a wide range of platforms.

Who is this book for?

This book is ideal for developers who know C/C++ languages, have some basic familiarity with graphics programming, and now want to take advantage of the new Vulkan API in the process of building next generation computer graphics. Some basic familiarity of Vulkan would be useful to follow the recipes. OpenGL developers who want to take advantage of the Vulkan API will also find this book useful.

What you will learn

  • Work with Swapchain to present images on screen
  • Create, submit, and synchronize operations processed by the hardware
  • Create buffers and images, manage their memory, and upload data to them from CPU
  • Explore descriptor sets and set up an interface between application and shaders
  • Organize drawing operations into a set of render passes and subpasses
  • Prepare graphics pipelines to draw 3D scenes and compute pipelines to perform mathematical calculations
  • Implement geometry projection and tessellation, texturing, lighting, and post-processing techniques
  • Write shaders in GLSL and convert them into SPIR-V assemblies
  • Find out about and implement a collection of popular, advanced rendering techniques found in games and benchmarks

Product Details

Country selected
Publication date, Length, Edition, Language, ISBN-13
Publication date : Apr 28, 2017
Length: 700 pages
Edition : 1st
Language : English
ISBN-13 : 9781786468154
Languages :

What do you get with a Packt Subscription?

Free for first 7 days. €18.99 p/m after that. Cancel any time!
Product feature icon Unlimited ad-free access to the largest independent learning library in tech. Access this title and thousands more!
Product feature icon 50+ new titles added per month, including many first-to-market concepts and exclusive early access to books as they are being written.
Product feature icon Innovative learning tools, including AI book assistants, code context explainers, and text-to-speech.
Product feature icon Thousands of reference materials covering every tech concept you need to stay up to date.
Subscribe now
View plans & pricing

Product Details

Publication date : Apr 28, 2017
Length: 700 pages
Edition : 1st
Language : English
ISBN-13 : 9781786468154
Languages :

Packt Subscriptions

See our plans and pricing
Modal Close icon
€18.99 billed monthly
Feature tick icon Unlimited access to Packt's library of 7,000+ practical books and videos
Feature tick icon Constantly refreshed with 50+ new titles a month
Feature tick icon Exclusive Early access to books as they're written
Feature tick icon Solve problems while you work with advanced search and reference features
Feature tick icon Offline reading on the mobile app
Feature tick icon Simple pricing, no contract
€189.99 billed annually
Feature tick icon Unlimited access to Packt's library of 7,000+ practical books and videos
Feature tick icon Constantly refreshed with 50+ new titles a month
Feature tick icon Exclusive Early access to books as they're written
Feature tick icon Solve problems while you work with advanced search and reference features
Feature tick icon Offline reading on the mobile app
Feature tick icon Choose a DRM-free eBook or Video every month to keep
Feature tick icon PLUS own as many other DRM-free eBooks or Videos as you like for just €5 each
Feature tick icon Exclusive print discounts
€264.99 billed in 18 months
Feature tick icon Unlimited access to Packt's library of 7,000+ practical books and videos
Feature tick icon Constantly refreshed with 50+ new titles a month
Feature tick icon Exclusive Early access to books as they're written
Feature tick icon Solve problems while you work with advanced search and reference features
Feature tick icon Offline reading on the mobile app
Feature tick icon Choose a DRM-free eBook or Video every month to keep
Feature tick icon PLUS own as many other DRM-free eBooks or Videos as you like for just €5 each
Feature tick icon Exclusive print discounts

Frequently bought together


Stars icon
Total 124.97
Vulkan Cookbook
€41.99
Learning Vulkan
€45.99
OpenGL 4 Shading Language Cookbook
€36.99
Total 124.97 Stars icon
Banner background image

Table of Contents

12 Chapters
Instance and Devices Chevron down icon Chevron up icon
Image Presentation Chevron down icon Chevron up icon
Command Buffers and Synchronization Chevron down icon Chevron up icon
Resources and Memory Chevron down icon Chevron up icon
Descriptor Sets Chevron down icon Chevron up icon
Render Passes and Framebuffers Chevron down icon Chevron up icon
Shaders Chevron down icon Chevron up icon
Graphics and Compute Pipelines Chevron down icon Chevron up icon
Command Recording and Drawing Chevron down icon Chevron up icon
Helper Recipes Chevron down icon Chevron up icon
Lighting Chevron down icon Chevron up icon
Advanced Rendering Techniques Chevron down icon Chevron up icon

Customer reviews

Top Reviews
Rating distribution
Full star icon Full star icon Half star icon Empty star icon Empty star icon 2.9
(19 Ratings)
5 star 31.6%
4 star 10.5%
3 star 15.8%
2 star 5.3%
1 star 36.8%
Filter icon Filter
Top Reviews

Filter reviews by


Andrew Mitchell Oct 25, 2017
Full star icon Full star icon Full star icon Full star icon Full star icon 5
[Disclaimer: I received the ebook version of this product for free] I love it, the information is presented clearly and since Vulkan is relatively new it's hard to find good resources on it, but this is definitely a good resource for anyone wanting to learn Vulkan!
Amazon Verified review Amazon
Kindle Customer Oct 02, 2017
Full star icon Full star icon Full star icon Full star icon Full star icon 5
Full disclosure: I received a copy of this book from the author; the following review is solely my opinion.The Vulkan Cookbook does an outstanding job of walking through the Vulkan API...with so many new concepts here, the level of detail the author goes into is greatly appreciated.Each chapter's "How to Do it" section provides code samples that cohesively illustrate each new structure and function while going through the steps to create a simple Vulkan renderer.The "How it Works" section of each chapter then describes what's going on under the hood and discusses not just the code, but the concepts behind the code; these sections have helped answer many of my questions.As someone who is currently learning Vulkan, I can say that anyone leaning Vulkan should consider this book to be an indispensable resource.
Amazon Verified review Amazon
cybereality Jan 31, 2018
Full star icon Full star icon Full star icon Full star icon Full star icon 5
So, as of this writing, I have read all 5 books available on Amazon on the Vulkan API and I would say that Vulkan Cookbook is one of the better resources out there. The format of the book is similar to other “cookbooks” you may have seen, with each recipe essentially describing one technique in a stand-alone fashion. Meaning the steps for each one will list fundamentals, like creating a logical device and all the other prerequisites, so you can easily refer back to one chapter when it’s time to implement a particular feature. I would personally recommend reading the text from front-to-back, as I think it’s a better way to learn, but you could certainly jump around and still not miss much (assuming you already have some understanding of Vulkan). Author Pawel Lapinski does a great job of showing real code for each recipe and only shows what is actually necessary for a technique. Unlike some other books, this isn’t a dry listing of the API documentation, rather the author shows practical usage of the API with some brief explanation. For this type of text, I think this works great and I imagine it would be very helpful to refer back to when it comes time to implement into your project.Among the chapters, Lapinski covers: instances and devices, image presentation, command buffers and synchronization, resources and memory, descriptor sets, render passes and framebuffers, shaders, graphics and compute pipelines, command recording and drawing, along with some additional chapters at the end for more general graphics programming concepts like loading textures and 3d models, lighting and shadowing, and cubemapping. Each chapter itself is then broken down into smaller recipes, that could be something like “enumerating available physical devices” to “submitting a command buffer to a queue”. This is really quite a good mix of topics, and, at 700 pages, adequate coverage is given to the most commonly used parts of the Vulkan API. Having already worked through some tutorials online, and read a few other books on Vulkan, most of the topics here were things I had some familiarity toward already, but I still found the reading helpful.Due to the tactical nature of the text, I would recommend the book for more intermediate to advanced programmers. While the author does a great job of explaining the specific steps needed to do particular actions in Vulkan, it may be helpful to at least understand some of the big picture before diving in here. I might even say this is the best book on the market today for Vulkan, though I’d probably also recommend reading it after one of the others available. It may be helpful to start with a Hello World type app in Vulkan, in which case you could first follow the awesome tutorial over at vulkan-tutorial.com, or get Kenwright’s Vulkan Graphics API: in 20 Minutes, which was a little rough but still a cheap and quick way to obtain an overview of the API. For beginners, or maybe people that want to start at a more basic level, Introduction to Computer Graphics and the Vulkan API (also by Kenwright) may be a more comfortable spot to jump in at. And the other books out there were good in their own right, though some of them didn’t move past simple function/structure documentation.One thing I really wish is that someone could make a Vulkan book on the level of Frank Luna’s DirectX series. Luna is able to show many practical graphics programming techniques in one book, and in the end you’ll have a handful of pretty sweet demos to showcase. Though Kenwright attempts this, I still haven’t seen this really accomplished yet for Vulkan. While the end chapters of Vulkan Cookbook do dip into this territory with shadow mapping and post processing, it would be nice to see an entire book written like this. However, given that Vulkan is a relatively new API, it’s probably more useful to start with the basics, and hope that competent readers can port techniques from other APIs once they have a feeling for how things work.Keep in mind, Vulkan is an advanced and complex topic, and a single book won’t teach you everything you need to know. While many of the Vulkan books out today have seemed to release to mixed reviews, I feel that all of them have been helpful. Even reading the same topics explained by different authors can help with knowledge understanding and retention. And there are also some unique things in each book, so I would fully recommend reading them all if you’re really serious about getting into Vulkan. I realize there are some advanced coders that can study the documentation and hit the ground running, but I find the “guided tour” offered from books to be more conducive to learning for me personally. Your opinion my differ, but I’d have to say that you can’t really go wrong with Vulkan Cookbook by Pawel Lapinski. Recommended.
Amazon Verified review Amazon
Michael Williams May 25, 2017
Full star icon Full star icon Full star icon Full star icon Full star icon 5
There are very few sources for Vulkan even on the internet. This is the best book or any documentation really that you'll find on it. The other books are just basic documentation and grossly complex for the sake of complexity. This book actually takes you step by step with great detail
Amazon Verified review Amazon
HumanComplex May 01, 2018
Full star icon Full star icon Full star icon Full star icon Full star icon 5
very clear (given the subject material, vulkan is stupidly verbose). tons of practical examples.
Amazon Verified review Amazon
Get free access to Packt library with over 7500+ books and video courses for 7 days!
Start Free Trial

FAQs

What is included in a Packt subscription? Chevron down icon Chevron up icon

A subscription provides you with full access to view all Packt and licnesed content online, this includes exclusive access to Early Access titles. Depending on the tier chosen you can also earn credits and discounts to use for owning content

How can I cancel my subscription? Chevron down icon Chevron up icon

To cancel your subscription with us simply go to the account page - found in the top right of the page or at https://subscription.packtpub.com/my-account/subscription - From here you will see the ‘cancel subscription’ button in the grey box with your subscription information in.

What are credits? Chevron down icon Chevron up icon

Credits can be earned from reading 40 section of any title within the payment cycle - a month starting from the day of subscription payment. You also earn a Credit every month if you subscribe to our annual or 18 month plans. Credits can be used to buy books DRM free, the same way that you would pay for a book. Your credits can be found in the subscription homepage - subscription.packtpub.com - clicking on ‘the my’ library dropdown and selecting ‘credits’.

What happens if an Early Access Course is cancelled? Chevron down icon Chevron up icon

Projects are rarely cancelled, but sometimes it's unavoidable. If an Early Access course is cancelled or excessively delayed, you can exchange your purchase for another course. For further details, please contact us here.

Where can I send feedback about an Early Access title? Chevron down icon Chevron up icon

If you have any feedback about the product you're reading, or Early Access in general, then please fill out a contact form here and we'll make sure the feedback gets to the right team. 

Can I download the code files for Early Access titles? Chevron down icon Chevron up icon

We try to ensure that all books in Early Access have code available to use, download, and fork on GitHub. This helps us be more agile in the development of the book, and helps keep the often changing code base of new versions and new technologies as up to date as possible. Unfortunately, however, there will be rare cases when it is not possible for us to have downloadable code samples available until publication.

When we publish the book, the code files will also be available to download from the Packt website.

How accurate is the publication date? Chevron down icon Chevron up icon

The publication date is as accurate as we can be at any point in the project. Unfortunately, delays can happen. Often those delays are out of our control, such as changes to the technology code base or delays in the tech release. We do our best to give you an accurate estimate of the publication date at any given time, and as more chapters are delivered, the more accurate the delivery date will become.

How will I know when new chapters are ready? Chevron down icon Chevron up icon

We'll let you know every time there has been an update to a course that you've bought in Early Access. You'll get an email to let you know there has been a new chapter, or a change to a previous chapter. The new chapters are automatically added to your account, so you can also check back there any time you're ready and download or read them online.

I am a Packt subscriber, do I get Early Access? Chevron down icon Chevron up icon

Yes, all Early Access content is fully available through your subscription. You will need to have a paid for or active trial subscription in order to access all titles.

How is Early Access delivered? Chevron down icon Chevron up icon

Early Access is currently only available as a PDF or through our online reader. As we make changes or add new chapters, the files in your Packt account will be updated so you can download them again or view them online immediately.

How do I buy Early Access content? Chevron down icon Chevron up icon

Early Access is a way of us getting our content to you quicker, but the method of buying the Early Access course is still the same. Just find the course you want to buy, go through the check-out steps, and you’ll get a confirmation email from us with information and a link to the relevant Early Access courses.

What is Early Access? Chevron down icon Chevron up icon

Keeping up to date with the latest technology is difficult; new versions, new frameworks, new techniques. This feature gives you a head-start to our content, as it's being created. With Early Access you'll receive each chapter as it's written, and get regular updates throughout the product's development, as well as the final course as soon as it's ready.We created Early Access as a means of giving you the information you need, as soon as it's available. As we go through the process of developing a course, 99% of it can be ready but we can't publish until that last 1% falls in to place. Early Access helps to unlock the potential of our content early, to help you start your learning when you need it most. You not only get access to every chapter as it's delivered, edited, and updated, but you'll also get the finalized, DRM-free product to download in any format you want when it's published. As a member of Packt, you'll also be eligible for our exclusive offers, including a free course every day, and discounts on new and popular titles.