Appendix A. Installing Visual SourceSafe 2005
In this appendix, we will see how to install Visual SourceSafe 2005 and how to configure it for remote access using the internet plug-in. When installing Visual SourceSafe 2005 we have two types of configurations; the server and the clients.
Note
Installation of Visual SourceSafe 2005 on the Intel Itanium (IA64) is not supported.
Both installation configurations must be performed by a user with Windows administration privileges. The installation requires the .NET Framework 2.0 and the Microsoft Document Explorer 2005. If they are not already installed, they will be installed by the Visual SourceSafe 2005 Setup.
Note
If you have installed any previous versions of Visual SourceSafe, such as Visual SourceSafe 6.0d or any other previous version, then you must uninstall it before beginning to install Visual SourceSafe 2005.
SourceSafe 2005 should not be installed side by side with any previous version of SourceSafe, otherwise the correct operation of either version cannot be guaranteed. Furthermore, there is no need to keep previous versions of the product installed, because SourceSafe 2005 can operate against existing SourceSafe 6.0 databases.
Server Requirements
The Visual SourceSafe server hosts the SourceSafe databases, the LAN Booster Windows service, and the remote HTTP XML web service.
Although you can use Windows Professional editions to install SourceSafe as a server, to avoid connection limitations you must use a Windows Server operating system.
Note
Windows XP only supports a maximum of 10 concurrent client incoming sessions, which is sub-optimal if you plan to share your SourceSafe web service with other team members.
The server should have installed the network file sharing service (to enable shared folders), the TCP/IP protocol, an SSL Certificate (if you want to use remote access using HTTPS secure connections) and, for best security, a NTFS file system on the drives that will host SourceSafe databases. We will see how to create and install an SSL certificate in the Configuring SourceSafe for Remote Access section.
SourceSafe 2005 supports databases with a maximum individual file size of 4GB. While there is no limit for the database size, it is recommended to keep the database size to less than 4-5GB so that database maintenance tools like Analyze can run faster as well as often. The database drives must have enough disk space to accommodate database growth, especially when performing file operations like branching. To protect against disk drive failures, the server can have a Redundant Array of Independent Disks (RAID) configuration on the database drives.
Client Requirements
Note
When used as a source control provider for Visual Studio, the Visual SourceSafe 2005 client requirements fall into the requirements for running Visual Studio. Although administrator privileges are required for installation, after installation SourceSafe clients can run under normal user accounts.
SourceSafe Installation
The server installation is started by executing Setup.exe from the SourceSafe installation kit.
After loading the required components, the SourceSafe Setup displays the Start Page:
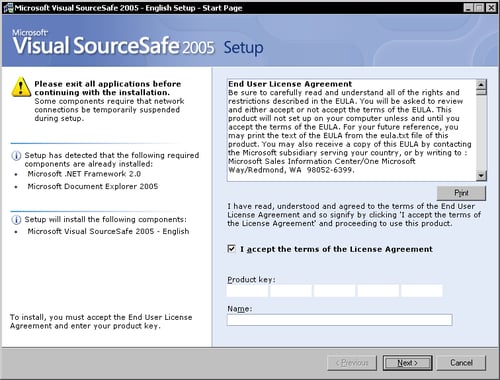
The Start Page asks for the product key, the user name, and the acceptance of the terms of the license agreement.
Note
Every individual installation of SourceSafe requires a separate license. You can reuse the same product key on multiple installations but you must have a license for every one in order to avoid violating the copyright law.
After accepting the license agreement and entering a product key click the Next button to advance to the Options Page:
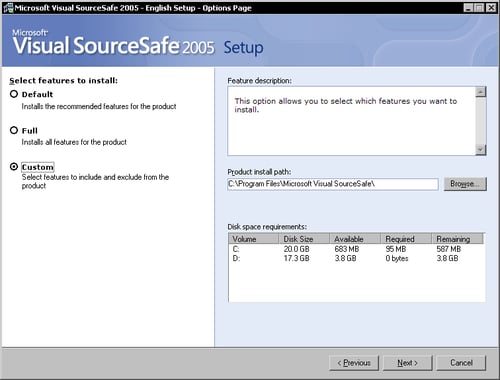
The Options Page lets you choose from the Default, Full, and Custom install options. To specifically select which components to install, choose the Custom option. Also you can leave the default installation path or set a custom installation path. Click Next to advance to the second Options Page:
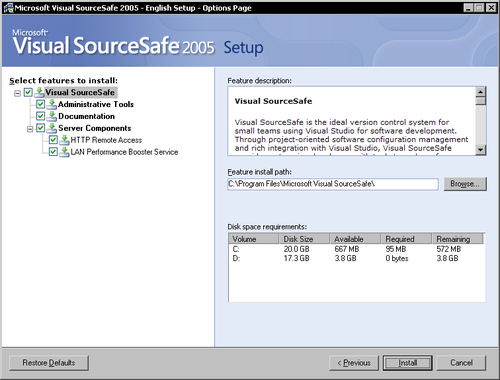
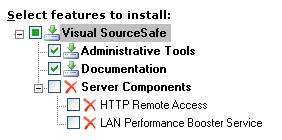
The second Options Page lets you choose the components you want to install.
Visual SourceSafe: Installs the client components such as Visual SourceSafe Explorer.
Administrative Tools: Installs the Visual SourceSafe Administrator and tools for database maintenance.
Documentation: Installs the Visual SourceSafe documentation.
Server Components: Installs the server components:
HTTP Remote Access: Installs the HTTP web service components.
LAN Performance Booster Service: Installs the LAN booster Windows service.
Server Configuration
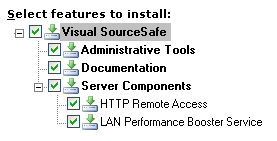
To install SourceSafe 2005 on the server machine, select all the components.
Client Configuration
To install SourceSafe 2005 on the client machines, select only the client components. In the Options Page uncheck the Server Components section.
Finishing the Installation
After choosing the components to install, click Install to advance to the Install Page and finish the installation. After all components are installed, the Setup displays the Finish Page.
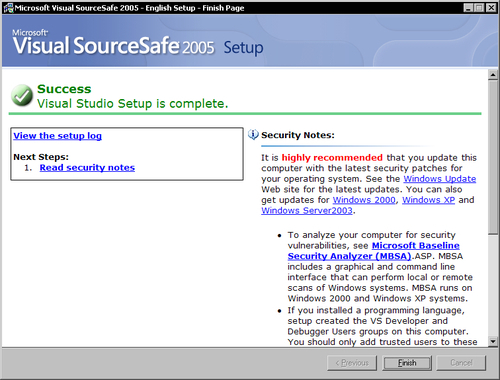
Click Finish to close the setup. .


