Scene building
Now that we've seen how to transform objects and navigate the scene viewport successfully, let's proceed to complete our first level for the coin collection game. Let's separate the two floor meshes apart in space, leaving a gap between them that we'll fix by creating a bridge, which the player will be able to cross, moving between the floor spaces like islands. We can use the translate tool (W) to move objects around. See Figure 1.29:

Figure 1.29: Separating the floor meshes into islands
Tip
If you want to create more floor objects, you can use the method that we've seen already by dragging and dropping the mesh asset in the Project panel in the Scene viewport. Alternatively, you can duplicate the selected object in the viewport by pressing Ctrl + D on the keyboard. Both methods produce the same result.
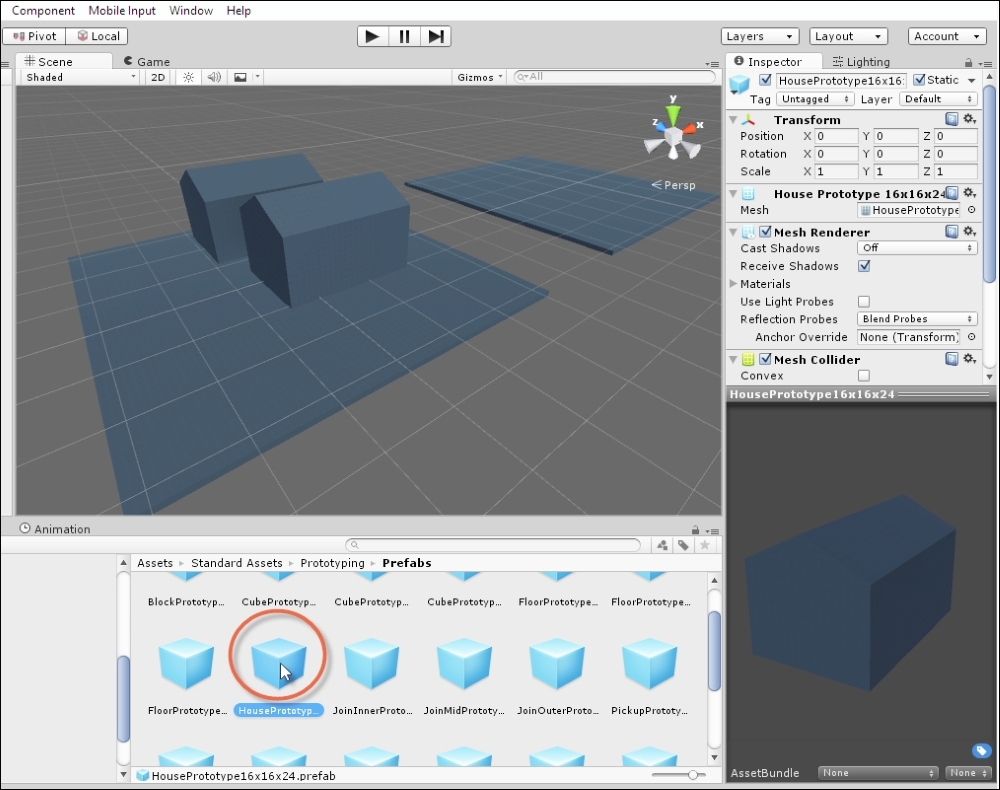
Next, we'll add some props and obstacles to the scene. Drag and drop some house objects onto the floor. The house object (HousePrototype16x16x24) is found in the Assets | Standard Assets | Prototyping | Prefabs folder. See Figure 1.30:

Figure 1.30: Adding house props to the scene
On dragging and dropping the house in the scene, it may align to the floor nicely with the bottom against the floor, or it may not align like that. If it does, that's splendid and great luck! However, we shouldn't rely on luck every time because we're professional game developers! Thankfully, we can make any two mesh objects align easily in Unity using vertex snapping. This feature works by forcing two objects into positional alignment within the scene by overlapping their vertices at a specific and common point.
For example, consider Figure 1.31. Here, a house object hovers awkwardly above the floor and we naturally want it to align level with the floor and perhaps over to the floor corner. To achieve this, start by selecting the house object (click on it or select it from the Hierarchy panel). The object to be selected is the one that should move to align and not the destination (which is the floor), which should remain in place.

Figure 1.31: Misaligned objects can be snapped into place with Vertex Snapping
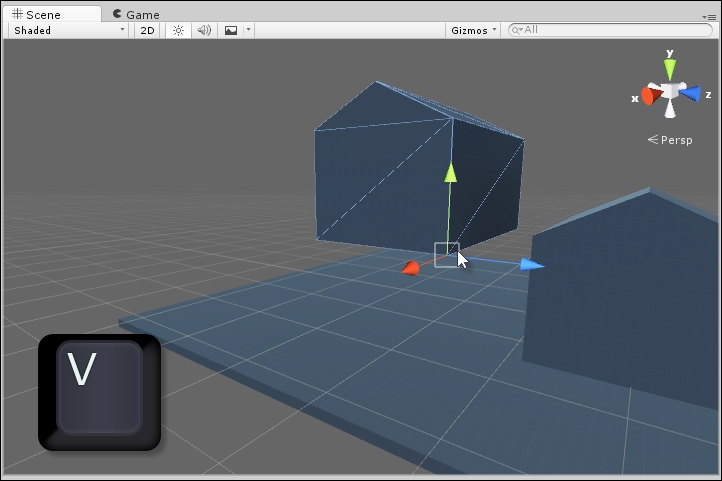
Next, activate the translate tool (W) and hold down the V key for vertex snapping. With V held down, move the cursor around and see how the Gizmo cursor sticks to the nearest vertex of the selected mesh. See Figure 1.32. Unity is asking you to pick a source vertex for the snapping:

Figure 1.32: Hold down V to activate Vertex Snapping
With V held down, move the cursor to the bottom corner of the house, and then click and drag from the corner to the floor mesh corner. The house will then snap align to the floor, corner to corner. When aligned this way, it release the V key, and the two meshes get aligned exactly at the vertices. See Figure 1.33:

Figure 1.33: Align two meshes by vertices
Now you can assemble a complete scene using the mesh assets included in the Prototyping package. Drag and drop props in the scene, and using translate, rotate, and scale, you can reposition, realign, and rotate these objects; using vertex snapping, you can align them wherever you need. Give this some practice. See Figure 1.34 for the scene arrangement that I made using only these tools and assets:

Figure 1.34: Building a complete level


