Building an entity model for use in the rest of the book
Websites and web services usually need to work with data in a relational database or another data store. There are several technologies that could be used, from lower-level ADO.NET to higher-level EF Core. We will use EF Core since it is flexible and more familiar to .NET developers.
In this section, we will define an EF Core entity data model for a database named Northwind stored in SQL Server. It will be used in most of the projects that we create in subsequent chapters.
Northwind database SQL scripts
The script for SQL Server creates 13 tables as well as related views and stored procedures. The SQL scripts are found at https://github.com/markjprice/web-dev-net9/tree/main/scripts/sql-scripts.
There are multiple SQL scripts to choose from, as described in the following list:
Northwind4AzureSqlEdgeDocker.sqlscript: To use SQL Server on a local computer in Docker. The script creates the Northwind database. It does not drop it if it already exists because the Docker container should be empty anyway as a fresh one will be spun up each time. This is my recommendation. Instructions to install Docker and set up a SQL Edge image and container are in the next section of this book.Northwind4SqlServer.sqlscript: To use SQL Server on a local Windows or Linux computer. The script checks if the Northwind database already exists and if necessary drops it before creating it. Instructions to install SQL Server Developer Edition (free) on your local Windows computer can be found in the GitHub repository for this book at https://github.com/markjprice/web-dev-net9/blob/main/docs/sql-server/README.md.Northwind4AzureSqlDatabaseCloud.sqlscript: To use SQL Server with an Azure SQL Database resource created in the Azure cloud. You will need an Azure account; these resources cost money as long as they exist! The script does not drop or create the Northwind database because you should manually create the Northwind database using the Azure portal user interface. The script only creates the database objects, including the table structure and data.
Installing Docker and the Azure SQL Edge container image
Docker provides a consistent environment across development, testing, and production, minimizing the “it works on my machine” issue. Docker containers are more lightweight than traditional virtual machines, making them faster to start up and less resource-intensive.
Docker containers can run on any system with Docker installed, making it easy to move databases between environments or across different machines. You can quickly spin up a SQL database container with a single command, making setup faster and more reproducible. Each database instance runs in its own container, ensuring that it is isolated from other applications and databases on the same machine.
You can install Docker on any operating system and use a container that has Azure SQL Edge, a cross-platform minimal featured version of SQL Server that only includes the database engine. For personal, educational, and small business use, Docker Desktop is free to use. It includes the full set of Docker features, including container management and orchestration. The Docker Command-line Interface (CLI) and Docker engine are open source and free to use, allowing developers to build, run, and manage containers.
Docker also has paid tiers that offer additional features, such as enhanced security, collaboration tools, more granular access control, priority support, and higher rate limits on Docker Hub image pull.
The Docker image we will use has Azure SQL Edge based on Ubuntu 18.4. It is supported with Docker Engine 1.8 or later. Azure SQL Edge requires a 64-bit processor (either x64 or ARM64), with a minimum of one processor and 1 GB RAM on the host:
- Install Docker Desktop from the following link: https://docs.docker.com/engine/install/
- Start Docker Desktop, which could take a few minutes on the initial start, as shown in Figure 1.6:
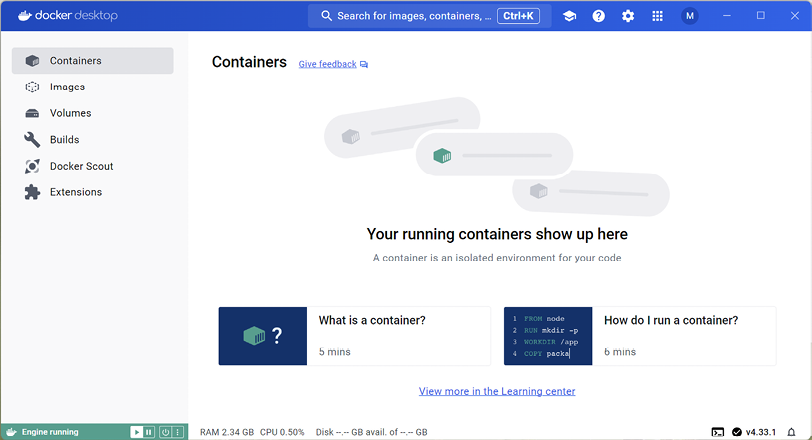
Figure 1.6: Docker Desktop v4.33.1 (August 2024) on Windows
- At the command prompt or terminal, pull down the latest container image for Azure SQL Edge, as shown in the following command:
docker pull mcr.microsoft.com/azure-sql-edge:latest - Wait for the image as it is downloading, as shown in the following output:
latest: Pulling from azure-sql-edge a055bf07b5b0: Pull complete cb84717c05a1: Pull complete 35d9c30b7f54: Downloading [========================> ] 20.46MB/42.55MB 46be68282524: Downloading [============> ] 45.94MB/186MB 5eee3e29ad15: Downloading [======================================> ] 15.97MB/20.52MB 15bd653c6216: Waiting d8d6247303da: Waiting c31fafd6718a: Waiting fa1c91dcb9c8: Waiting 1ccbfe988be8: Waiting - Note the results, as shown in the following output:
latest: Pulling from azure-sql-edge
2f94e549220a: Pull complete
830b1adc1e72: Pull complete
f6caea6b4bd2: Pull complete
ef3b33eb5a27: Pull complete
8a42011e5477: Pull complete
f173534aa1e4: Pull complete
6c1894e17f11: Pull complete
a81c43e790ea: Pull complete
c3982946560a: Pull complete
25f31208d245: Pull complete
Digest: sha256:7c203ad8b240ef3bff81ca9794f31936c9b864cc165dd187c23c5bfe06cf0340
Status: Downloaded newer image for mcr.microsoft.com/azure-sql-edge:latest
mcr.microsoft.com/azure-sql-edge:latest
Running the Azure SQL Edge container image
Now we can run the image:
- At the command prompt or terminal, run the container image for Azure SQL Edge with a strong password and name the container
azuresqledge, as shown in the following command:docker run --cap-add SYS_PTRACE -e 'ACCEPT_EULA=1' -e 'MSSQL_SA_PASSWORD=s3cret-Ninja' -p 1433:1433 --name azuresqledge -d mcr.microsoft.com/azure-sql-edge
Good Practice: The password must be at least eight characters long and contain characters from three of the following four sets: uppercase letters, lowercase letters, digits, and symbols. Otherwise, the container cannot set up the SQL Edge engine and will stop working.
On Windows 11, running the container image at the command prompt failed for me. See the next section titled Running a container using the user interface for steps that worked.
- If your operating system firewall blocks access, then allow access.
- In Docker Desktop, in the Containers section, confirm that the image is running, as shown in Figure 1.7:
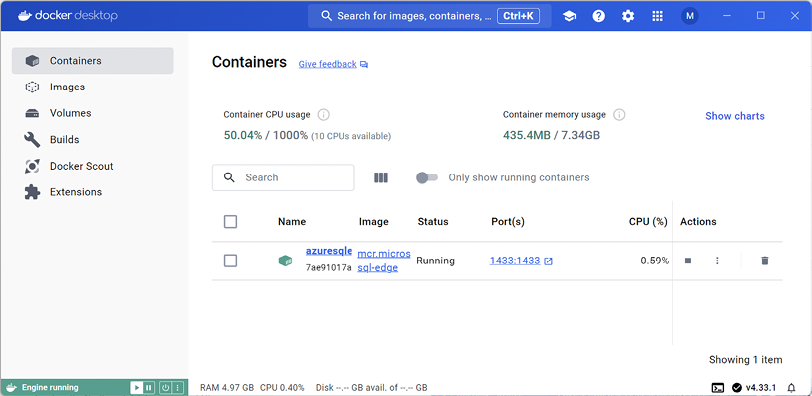
Figure 1.7: Azure SQL Edge running in Docker Desktop on Windows
- At the command prompt or terminal, ask Docker to list all containers, both running and stopped, as shown in the following command:
docker ps -a - Note the container is “Up” and listening externally on port
1433, which is mapped to its internal port1433, as shown highlighted in the following output:CONTAINER ID IMAGE COMMAND CREATED STATUS PORTS NAMES 183f02e84b2a mcr.microsoft.com/azure-sql-edge "/opt/mssql/bin/perm…" 8 minutes ago Up 8 minutes 1401/tcp, 0.0.0.0:1433->1433/tcp azuresqledge
More Information: You can learn more about the docker ps command at https://docs.docker.com/engine/reference/commandline/ps/.
Running a container using the user interface
If you successfully ran the SQL Edge container, then you can skip this section and continue with the next section, titled Connecting to Azure SQL Edge in a Docker container.
If entering a command at the prompt or terminal fails for you, try following these steps to use the user interface:
- In Docker Desktop, navigate to the Images tab.
- In the mcr.microsoft.com/azuresqledge row, click the Run action.
- In the Run a new container dialog box, expand Optional settings, and complete the configuration, as shown in Figure 1.8 and in the following items:
- Container name:
azuresqledge, or leave blank to use a random name. - Ports:
- Enter
1401to map to :1401/tcp. - Enter
1433to map to :1433/tcp.
- Enter
- Volumes: leave empty.
- Environment variables (click + to add a second one):
- Enter
ACCEPT_EULAwith valueY(or1). - Enter
MSSQL_SA_PASSWORDwith values3cret-Ninja.
- Enter
- Container name:
- Click Run.
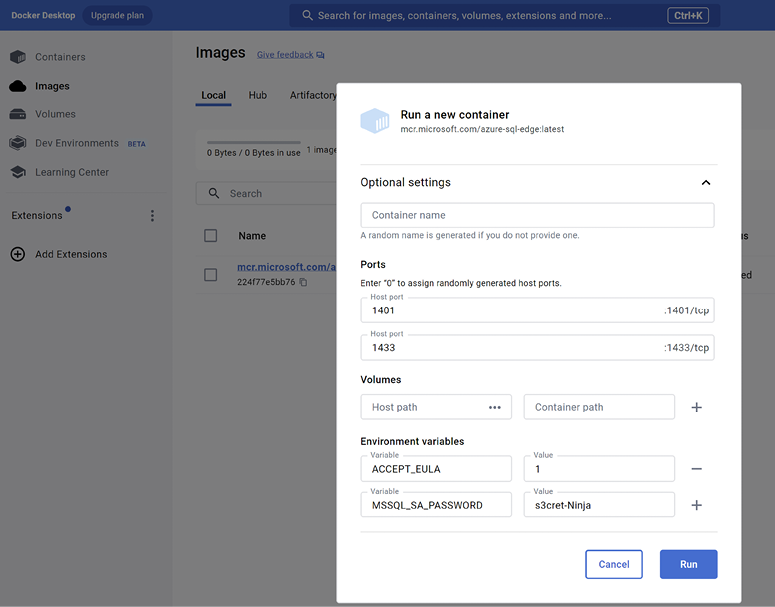
Figure 1.8: Running a container for Azure SQL Edge with the user interface
Connecting to Azure SQL Edge in a Docker container
Use your preferred database tool to connect to Azure SQL Edge in the Docker container. Some common database tools are shown in the following list:
- Windows only:
- SQL Server Management Studio (SSMS): The most popular and comprehensive tool for managing SQL Server databases. Free to download from Microsoft.
- SQL Server Data Tools (SSDT): Integrated into Visual Studio and free to use, SSDT provides database development tools for designing, deploying, and managing SQL Server databases.
- Cross-platform for Windows, macOS, Linux:
- VS Code’s MS SQL extension: Query execution, IntelliSense, database browsing, and connection to SQL Server databases.
- Azure Data Studio: A cross-platform database management tool focused on query editing, data insights, and lightweight management.
Some notes about the database connection string for SQL Edge:
- Data Source, a.k.a. server:
tcp:127.0.0.1,1433 - You must use SQL Server Authentication, a.k.a. SQL Login. That is, you must supply a username and password. The Azure SQL Edge image has the
sauser already created and you had to give it a strong password when you ran the container. We chose the passwords3cret-Ninja. - You must select the Trust Server Certificate check box.
- Initial Catalog, a.k.a. database:
masteror leave blank. (We will create the Northwind database using a SQL script so we do not specify that as the database name yet.)
Connecting from Visual Studio
To connect to SQL Edge using Visual Studio:
- In Visual Studio, navigate to View | Server Explorer.
- In the mini-toolbar, click the Connect to Database... button.
- Enter the connection details, as shown in Figure 1.9:
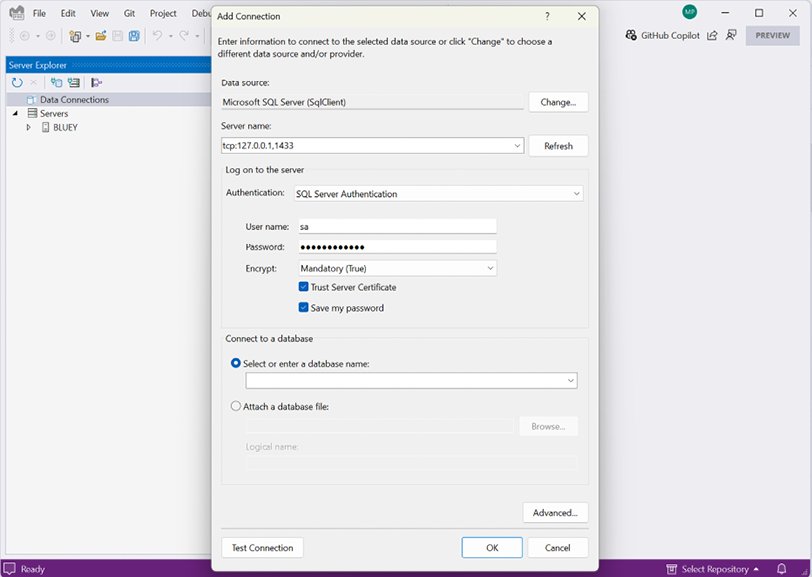
Figure 1.9: Connecting to your Azure SQL Edge server from Visual Studio
Connecting from VS Code
To connect to SQL Edge using VS Code:
- In VS Code, navigate to the SQL Server extension. Note that the
mssqlextension might take a few minutes to initialize the first time. - In the SQL extension, click Add Connection....
- Enter the server name
tcp:127.0.0.1,1433, as shown in Figure 1.10:

Figure 1.10: Specifying the server name
- Leave the database name blank by pressing Enter, as shown in Figure 1.11:

Figure 1.11: Specifying the database name (leave blank)
- Select SQL Login, as shown in Figure 1.12:

Figure 1.12: Choosing SQL Login to authenticate
- Enter the user ID
sa, as shown in Figure 1.13:

Figure 1.13: Entering the user ID of sa
- Enter the password
s3cret-Ninja, as shown in Figure 1.14:

Figure 1.14: Entering the password
- Select Yes to save the password for the future, as shown in Figure 1.15:

Figure 1.15: Saving the password for future use
- Enter a connection profile name,
Azure SQL Edge in Docker, as shown in Figure 1.16:

Figure 1.16: Naming the connection
- Click Enable Trust Server Certificate, as shown in Figure 1.17:
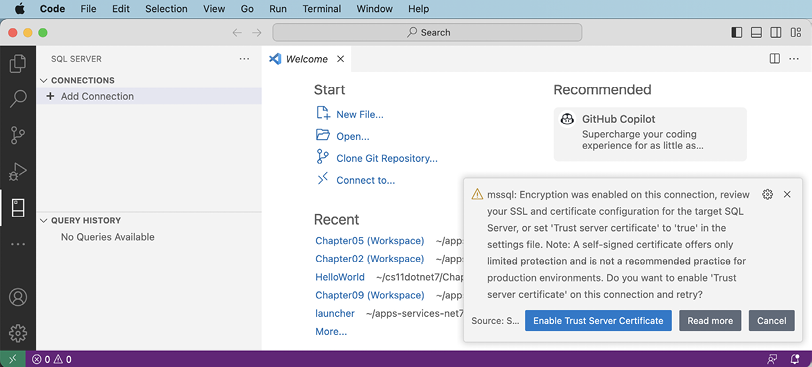
Figure 1.17: Trusting the local developer certificate
- Note the success notification message.
Creating the Northwind database using a SQL script
Now you can use your preferred code editor (or database tool) to execute the SQL script to create the Northwind database in SQL Edge:
- Open the
Northwind4AzureSQLEdgeDocker.sqlfile. - Execute the SQL script:
- If you are using Visual Studio, right-click in the script, then select Execute, and then wait to see the
Command completed successfullymessage. - If you are using VS Code, right-click in the script, select Execute Query, select the Azure SQL Edge in Docker connection profile, and then wait to see the
Commands completed successfullymessage.
- If you are using Visual Studio, right-click in the script, then select Execute, and then wait to see the
- Refresh the data connection:
- If you are using Visual Studio, then in Server Explorer, right-click Tables and select Refresh.
- If you are using VS Code, then right-click the Azure SQL Edge in Docker connection profile and choose Refresh.
- Expand Databases, expand Northwind, and then expand Tables.
- Note that 13 tables have been created, for example,
Categories,Customers, andProducts. Also note that dozens of views and stored procedures have also been created, as shown in Figure 1.18:
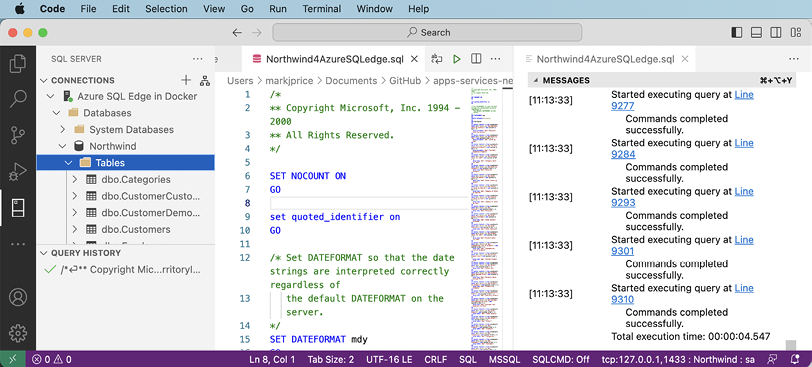
Figure 1.18: Northwind database created by SQL script in VS Code
You now have a running instance of Azure SQL Edge containing the Northwind database that you can connect to from your ASP.NET Core projects.
Removing Docker resources
When you have completed all the chapters in the book, or you plan to use a full SQL Server or Azure SQL Database instead of a SQL Edge container, and you want to remove all the Docker resources, then follow these steps:
- At the command prompt or terminal, stop the
azuresqledgecontainer, as shown in the following command:docker stop azuresqledge - At the command prompt or terminal, remove the
azuresqledgecontainer, as shown in the following command:docker rm azuresqledge
Warning! Removing the container will delete all data inside it.
- At the command prompt or terminal, remove the
azure-sql-edgeimage to release its disk space, as shown in the following command:docker rmi mcr.microsoft.com/azure-sql-edge
Setting up the EF Core CLI tool
The .NET CLI tool named dotnet can be extended with capabilities useful for working with EF Core. It can perform design-time tasks like creating and applying migrations from an older model to a newer model and generating code for a model from an existing database.
The dotnet-ef command-line tool is not automatically installed. You must install this package as either a global or local tool. If you have already installed an older version of the tool, then you should update it to the latest version:
- At a command prompt or terminal, check if you have already installed
dotnet-efas a global tool, as shown in the following command:dotnet tool list --global - Check in the list if an older version of the tool has been installed, like the one for .NET 7, as shown in the following output:
Package Id Version Commands ------------------------------------- dotnet-ef 9.0.0 dotnet-ef - If an old version is installed, then update the tool, as shown in the following command:
dotnet tool update --global dotnet-ef - If it is not already installed, then install the latest version, as shown in the following command:
dotnet tool install --global dotnet-ef
If necessary, follow any OS-specific instructions to add the dotnet tools directory to your PATH environment variable, as described in the output of installing the dotnet-ef tool.
By default, the latest GA release of .NET will be used to install the tool. To explicitly set a version, for example, to use a preview, add the --version switch. For example, to update to the latest .NET 10 preview or release candidate version (that will be available from February 2025 to October 2025), use the following command with a version wildcard:
dotnet tool update --global dotnet-ef --version 10.0-*
Once the .NET 10 GA release happens in November 2025, you can just use the command without the --version switch to upgrade.
You can also remove the tool, as shown in the following command:
dotnet tool uninstall --global dotnet-ef
Creating a class library for entity models
You will now define entity data models in a class library so that they can be reused in other types of projects, including client-side app models.
Good Practice: You should create a separate class library project for your entity data models from the class library for your data context. This allows easier sharing of the entity models between backend web servers and frontend desktop, mobile, and Blazor clients, while only the backend needs to reference the data context class library.
We will automatically generate some entity models using the EF Core command-line tool:
- Use your preferred code editor to create a new project and solution, as defined in the following list:
- Project template: Class Library /
classlib - Project file and folder:
Northwind.EntityModels - Solution file and folder:
MatureWeb
- Project template: Class Library /
You can target either .NET 8 (LTS) or .NET 9 (STS) for all the projects in this book but you should be consistent. If you choose .NET 9 for the class libraries, then choose .NET 9 for later MVC and Web API projects.
- In the
Northwind.EntityModelsproject, add package references for the SQL Server database provider and EF Core design-time support, as shown in the following markup:<ItemGroup> <PackageReference Include="Microsoft.EntityFrameworkCore.SqlServer" /> <PackageReference Include="Microsoft.EntityFrameworkCore.Design"> <PrivateAssets>all</PrivateAssets> <IncludeAssets>runtime; build; native; contentfiles; analyzers; buildtransitive</IncludeAssets> </PackageReference> </ItemGroup> - Delete the
Class1.csfile. - Build the
Northwind.EntityModelsproject to restore packages. - Make sure that the SQL Edge container is running because you are about to connect to the server and its Northwind database.
- At a command prompt or terminal, in the
Northwind.EntityModelsproject folder (the folder that contains the.csprojproject file), generate entity class models for all tables, as shown in the following command:dotnet ef dbcontext scaffold "Data Source=tcp:127.0.0.1,1433;Initial Catalog=Northwind;User Id=sa;Password=s3cret-Ninja;TrustServerCertificat e=true;" Microsoft.EntityFrameworkCore.SqlServer --namespace Northwind.EntityModels --data-annotations
Note the following:
- The command to perform:
dbcontext scaffold - The connection string:
"Data Source=tcp:127.0.0.1,1433;Initial Catalog=Northwind;User Id=sa;Password=s3cret-Ninja';TrustServerCertificate=true;" - The database provider:
Microsoft.EntityFrameworkCore.SqlServer - The namespace:
--namespace Northwind.EntityModels - To use data annotations as well as the Fluent API:
--data-annotations
Warning! dotnet-ef commands must be entered all on one line and in a folder that contains a project, or you will see the following error: No project was found. Change the current working directory or use the --project option. Remember that all command lines can be found at and copied from the following link:
https://github.com/markjprice/web-dev-net9/blob/main/docs/command-lines.md
Creating a class library for a database context
You will now define a database context class library:
- Add a new project to the solution, as defined in the following list:
- Project template: Class Library /
classlib - Project file and folder:
Northwind.DataContext - Solution file and folder:
MatureWeb
- Project template: Class Library /
- In the
Northwind.DataContextproject, statically and globally import theConsoleclass, add a package reference to the EF Core data provider for SQL Server, and add a project reference to theNorthwind.EntityModelsproject, as shown in the following markup:<ItemGroup Label="To simplify use of WriteLine."> <Using Include="System.Console" Static="true" /> </ItemGroup> <ItemGroup Label="Versions are set at solution-level."> <PackageReference Include="Microsoft.EntityFrameworkCore.SqlServer" /> </ItemGroup> <ItemGroup> <ProjectReference Include="..\Northwind.EntityModels \Northwind.EntityModels.csproj" /> </ItemGroup>
Warning! The path to the project reference should not have a line break in your project file.
- In the
Northwind.DataContextproject, delete theClass1.csfile. - Build the
Northwind.DataContextproject to restore packages. - In the
Northwind.DataContextproject, add a class namedNorthwindContextLogger.cs. - Modify its contents to define a static method named
WriteLinethat appends a string to the end of a text file namednorthwindlog-<date_time>.txton the desktop, as shown in the following code:using static System.Environment; namespace Northwind.EntityModels; public class NorthwindContextLogger { public static void WriteLine(string message) { string folder = Path.Combine(GetFolderPath( SpecialFolder.DesktopDirectory), "book-logs"); if (!Directory.Exists(folder)) Directory.CreateDirectory(folder); string dateTimeStamp = DateTime.Now.ToString( "yyyyMMdd_HHmmss"); string path = Path.Combine(folder, $"northwindlog-{dateTimeStamp}.txt"); StreamWriter textFile = File.AppendText(path); textFile.WriteLine(message); textFile.Close(); } } - Move the
NorthwindContext.csfile from theNorthwind.EntityModelsproject/folder to theNorthwind.DataContextproject/folder.
In Visual Studio Solution Explorer, if you drag and drop a file between projects, it will be copied. If you hold down Shift while dragging and dropping, it will be moved. In VS Code EXPLORER, if you drag and drop a file between projects, it will be moved. If you hold down Ctrl while dragging and dropping, it will be copied.
- In
NorthwindContext.cs, note the second constructor can haveoptionspassed as a parameter, which allows us to override the default database connection string in any projects such as websites that need to work with the Northwind database, as shown in the following code:public NorthwindContext( DbContextOptions<NorthwindContext> options) : base(options) { } - In
NorthwindContext.cs, in theOnConfiguringmethod, remove the compiler#warningabout the connection string and then add statements to dynamically build a database connection string for SQL Edge in Docker, as shown in the following code:protected override void OnConfiguring( DbContextOptionsBuilder optionsBuilder) { if (!optionsBuilder.IsConfigured) { SqlConnectionStringBuilder builder = new(); builder.DataSource = "tcp:127.0.0.1,1433"; // SQL Edge in Docker. builder.InitialCatalog = "Northwind"; builder.TrustServerCertificate = true; builder.MultipleActiveResultSets = true; // Because we want to fail faster. Default is 15 seconds. builder.ConnectTimeout = 3; // SQL Server authentication. builder.UserID = Environment.GetEnvironmentVariable("MY_SQL_USR"); builder.Password = Environment.GetEnvironmentVariable("MY_SQL_PWD"); optionsBuilder.UseSqlServer(builder.ConnectionString); optionsBuilder.LogTo(NorthwindContextLogger.WriteLine, new[] { Microsoft.EntityFrameworkCore .Diagnostics.RelationalEventId.CommandExecuting }); } } - In the
Northwind.DataContextproject, add a class namedNorthwindContextExtensions.cs. Modify its contents to define an extension method that adds the Northwind database context to a collection of dependency services, as shown in the following code:using Microsoft.Data.SqlClient; // To use SqlConnectionStringBuilder. using Microsoft.EntityFrameworkCore; // To use UseSqlServer. using Microsoft.Extensions.DependencyInjection; // To use IServiceCollection. namespace Northwind.EntityModels; public static class NorthwindContextExtensions { /// <summary> /// Adds NorthwindContext to the specified IServiceCollection. Uses the SqlServer database provider. /// </summary> /// <param name="services">The service collection.</param> /// <param name="connectionString">Set to override the default.</param> /// <returns>An IServiceCollection that can be used to add more services.</returns> public static IServiceCollection AddNorthwindContext( this IServiceCollection services, // The type to extend. string? connectionString = null) { if (connectionString is null) { SqlConnectionStringBuilder builder = new(); builder.DataSource = "tcp:127.0.0.1,1433"; // SQL Edge in Docker. builder.InitialCatalog = "Northwind"; builder.TrustServerCertificate = true; builder.MultipleActiveResultSets = true; // Because we want to fail faster. Default is 15 seconds. builder.ConnectTimeout = 3; // SQL Server authentication. builder.UserID = Environment.GetEnvironmentVariable("MY_SQL_USR"); builder.Password = Environment.GetEnvironmentVariable("MY_SQL_PWD"); connectionString = builder.ConnectionString; } services.AddDbContext<NorthwindContext>(options => { options.UseSqlServer(connectionString); options.LogTo(NorthwindContextLogger.WriteLine, new[] { Microsoft.EntityFrameworkCore .Diagnostics.RelationalEventId.CommandExecuting }); }, // Register with a transient lifetime to avoid concurrency // issues with Blazor Server projects. contextLifetime: ServiceLifetime.Transient, optionsLifetime: ServiceLifetime.Transient); return services; } } - Build the two class libraries and fix any compiler errors.
Setting the user and password for SQL Server authentication
If you are using SQL Server authentication, i.e., you must supply a user and password, then complete the following steps:
- In the
Northwind.DataContextproject, note the statements that setUserIdandPassword, as shown in the following code:// SQL Server authentication. builder.UserId = Environment .GetEnvironmentVariable("MY_SQL_USR"); builder.Password = Environment .GetEnvironmentVariable("MY_SQL_PWD");. - Set the two environment variables at the command prompt or terminal, as shown in the following commands:
- On Windows:
setx MY_SQL_USR <your_user_name> setx MY_SQL_PWD <your_password>- On macOS and Linux:
export MY_SQL_USR=<your_user_name> export MY_SQL_PWD=<your_password> - You will need to restart any command prompts, terminal windows, and applications like Visual Studio for this change to take effect.
Good Practice: Although you could define the two environment variables in the launchSettings.json file of an ASP.NET Core project, you must then be extremely careful not to include that file in a GitHub repository! You can learn how to ignore files in Git at https://docs.github.com/en/get-started/getting-started-with-git/ignoring-files.
Registering dependency services
You can register dependency services with different lifetimes, as shown in the following list:
- Transient: These services are created each time they’re requested. Transient services should be lightweight and stateless.
- Scoped: These services are created once per client request and are disposed of, then the response returns to the client.
- Singleton: These services are usually created the first time they are requested and then shared, although you can provide an instance at the time of registration too.
Introduced in .NET 8 is the ability to set a key for a dependency service. This allows multiple services to be registered with different keys and then retrieved later using that key:
builder.Services.AddKeyedsingleton<IMemoryCache, BigCache>("big");
builder.Services.AddKeyedSingleton<IMemoryCache, SmallCache>("small");
class BigCacheConsumer([FromKeyedServices("big")] IMemoryCache cache)
{
  public object? GetData() => cache.Get("data");
}
class SmallCacheConsumer(IKeyedServiceProvider keyedServiceProvider)
{
  public object? GetData() => keyedServiceProvider
    .GetRequiredKeyedService<IMemoryCache>("small");
}
In this book, you will use all three types of lifetime but we will not need to use keyed services.
By default, a DbContext class is registered using the Scope lifetime, meaning that multiple threads can share the same instance. But DbContext does not support multiple threads. If more than one thread attempts to use the same NorthwindContext class instance at the same time, then you will see the following runtime exception thrown: A second operation started on this context before a previous operation completed. This is usually caused by different threads using the same instance of a DbContext. However, instance members are not guaranteed to be thread-safe.
This happens in Blazor projects with components set to run on the server side because, whenever interactions on the client side happen, a SignalR call is made back to the server where a single instance of the database context is shared between multiple clients. This issue does not occur if a component is set to run on the client side.
Improving the class-to-table mapping
We will make some small changes to improve the entity model mapping and validation rules for SQL Server.
Remember that all code is available in the GitHub repository for the book. Although you will learn more by typing the code yourself, you never have to. Go to the following link and press . to get a live code editor in your browser: https://github.com/markjprice/web-dev-net9.
We will add a regular expression to validate that a CustomerId value is exactly five uppercase letters:
- In
Customer.cs, add a regular expression to validate its primary keyCustomerIdto only allow uppercase Western characters, as shown highlighted in the following code:[Key] [StringLength(5)] [RegularExpression("[A-Z]{5}")] public string CustomerId { get; set; } = null!; - In
Customer.cs, add the[Phone]attribute to itsPhoneproperty, as shown highlighted in the following code:[StringLength(24)] [Phone] public string? Phone { get; set; }
The [Phone] attribute adds the following to the rendered HTML: type="tel". On a mobile phone, this makes the keyboard use the phone dialer instead of the normal keyboard.
- In
Order.cs, decorate theCustomerIdproperty with the same regular expression to enforce five uppercase characters.
Testing the class libraries using xUnit
Several benefits of using xUnit are shown in the following list:
- xUnit is open-source and has a strong community and active development team behind it. This makes it more likely that it will stay up to date with the latest .NET features and best practices. xUnit benefits from a large and active community, which means many tutorials, guides, and third-party extensions are available for it.
- xUnit uses a more simplified and extensible approach compared to older frameworks. It encourages the use of custom test patterns and less reliance on setup and teardown methods, leading to cleaner test code.
- Tests in xUnit are configured using .NET attributes, which makes the test code easy to read and understand. It uses
[Fact]for standard test cases and[Theory]with[InlineData],[ClassData], or[MemberData]for parameterized tests, enabling data-driven testing. This makes it easier to cover many input scenarios with the same test method, enhancing test thoroughness while minimizing effort. - xUnit includes an assertion library that allows for a wide variety of assertions out of the box, making it easier to test a wide range of conditions without having to write custom test code. It can also be extended with popular assertion libraries, like
FluentAssertions, that allow you to articulate test expectations with human-readable reasons. - By default, xUnit supports parallel test execution within the same test collection, which can significantly reduce the time it takes to run large test suites. This is particularly beneficial in continuous integration environments where speed is critical. However, if you run your tests in a memory-limited VPS (Virtual Private Server), then that impacts how much data the server can handle at any given time and how many applications or processes it can run concurrently. In this scenario, you might want to disable parallel test execution. Memory-limited VPS instances are typically used as cheap testing environments.
- xUnit offers precise control over the test lifecycle with setup and teardown commands through the use of the constructor and destructor patterns and the
IDisposableinterface, as well as with the[BeforeAfterTestAttribute]for more granular control.
Now let’s build some unit tests to ensure the class libraries are working correctly.
Let’s write the tests:
- Use your preferred coding tool to add a new xUnit Test Project [C#] /
xunitproject namedNorthwind.UnitTeststo theMatureWebsolution. - In the
Northwind.UnitTestsproject, delete the version numbers specified for the testing packages in the project file. (Visual Studio and other code editors will give errors if you have projects that should use CPM but specify their own package versions without using theVersionOverrideattribute.) - In the
Northwind.UnitTestsproject, add a project reference to theNorthwind.DataContextproject, as shown in the following configuration:<ItemGroup> <PackageReference Include="coverlet.collector" /> <PackageReference Include="Microsoft.NET.Test.Sdk" /> <PackageReference Include="xunit" /> <PackageReference Include="xunit.runner.visualstudio" /> </ItemGroup> <ItemGroup> <ProjectReference Include="..\Northwind.DataContext \Northwind.DataContext.csproj" /> </ItemGroup>
Warning! The project reference must go all on one line with no line break.
- Build the
Northwind.UnitTestsproject to build referenced projects. - Rename
UnitTest1.cstoEntityModelTests.cs. - Modify the contents of the file to define two tests, the first to connect to the database and the second to confirm there are eight categories in the database, as shown in the following code:
using Northwind.EntityModels; // To use NorthwindContext. namespace Northwind.UnitTests; public class EntityModelTests { [Fact] public void DatabaseConnectTest() { using NorthwindContext db = new(); Assert.True(db.Database.CanConnect()); } [Fact] public void CategoryCountTest() { using NorthwindContext db = new(); int expected = 8; int actual = db.Categories.Count(); Assert.Equal(expected, actual); } [Fact] public void ProductId1IsChaiTest() { using NorthwindContext db = new(); string expected = "Chai"; Product? product = db.Products.Find(keyValues: 1); string actual = product?.ProductName ?? string.Empty; Assert.Equal(expected, actual); } } - Run the unit tests:
- If you are using Visual Studio, then navigate to Test | Run All Tests, and then view the results in Test Explorer.
- If you are using VS Code, then in the
Northwind.UnitTestsproject’s TERMINAL window, run the tests, as shown in the following command:dotnet test. Alternatively, use the TESTING window if you have installed C# Dev Kit.
- Note that the results should indicate that three tests ran, and all passed, as shown in Figure 1.19:
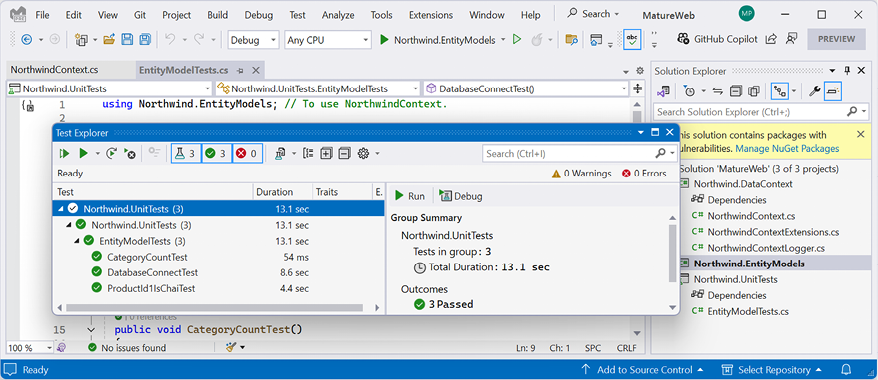
Figure 1.19: Three successful unit tests ran
If any of the tests fail, then try fix the issue.


