Other Base Flange options and flattening parts
In the previous section, we introduced Base Flanges, which are usually the first feature of your Sheet Metal part. As an example, we sketched a simple rectangle and then used this to make a rectangular Base Flange. This type of Base Flange is called a Single Closed profile because it only contains one single profile and that profile is closed (that is, it has no open areas or gaps in the outer perimeter). This can be seen in Figure 1.17.
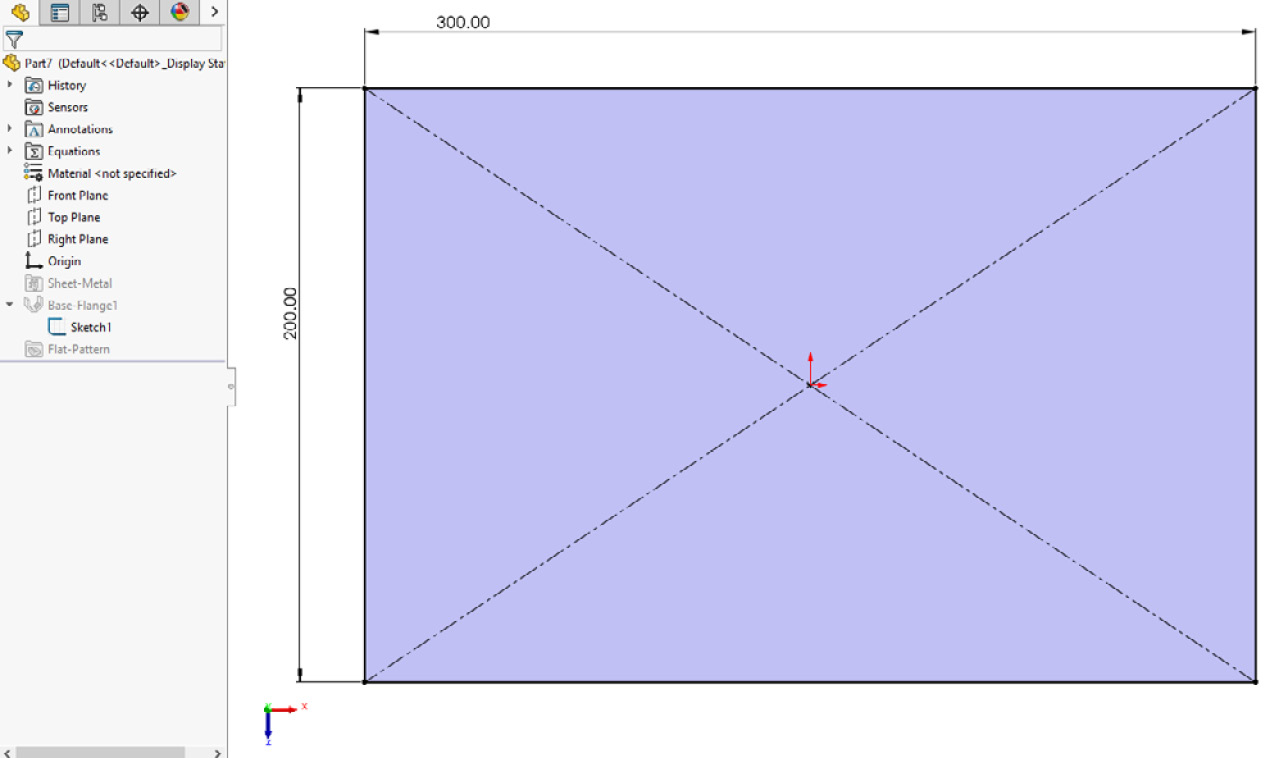
Figure 1.17: A Single Closed profile contains one single profile, which is closed
However, two other options can be useful for creating different kinds of Base Flanges. These are the Multiple Contained Closed and the Single Open Contour profiles. It's not too important to remember the specific names, as long as you know how to use each type.
Multiple Contained Closed
For our previous Base Flange, we just used one single closed profile, but closed profiles can also contain other closed profiles within them. This type is known as Multiple Contained Closed and can be useful for adding holes and cutouts to your Base Flange. An example of this is shown in Figure 1.18.
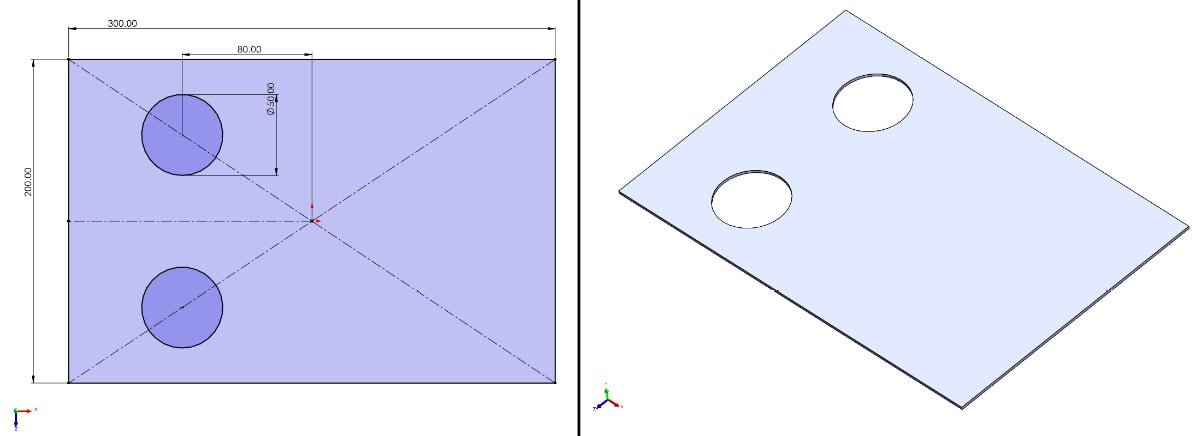
Figure 1.18: Multiple Contained Closed Base Flanges can contain smaller closed profiles within one larger closed profile
Although using the Multiple Contained Closed option for creating Base Flanges can sometimes save time, I would personally recommend creating very simple Base Flanges and then adding extra cutouts and holes as separate features. This approach just makes it easier to adjust or remove extra details later on, if needed.
Single Open Contour
Instead of using closed profiles, it is also possible to create Base Flanges using open profiles known as Single Open Contours. These can range from a simple, single line, up to more complex collections of Sketch Entities.
To create a basic Single Closed Contour Base Flange:
- Start a new part document and start a sketch on the appropriate Plane, such as the Front Plane.
- Sketch the Base Flange. It can be easiest to think of the Single Open Contour option as a side view or cross-section view of the flange. For the first example, try a single horizontal line,
100mmlong, using the Line tool (see Figure 1.19). - Remember to Fully Define your sketch by starting from the Origin and using the Smart Dimension tool to set the line's length.
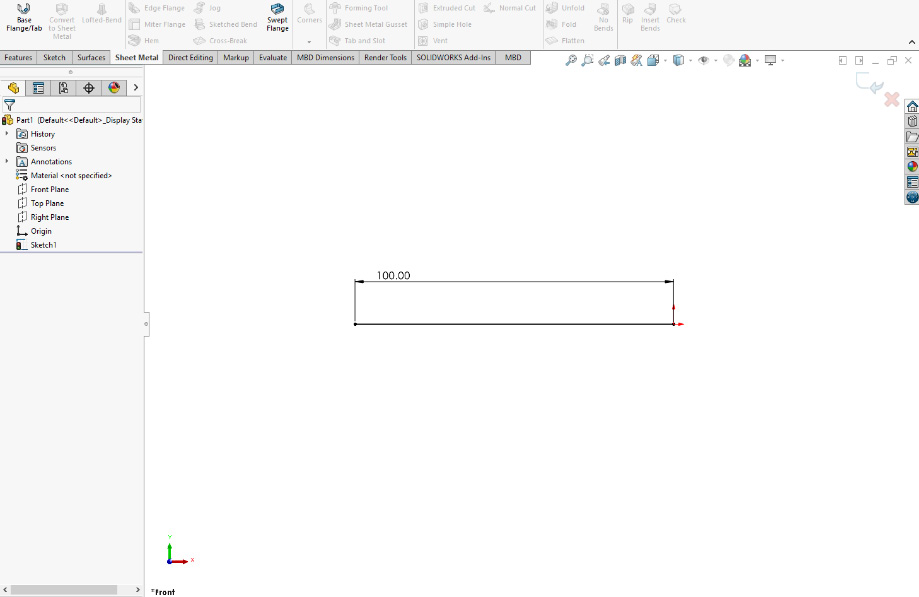
Figure 1.19: Using a single-line sketch to create a Single Open Contour Base Flange
- Select the Base Flange/Tab option from the Sheet Metal tab or toolbar.
- The width of the Base Flange can be set using the Direction 1 (and Direction 2, if required) options in the Property Manager on the left of the screen. The Sheet Metal properties can also be set at this stage (see Figure 1.20).
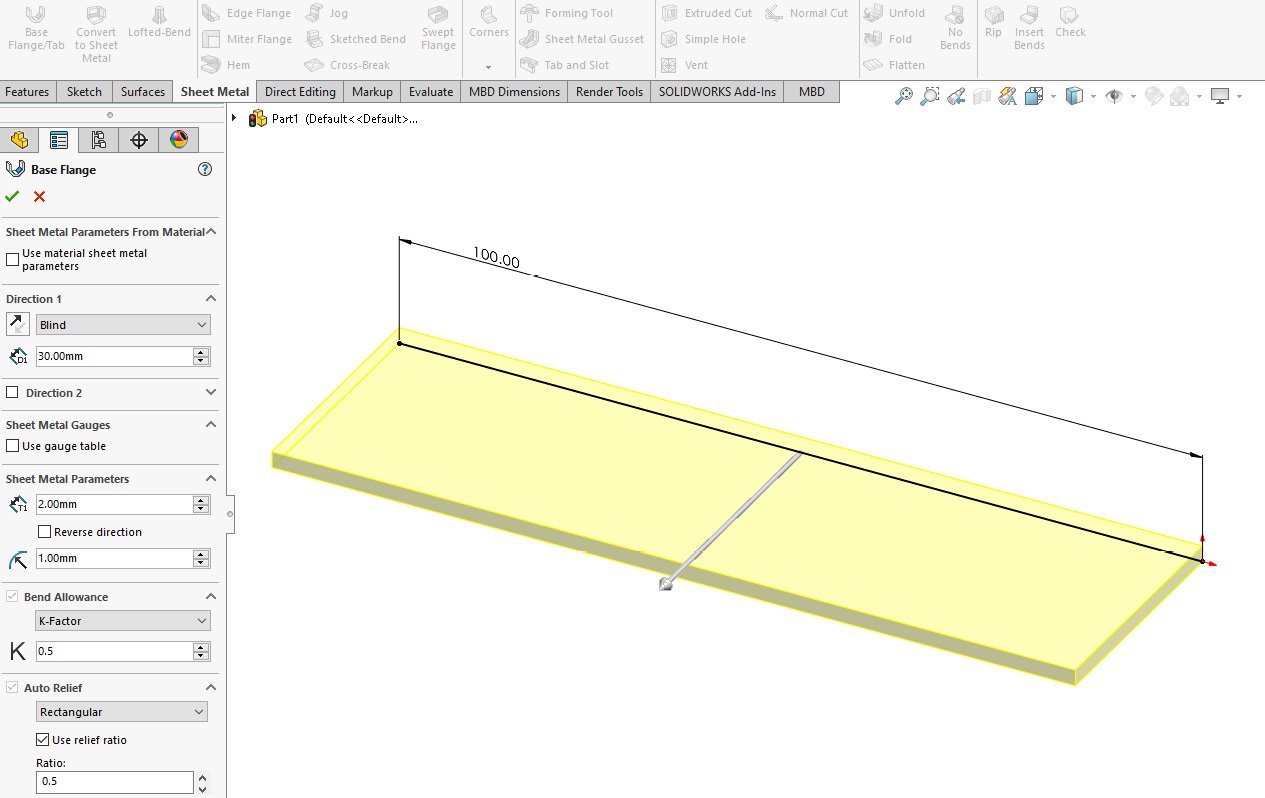
Figure 1.20: Creating a Base Flange
- Press OK to create a Base Flange. It can be seen that this creates a simple, rectangular Base Flange similar to the Single Closed Profile example from the first section.
In this way, the Single Open Contour Base Flange can be thought of as similar to the Thin Feature Extrude option from normal solid modeling.
Creating more Base Flange complex shapes
The real beauty of using the Single Open Contour option is that it allows you to easily create more complex, bent shapes in one feature.
- Start a new part document and start a sketch on the appropriate Plane, such as the Front Plane.
- Sketch a more complex shape using the Line tool. An example Z or jog shape can be seen in Figure 1.21.
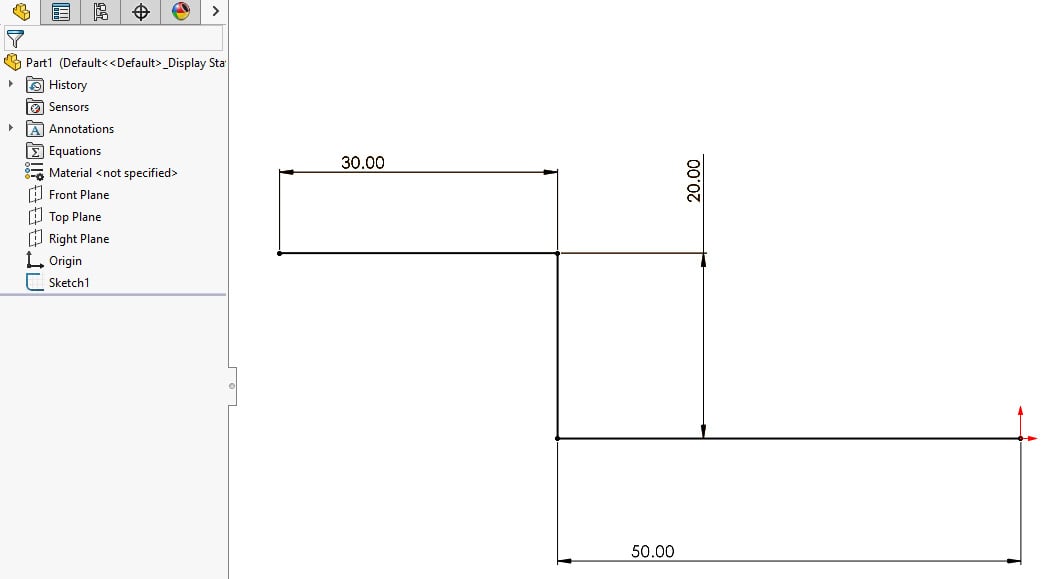
Figure 1.21: A more complex Single Open Contour sketch
- Select Base Flange/Tab from the Sheet Metal tools and set your desired options. Example settings could be:
- Width:
10mm, Direction 1 - Thickness:
2mm - Bend Radius:
1mm
- Width:
- Press OK to create a Base Flange (Figure 1.22). It can be seen that although the underlying sketch had sharp corners, the actual Base Flange feature has automatically been created with the bent corners using the Bend Radius that was specified in the Sheet Metal properties:
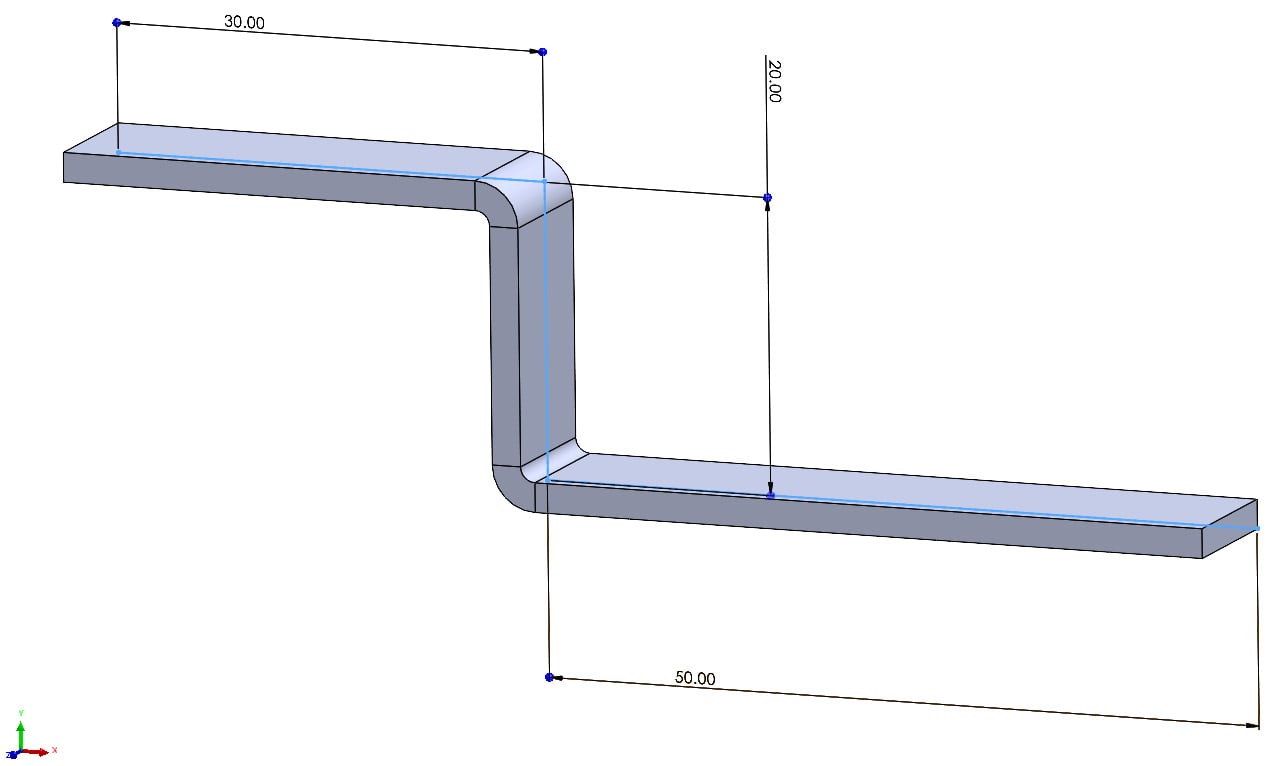
Figure 1.22: Single Open Contour Base Flange
Using Single Open Contours to create Base Flanges can be a good way to simplify the production of parts such as simple brackets.
Note that these types of sketches don't just need to use straight lines—they can also use arcs and splines if required.
Flattening parts
Now that we have created a part with bends in it, we can explore how 3D Sheet Metal parts can be flattened. Flattening is one of the features of the SolidWorks Sheet Metal module that really does add huge value to the design process because it allows parts to be accurately converted from finished parts into a state that can be easily created from sheets of flat stock material.
To flatten Sheet Metal parts:
- From within a Sheet Metal part, select the Flatten option from the Sheet Metal tab or toolbar (labeled i in Figure 1.23).
- The part will be unfolded into a flat sheet. Note the dotted outline, which indicates the bounding box of the flattened part, and the sketch lines, which show the location of Bend Lines (labeled ii in Figure 1.23).
- If your Bend Lines aren't visible, try going to View | Hide/Show | Sketches.
- Note also that the
Flat-Patternfolder at the end of the FeatureManager Design Tree is now unsuppressed and so is no longer grayed out (labeled iii in Figure 1.23).
Using the Flatten option essentially unsuppresses (or switches on) the Flat-Pattern folder, which flattens the part. If you expand the Flat-Pattern folder, then the Flat Pattern feature will be seen, and this contains the bend details of the part.
- To unflatten—or fold up—the part, simply click the Flatten button on the Sheet Metal tab or toolbar again or click the Flatten button that can be seen in the top right of the graphics area (labeled iv in Figure 1.23). Note that the part folds up and the
Flat-Patternfolder is now suppressed (or switched off) again.
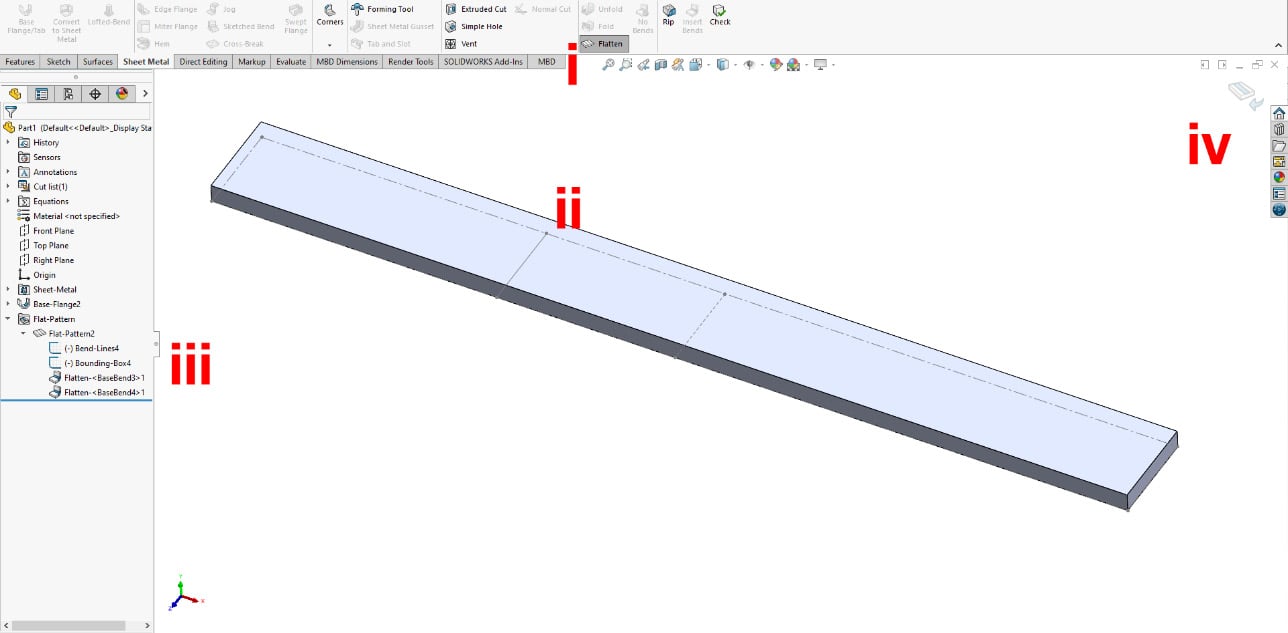
Figure 1.23: Flatten option
The Flatten option is a vital aspect of SolidWorks Sheet Metal that allows parts to be unfolded. As we progress through the book and learn about the Sheet Metal tools, we will see this option in use in a more practical setting.
A recap of Base Flange options and flattening parts
There are three types of Base Flange (See Fig. 1.24):
- Single Closed Profile: This is one of the most basic types of Base Flange and uses one single profile that is fully closed, such as a simple rectangle or square. Although it is simple, this type of Base Flange is extremely useful and is likely to make up the majority of Base Flanges for Sheet Metal parts.
- Multiple Contained Closed: Closed profiles can also contain smaller, closed profiles such as cutouts and holes. While these types of Base Flanges can be useful in certain situations, it is generally better practice to create simple Base Flanges using a Single Closed Profile and then add any extra holes, cuts, or details as separate features. This makes modification of these features at a later stage much easier.
- Single Open Contour: Base Flanges can also be created using a collection of single Sketch Entities such as lines, arcs, and splines. This type of Base Flange can be useful when creating items such as brackets.

Figure 1.24: Types of Base Flange; left to right: Single Closed Profile, Multiple Contained Closed, Single Open Contour
Flattening is a vital aspect of SolidWorks Sheet Metal and parts with bends can be flattened by simply selecting the Flatten option from the Sheet Metal tools. This will unsuppress the Flat-Pattern folder and unfold any bends in the part.
So far in this chapter, we have learned how to start Sheet Metal parts and how to create the first feature of most of these parts—the Base Flange. We have also looked at how to edit the various Sheet Metal properties that are important to those parts. So, now that we have a reasonable idea of how to start virtual Sheet Metal parts, we will jump briefly into a real-world aspect of sheet metal and take a look at the various sheet metal materials available.


