Creating a Base Flange
SolidWorks Sheet Metal parts can be started in two main ways—either by creating a Base Flange or by converting existing 3D parts into Sheet Metal parts. This section will cover the use of Base Flanges, which are the simplest but also the most flexible way to start new Sheet Metal parts.
Setting up the workspace
Before learning more about Base Flanges, let's first ensure that the workspace is set up correctly for Sheet Metal modeling. The Sheet Metal tools can be found via the Insert menu on the top menu bar (Figure 1.3) but it is faster and more convenient to use the Sheet Metal tab or toolbar:
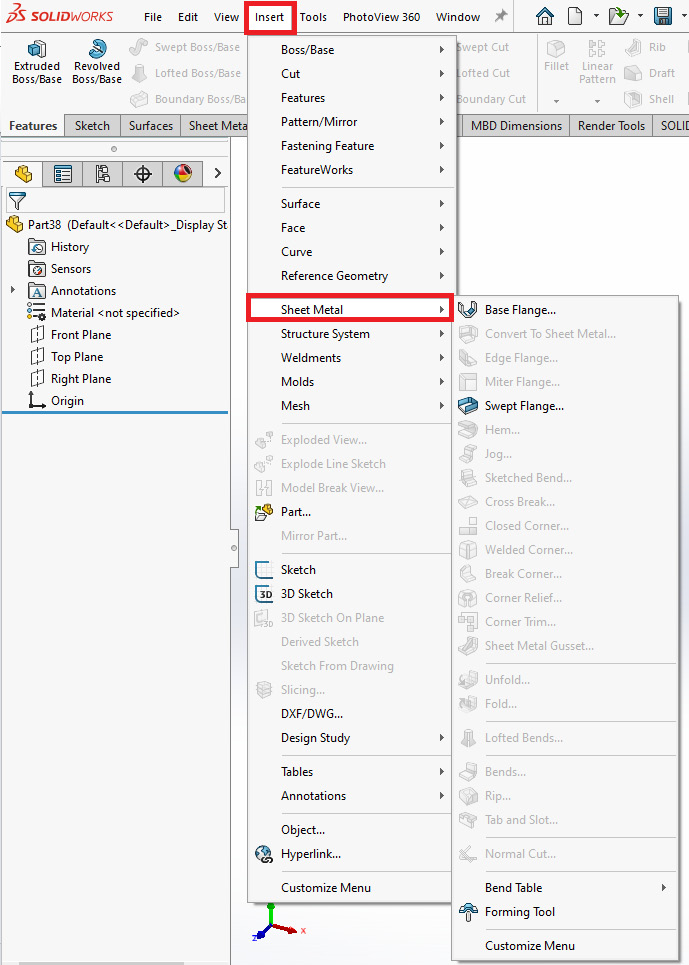
Figure 1.3: The Sheet Metal tools in the Insert menu
Setting up the Sheet Metal tab or toolbar
To add the Sheet Metal tab, proceed as follows:
- From within a SolidWorks part document, right-click on any of the existing tabs, or in any empty space, on the Command Manager (labeled i in Figure 1.4).
- Select the Tabs sub-option (labeled ii in Figure 1.4) and ensure that there is a check mark next to the Sheet Metal option (labeled iii in Figure 1.4).
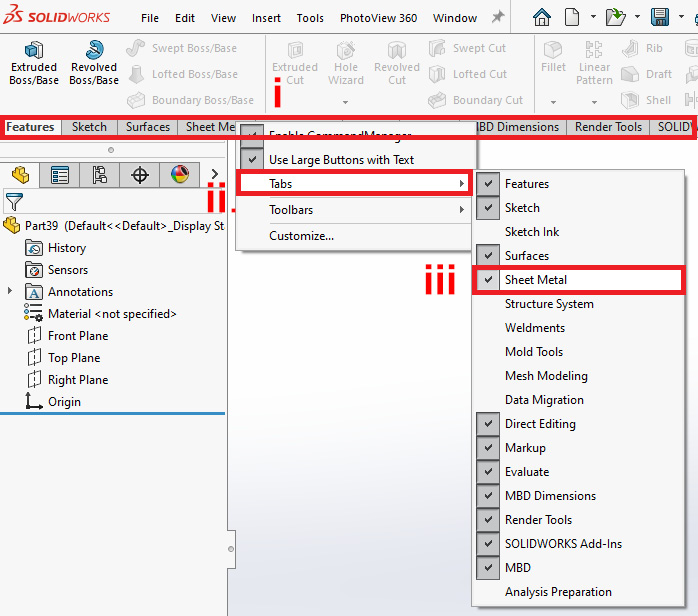
Figure 1.4: Adding the Sheet Metal tab to the Command Manager
This will then add the Sheet Metal tab to the existing tabs of the Command Manager.
To add the Sheet Metal toolbar:
- The Sheet Metal toolbar can be added in a similar way to the tab. First, right-click on any of the existing tabs, or in an empty space, on the Command Manager (labeled i in Figure 1.4).
- Select the Toolbars sub-option and ensure that there is a check mark next to the Sheet Metal option.
Should You Use the Sheet Metal Toolbar or the Sheet Metal Tab?
By default, the Sheet Metal tab and toolbar both contain the same set of tools. Either can be used throughout the book and this is a matter of user preference.
The Sheet Metal tab contains larger, clearer icons, but the toolbar can be moved into the Graphics Area for easier access to tools.
Making a Base Flange
A Base Flange is the first feature of a Sheet Metal part and is the simplest way to create new Sheet Metal parts, while also offering the most flexibility. This is because once a Base Flange has been created, additional features such as bends and flanges can be added to build up a 3D part in a similar way to standard solid modeling. By contrast, converting existing parts to Sheet Metal (as covered later in the book) can limit the type of part that can be created and reduce editing options at later stages.
To actually create a Base Flange, a profile first needs to be sketched. Various profile types can be used, but this section will cover the simplest: a Single Closed profile.
To create a Base Flange:
- Start a new SolidWorks part.
- Start a sketch on the appropriate Plane, such as the Top Plane (labeled i in Figure 1.5).
- Sketch the Base Flange profile. Different profile types will be covered later in the chapter, but for now, simply create a closed profile, such as a Center Rectangle (labeled ii in Figure 1.5).
- Fully Define the profile by using the Smart Dimension tool and linking it to the Origin (labeled iii in Figure 1.5). Make the rectangle
200mmhigh and300mmwide.Fully Defining Sketches
During SolidWorks modeling, it is important to Fully Define sketches to ensure that the Sketch Entities are fixed and will not behave in unexpected ways, such as moving position. Fully Defined Sketch Entities will turn black, and when a sketch is Fully Defined, this will be indicated in the lower right of the screen (labeled iv in Figure 1.5).
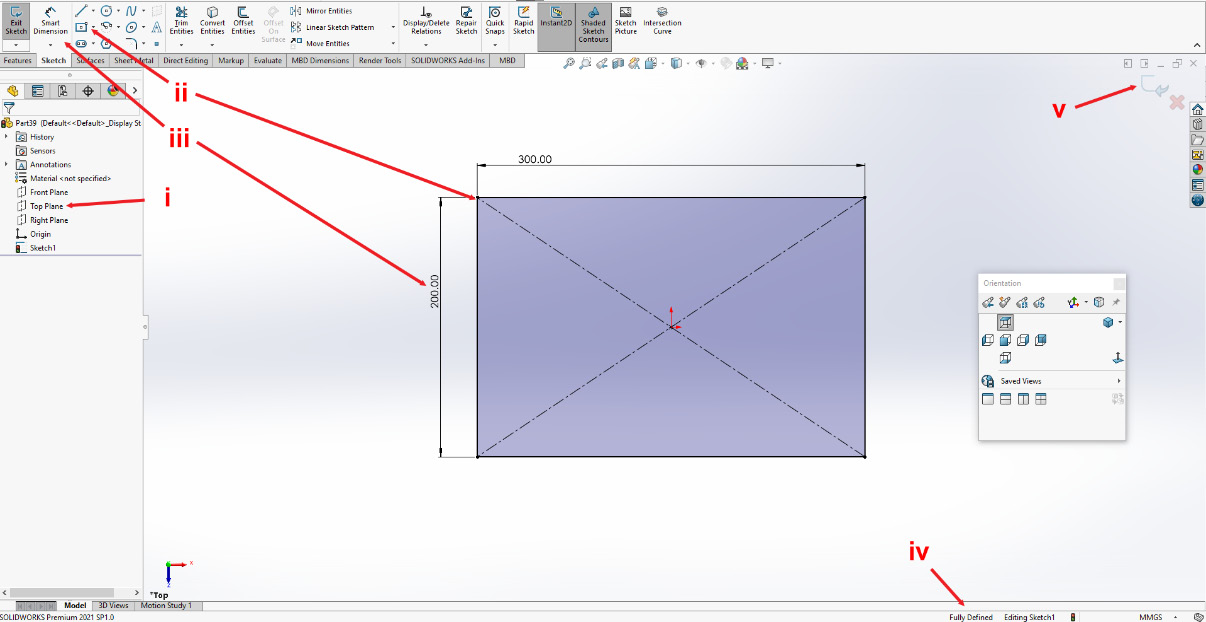
Figure 1.5: Sketching the Base Flange profile
- Exit the sketch (labeled v in Figure 1.5).
- Select the Sheet Metal tab or toolbar and select the Base Flange/Tab option—this should be the first icon (labeled i in Figure 1.6).
- You will be prompted to select a sketch. Select the previous sketch that was just drawn and a yellow preview of the Base Flange should appear (see Figure 1.6).
Note
It is also possible to skip Step 5 and select the Base Flange/Tab option directly from within the sketch. In this case, the sketch that is being edited will automatically be used.
- Enter the following settings (these will be covered in more detail later in the chapter):
- Thickness:
1mm - Bend Allowance:
K-Factor, 0.5 - Auto Relief:
Rectangular - Ratio:
0.5(labeled iii in Figure 1.6)
- Thickness:
Press OK (labeled iv in Figure 1.6) and the Base Flange feature is created.
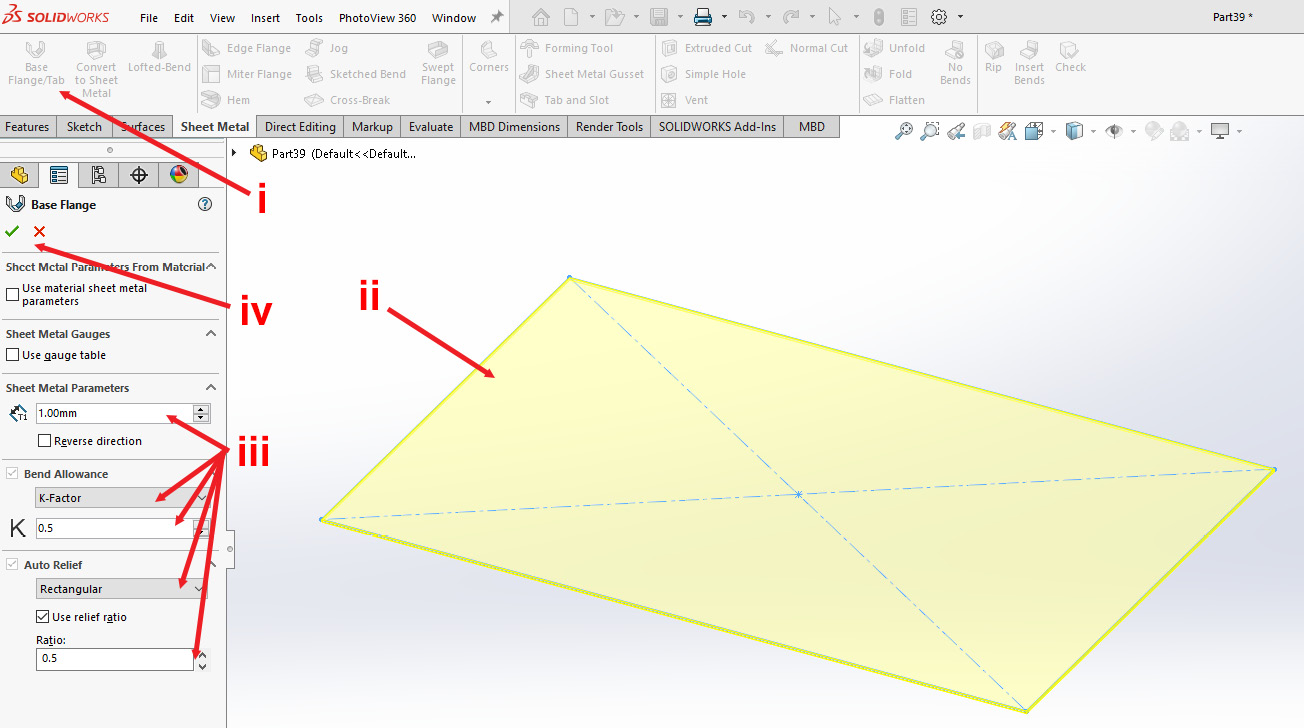
Figure 1.6: Creating a Base Flange feature
The Base Flange feature is now created, and Base-Flange1 (note: your number may differ) appears in the FeatureManager Design Tree at the left of the screen (labeled i in Figure 1.7). This feature can be edited and adjusted in the usual way by left-clicking on the feature and selecting Edit Feature.
Creating a Base Flange feature turns the entire part into a Sheet Metal part and so automatically adds some extra items to the FeatureManager Design Tree. These items indicate that a part is a Sheet Metal model, and they are made up of the following:
Sheet-Metalfolder: This contains all of the global properties of your Sheet Metal part, such as the Thickness and the Bend Radius properties (labeled ii in Figure 1.7).Flat-Patternfolder: This folder contains a flattened version of the part (labeled iii in Figure 1.7). By default, this folder will be suppressed, so it will appear grayed out at this stage, but this will be covered in more detail later in the chapter.Cut listfolder: This folder contains all of the separate sheets that make up the part. It can be thought of in a similar way to theSolid Bodiesfolder that is used in normal solid modeling
The number in brackets after the folder name indicates how many sheets make up the part. For example, a part with two separate body and lid sheets would show (2) after the Cut list folder (labeled iv in Figure 1.7).
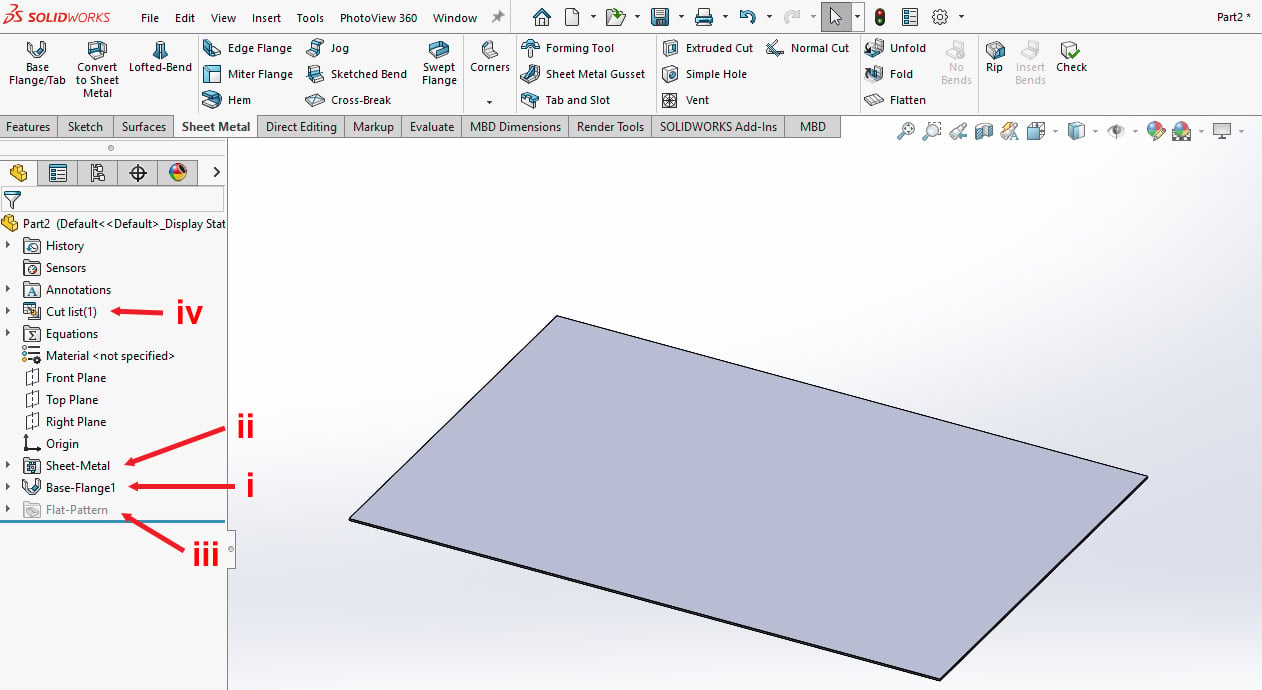
Figure 1.7: Sheet Metal part details
Base Flanges are usually the best way of starting your Sheet Metal parts and are often the first feature created in a Sheet Metal part. They can be made by sketching a closed profile, then selecting the Base Flange/Tab option from the Sheet Metal tools.
Adding a Base Flange feature will turn the part into a Sheet Metal part and will automatically add the Flat-Pattern, Cut list, and Sheet-Metal folders, which we will explore more in the following section.
Saving Parts
At this stage, your current part can be saved as we will continue using this document throughout the book.
When working in SolidWorks, try to get into the habit of regularly saving your work, as a safeguard against crashes and other problems.


