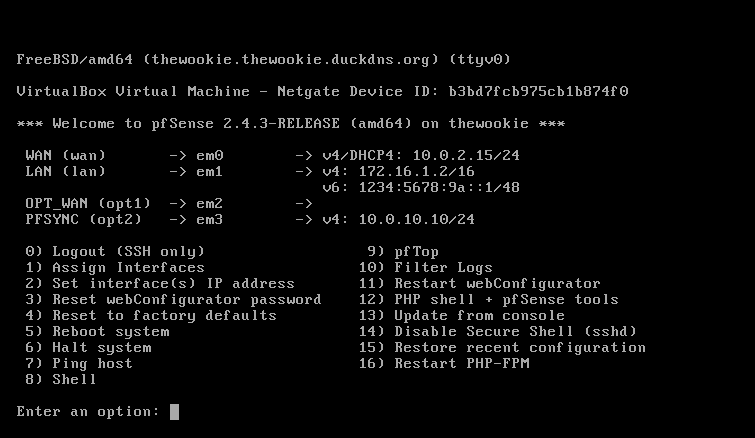
On boot, you should eventually see a menu identical to the one seen on the CD version, with the boot multi or single user options, and other options. After a timeout period, the boot process will continue and you will get an Options menu. If the default interface assignments are unsatisfactory, select 1 from the menu to begin interface assignment. This is where the network cards installed in the system are given their roles as WAN, LAN, and optional interfaces (OPT1, OPT2, and so on).
If you select this option, you will be presented with a list of network interfaces. This list provides four pieces of information:
- pfSense's device name for the interface (fxp0, em1, and so on)
- The MAC address of the interface
- The link state of the interface (up if a link is detected; down otherwise)
- The manufacturer and model of the interface (Intel PRO 1000, for example)
As you are probably aware, generally speaking, no two network cards have the same MAC address, so each of the interfaces in your system should have a unique MAC address.
- To begin the configuration, select 1 and Enter for the Assign Interfaces option.
- After that, a prompt will show up for VLAN configuration.
We will cover VLAN configuration in Chapter 4, Using pfSense as a Firewall, and we will cover both configuration from the command line and web GUI VLAN configuration.
- If you wish to set up VLANs, see Chapter 3, VLANs. Otherwise, type n and press Enter. Keep in mind that you can always configure VLANs later on.
- The interfaces must be configured, and you will be prompted for the WAN interface first.
- If you only configure one interface, it will be assigned to the WAN, and you will subsequently be able to log in to pfSense through this port.
This is not what you would normally want, as the WAN port is typically accessible from the other side of the firewall.
- When at least one other interface is configured, you will no longer be able to log in to pfSense from the WAN port. Unless you are using VLANs, you will have to set up at least two network interfaces.
In pfSense, network interfaces are assigned rather cryptic device names (for example, fxp0, em1, and so on) and it is not always easy to know which ports correspond to particular device names. One way of solving this problem is to use the automatic interface assignment feature.
- To do this, unplug all network cables from the system, and then type a and press Enter to begin auto-detection.
- The WAN interface is the first interface to be detected, so plug a cable into the port you intend to be the WAN interface.
The process is repeated with each successive interface.
- The LAN interface is configured next, then each of the optional interfaces (OPT1, OPT2).
If auto-detection does not work, or you do not want to use it, you can always choose manual configuration. You can always reassign network interfaces later on, so even if you make a mistake on this step, the mistake can be easily fixed.
- Once you have finished configuration, type y at the Do you want to proceed? prompt, or type n and press Enter to re-assign the interfaces.
- Option two on the menu is Set interface(s) IP address, and you will likely want to complete this step as well. When you invoke this option, you will be prompted to specify which interface's IP address is to be set.
- If you select WAN interface, you will be asked if you want to configure the IP address via DHCP. In most scenarios, this is probably the option you want to choose, especially if pfSense is acting as a firewall. In that case, the WAN interface will receive an IP address from your ISP's DHCP server. For all other interfaces (or if you choose not to use DHCP on the WAN interface), you will be prompted to enter the interface's IPv4 address.
- The next prompt will ask you for the subnet bit count. In most cases, you'll want to enter 8 if you are using a Class A private address, 16 for Class B, and 24 for Class C, but if you are using classless subnetting (for example, to divide a Class C network into two separate networks), then you will want to set the bit count accordingly.
- You will also be prompted for the IPv4 gateway address (any interface with a gateway set is a WAN, and pfSense supports multiple WANs); if you are not configuring the WAN interface(s), you can just hit Enter here.
- Next, you will be prompted to provide the address, subnet bit count, and gateway address for IPv6; if you want your network to fully utilize IPv6 addresses, you should enter them here.
The advantages of IPv6 over IPv4 will be discussed more fully in Chapter 2, Advanced pfSense Configuration.
We have now configured as much as we need to from the console (actually, we have done more than we have to, since we really only have to configure the WAN interface from the console). The remainder of the configuration can be done from the pfSense web GUI.


