Setting up the Python environment for AI/ML projects
For marketers who are relatively new to the world of AI/ML, setting up a robust Python environment is the first technical step to unlocking the potential of data science in marketing strategies. Python, renowned for its simplicity and powerful libraries, serves as the backbone for most AI/ML projects in today’s technology companies. This section will guide you through setting up a Python environment tailored for AI/ML in marketing projects, ensuring that you have the necessary tools and libraries at your disposal. Python’s appeal lies in its vast ecosystem of libraries designed for data analysis, ML, natural language processing (NLP), and more. For AI/ML projects, using an Anaconda distribution is highly recommended due to its simplicity in managing packages and environments. Let’s look at how you can get started.
Installing the Anaconda distribution
Visit the Anaconda website at https://www.anaconda.com/download and download the installer for Python 3. Once the Anaconda distribution has been downloaded, you can follow the installation instructions and create a new environment. This can be done by opening a terminal window and typing:
conda create --name ai_marketing python=3.8
conda activate ai_marketing
After running these commands, you should have a new Python environment named ai_marketing with Python 3.8 installed and activated. This environment will help you manage dependencies for your AI/ML projects effectively, isolating them from other projects on your system.
Installing essential Python libraries for AI/ML
With your environment set up, the next step is to install the key Python libraries that will power your AI/ML marketing projects. The following are some of the essential Python libraries for AI/ML projects, grouped by their general functionality. You can install these libraries using Anaconda via the following terminal commands:
- NumPy and pandas for data manipulation:
conda install numpy pandas - Matplotlib and Seaborn for data visualization:
conda install matplotlib seaborn - scikit-learn for ML:
conda install scikit-learn - TensorFlow and Keras for deep learning:
conda install tensorflow keras - NLTK and spaCy for NLP:
conda install nltk spacy - Hugging Face’s Transformers for advanced NLP and generative AI:
pip install transformers
Integrating your environment with JupyterLab
JupyterLab offers an interactive coding environment ideal for data exploration, visualization, and presenting step-by-step AI/ML analyses. This can be installed via the following terminal command:
conda install jupyterlab
To launch JupyterLab, where you can create and manage your notebooks, type the following in the terminal:
jupyter lab
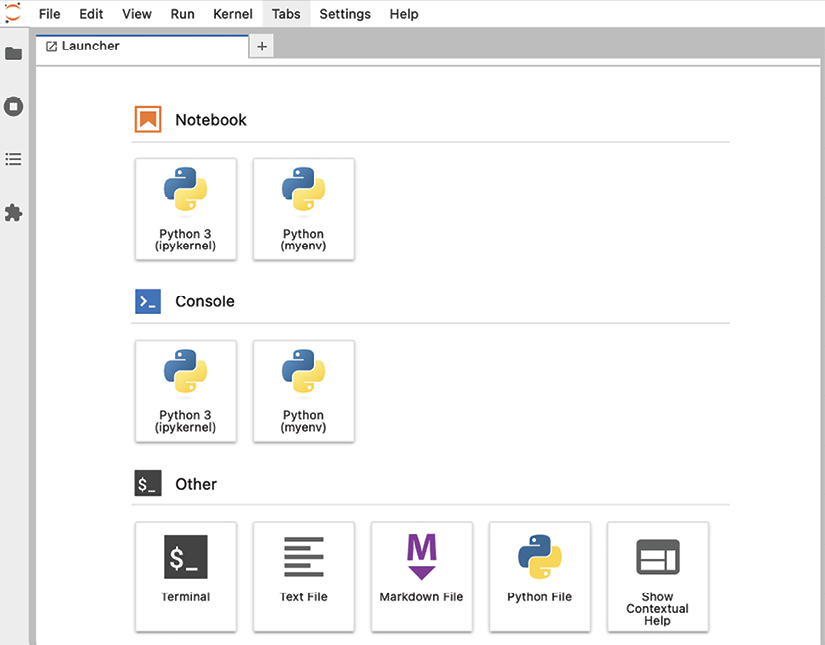
You should now see a screen similar to what is shown below in a newly launched browser window:

Figure 1.7: Image of the JupyterLab UI after launch
Verifying your setup
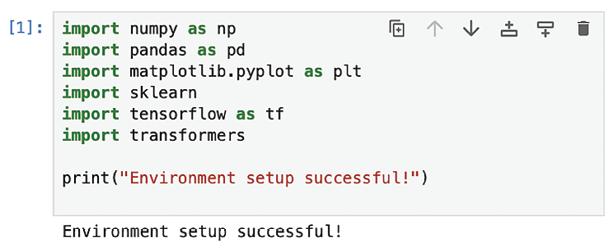
To ensure that everything is set up correctly, run a simple Python script in a Jupyter notebook to verify the installation of key libraries. Click on the icon below the Notebook heading of Figure 1.7 and type the following lines of code:
import numpy as np
import pandas as pd
import matplotlib.pyplot as plt
import sklearn
import tensorflow as tf
import transformers
print("Environment setup successful!")
Pressing Shift + Enter will execute the code in the cell:

Figure 1.8: Environment setup successful message
Navigating the Jupyter notebook
- With your Jupyter notebook, you can now write, run, and document your Python code in a step-by-step manner. You can find extensive documentation and tutorials on the jupyter.org website. Here are some basics to get you started:
- Creating new cells: You can add new cells to your notebook by clicking the + button in the toolbar at the top. This will insert a new cell directly below your current selection.
- Running cells: To execute the code within a cell, select the cell and then press Shift + Enter or click the Run button in the toolbar. This will run the code and display any output below the cell.
You can also use Ctrl + Enter to run the cell without moving to the next one.
- Changing cell types: Jupyter Notebook supports different types of cells, including code cells for Python code and Markdown cells for text.
You can change the cell type using the dropdown menu in the toolbar. Select Code for Python code or Markdown for narrative text, equations, or HTML.
- Using Markdown for documentation: Markdown cells allow you to add formatted text, bullet points, numbered lists, hyperlinks, images, and more to make your notebook more readable and informative. Basic Markdown syntax includes:
#for headings (e.g.,# Heading 1,## Heading 2)–or*for bullet lists1.,2., etc., for numbered lists`code`for inline code[Link text](url)for hyperlinks[Alt text](Image URL)for images
- Saving and sharing notebooks: Save your notebook regularly by clicking the Save icon in the toolbar or using Ctrl + S (or Cmd + S on a Mac).
You can share your notebook by downloading it in various formats (including .ipynb, HTML, PDF, etc.) from the File -> Download as menu.
- Shortcuts for efficiency: Jupyter supports several keyboard shortcuts for common operations. Press Esc to enter command mode, where you can:
- Use A to insert a new cell above the current cell.
- Use B to insert a new cell below.
- Use M to change the current cell to a Markdown cell.
- Use Y to change it back to a code cell.
- Use D, D (press D twice) to delete the current cell.


