Configuring Julia with Jupyter Notebook in Terminal-only cloud environments
In this recipe, we show how to configure Jupyter (both JupyterLab and Jupyter Notebook) for use in Terminal-only environments on a Linux platform (that is, environments that do not provide any graphical desktop interface). For these remote environments, running Jupyter Notebook is trickier. For illustrative purposes, we will use the AWS Cloud.
Getting ready
Before you start, you need to have a Linux machine with IJulia and either Jupyter Notebook or JupyterLab installed:
Prepare a Linux machine (for example, an AWS EC2 instance) with Julia installed, and Jupyter Notebook or JupyterLab (you can follow the instructions in the previous recipes).
Make sure that you can open an SSH connection to your Linux machine. If this is an instance of Linux on the AWS Cloud, you can follow the instructions given at https://docs.aws.amazon.com/AWSEC2/latest/UserGuide/AccessingInstancesLinux.html.In particular, you need to know the server's address, login name (in the examples we use
ubuntu, which is the default username on Ubuntu Linux), and have the private key file (in the examples, we name itkeyname.pem, and the user's password could be used instead of the key file).
Note
Please note that for Windows 10, there is no default SSH client. Hence, this recipe has been tested with the SSH client included with Git for Windows tools, available at https://git-scm.com/download/win/. Once Git for Windows is installed, the SSH executable by default can be found at C:\Program Files\Git\usr\bin\ssh.exe.Please note that on *ux environments (for example, Linux, OS X) the key file, keyfile.pem, which is used for connection should be readable only to the local user. If you just downloaded it from AWS, you need to execute the$ chmod 400 keyfile.pem command before running the ssh command to open the SSH connection.
Note
In the GitHub repository for this recipe, you will find the commands.txt file that contains the presented sequence of shell and Julia commands.
How to do it...
A general scenario for working with Jupyter Notebook/JupyterLab on a remote machine consists of the following three steps:
- Set up the SSH tunnel on port
8888 - Start JupyterLab on the remote machine
- Find the link in the launch log and copy it to the browser on the local machine
We discuss each step in detail and consider alternative configurations for Jupyter Notebook and JupyterLab:
- Connect to the Linux machine from your desktop computer (local machine). While opening the SSH connection, set up a tunnel on port
8888. In place of[enter_hostname_here], provide the appropriate hostname (for example, in the AWS Cloud, the hostname could look like this:ec2-18-188-4-172.us-east-2.compute.amazonaws.com):
$ ssh -i path/to/keyfile.pem -L8888:127.0.0.1:8888 ubuntu@[enter_hostname_here]
- Once the connection has been set up, run your Jupyter Notebook or JupyterLab on the remote machine. Execute the command shown (this assumes that the
IJuliapackage is installed on your machine along with instructions from the previous recipes and you used the default setting for the Juliapackagesfolder):
$ ~/.julia/packages/Conda/hsaaN/deps/usr/bin/jupyter labPlease note that the Windows version of the preceding command is the following:
C:\> %userprofile%\.julia\packages\Conda\hsaaN\deps\usr\Scripts\jupyter-labYou can also use either Jupyter Lab or Jupyter Notebook command versions (see the instructions from the previous recipe).
Note
Please note that, depending on your Julia and Anaconda configuration, the executable jupyter file could be in a different location. On Linux environments, you can search for it with the $ find ~/ -name "jupyter" command. This assumes the search is run in your local home folder.
- Look for console output similar to this:
Copy/paste this URL into your browser when you connect for the first time,to login with a token:
http://localhost:8888/?token=b86b66b81a62d4be1ae34e7d6bd006a8ba5cb937e74b99cf- Paste the link marked with bold to your browser on your local machine (not the remote server).
If you have properly configured the SSH tunnel, you should see Jupyter Notebook/JupyterLab running on the remote server in the browser on the local machine. Please note that the environment will be available for only as long as the SSH connection is open. If you close the SSH connection, you will lose access to your Jupyter Notebook or JupyterLab.
How it works...
Using Jupyter Notebook via the internet requires setting up an SSH tunnel to the server. This is the option we present in this tutorial. Please note that on a local network, you can connect directly to the server without SSH tunneling.
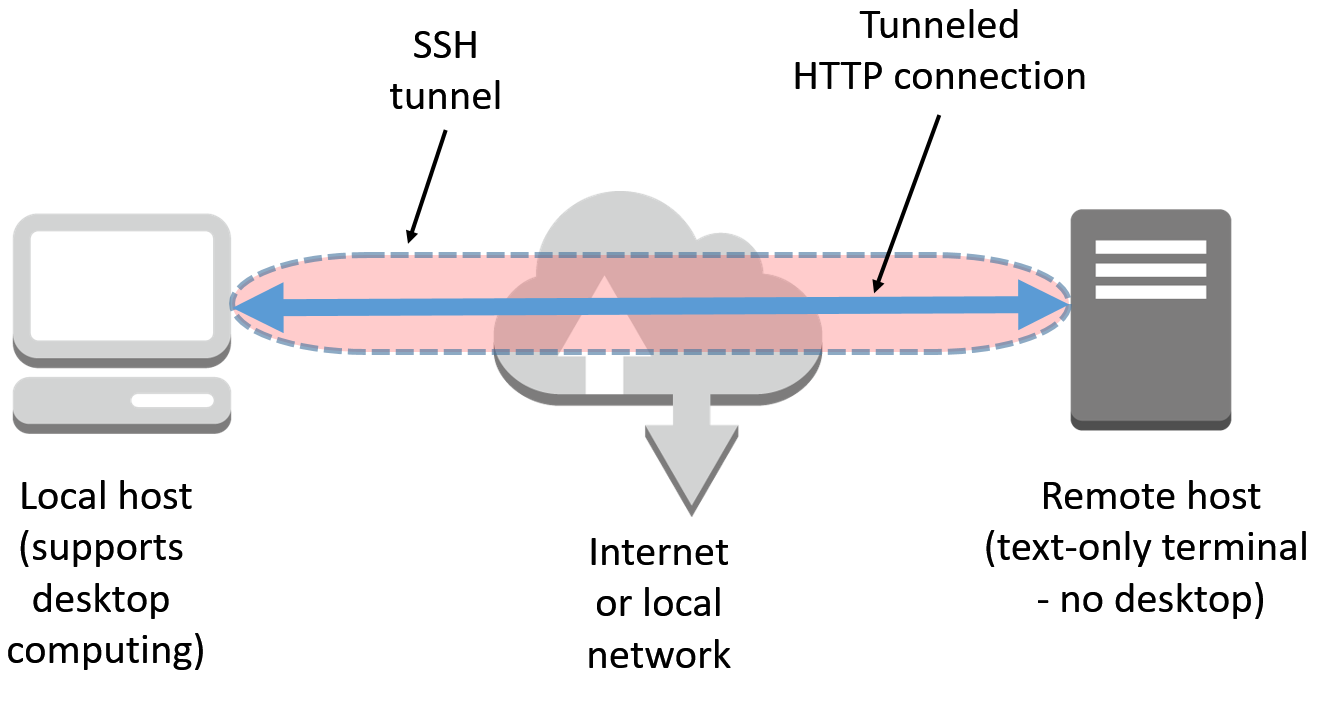
In the preceding scenario, the command-line argument-L 8888:127.0.0.1:8888 tells ssh to open a secure tunnel over SSH from your machine to port 8888 on the target machine in the cloud (as shown in the following diagram):
There's more...
Yet another option for running IJulia on a text-only Terminal remote machine is to use a detached mode for the Jupyter environment. However, in order to obtain access to Jupyter Notebook, a token key is required. Please see the following example:
julia> usingIJulia

julia> notebook(detached=true)

julia> run(`$(IJulia.notebook_cmd[1]) notebook list`)
Currently running servers:
http://localhost:8888/?token=2bb8421e3bba78c8c551a8af1f22460bb4bb3fdc5a0986bb
Now, you can simply copy and paste the preceding link into your web browser.
See also
More information on SSH tunneling can be found at https://www.ssh.com/ssh/tunneling/example.