Defining your component database structure
Our component needs to store information in the Joomla! database. So, we need to identify all the tables and columns we need for our component. Once we have identified all the elements of our problem, it is easy to write down the table’s structure.
We will take the following approach to write the table’s structure:
- Add database tables for entities
- Add extra information columns to tables
- Reflect relationships in the database
- Create tables (What kind of tables? We already added database tables for entities (see the first item))
Let’s start by taking a quick to the Joomla! database’s default tables before adding our tables.
A quick look at the Joomla! database
After installing Joomla!, your database will be populated with several tables. These tables are part of Joomla! Core.
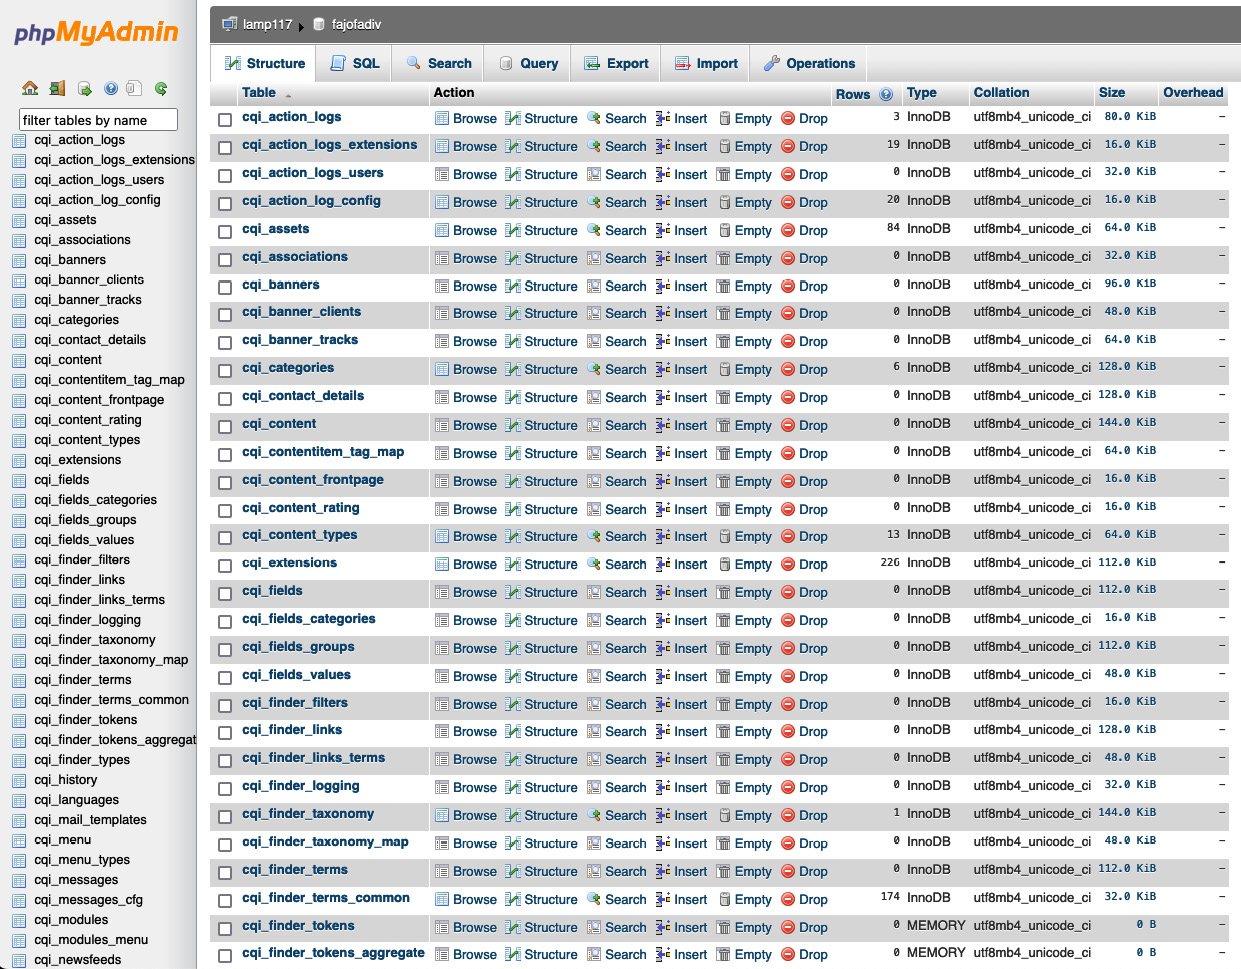
If you log in to PhpMyAdmin, you may see something like this:

Figure 1.3 – Joomla! tables after installing Joomla!
Here, you can see some tables that come with Joomla!. You should not change these tables or edit their content directly in the database unless you know what you are doing.
One thing you may have noticed is that my installation table names are different from yours. In my case, all the tables start with the cqi_ prefix; in your installation, you will find a different prefix.
This is a security measure that has come with Joomla! since Joomla! 1.0. Adding this prefix prevents possible attackers from knowing the exact name of the tables, thus preventing them from planning a direct attack on your database.
This also makes it impossible for us to know the exact table names when we are creating our extensions. To overcome this problem, in Joomla!, we can use the #__ prefix for table names in the code of the extension. You will also find this convention in this book when referring to database tables.
If you want to know the exact database prefix of your Joomla! installation, access the backend of your site and go to System. In the Information panel, click on the System Information link. Then, go to the Configuration File tab; you may find it next to the dbprefix setting.
Adding database tables for entities
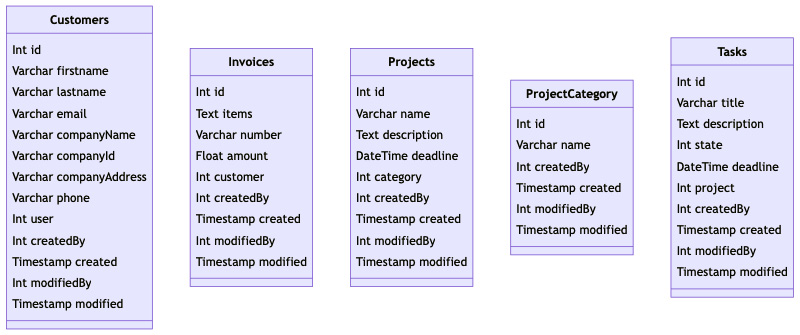
As a rule of thumb, we will have one table per entity in our problem, so we can start representing our tables as per this schema:

Figure 1.4 – Representation of our tables with their fields
This simple scheme covers all the tables with their fields. Even so, you may notice we have not added any customer data to the invoice. You need to add Customer data to the invoices because when you delete customers, you will lose the Customer data on your invoice! That is because we have just added fields that hold unique and independent information, and now, we are going to add the fields that relate one table with another. Consider the following schema:

Figure 1.5 – Representation of our tables after adding related fields
Our tables are now complete as they define all the fields and relationships we specified in the previous sections.
Adding extra information columns to tables
Even though we have completed our database structure, it will be a poor database definition if we do not add some extra columns to our definition. For instance, we could add a column registering the creation date of an invoice. Also, it might be interesting to know if an invoice has been modified after creation.
Finally, how do you relate the customer field in the Invoices table with the Customers table? We can do this by adding metadata to our component.
You will want to add some metadata columns to all your tables. These metadata fields give you information about when a new row was added to your table or the last user who modified it. Therefore, these are the common fields you will add to your tables:
- id: It’s used to refer to the specific entity
- modified: Represents the date when the entity was edited
- created: Represents the date when the entity was created
- modified_by: Links to the user who edited the entity
- created_by: Links to the user who created the entity
The database should generate the id column value automatically when each entity is created:

Figure 1.6 – Representation of our tables after adding metadata fields
Reflecting relationships in the database
The last step to having a good visual representation of the project is adding relationships to our diagram.
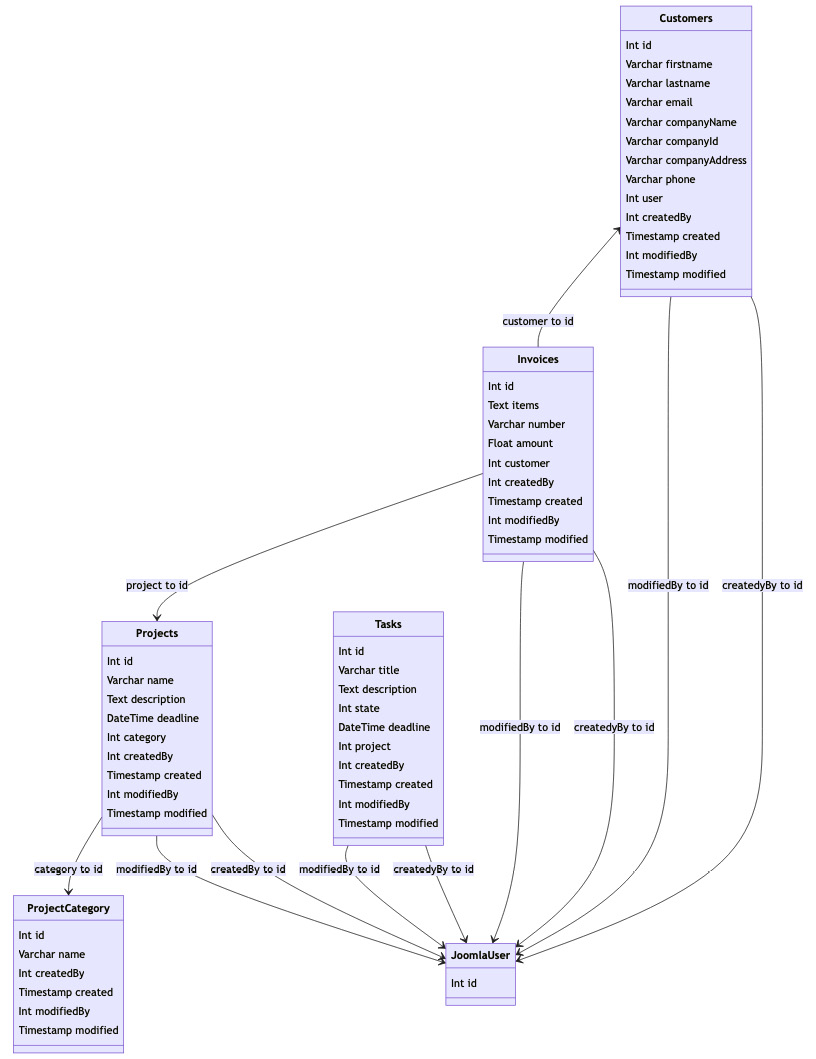
After adding the extra information fields, our relationships have grown – now, every table is related to the Joomla! User table via the modified_by and created_by fields.
Even though we do not need to create the Joomla! User table, it is a good idea to include a representation of this table in our diagram. We do not need to cover the whole table; just showing the fields we use is enough:

Figure 1.7 – Representation of our tables with all the relationships between them
Here, you can see a full representation of our tables, with arrows representing how they are related.
As you can see, every table links to the Joomla! User table. This is because we have different fields such as modified_by or created_by, which relate to the id field in the Joomla! User table. Besides that, we can see how our tables are related graphically so that we can represent all the relationships we defined in the previous section.
Creating tables in the database
Once we have a clear representation of our tables, we can generate the code to create the tables in our database.
You can use the following code to create the projects table:
CREATE TABLE IF NOT EXISTS '#__spm_projects' (
    'id' int(11) UNSIGNED NOT NULL AUTO_INCREMENT,
    'name' VARCHAR(255) NOT NULL,
    'alias' VARCHAR(255) NOT NULL,
    'description' TEXT,
    'deadline' DATETIME,
    'category' INT(11),
    'created' DATETIME DEFAULT NOW(),
    'modified' DATETIME DEFAULT NOW(),
    'created_by' INT(11)  NOT NULL ,
    'modified_by' INT(11)  NOT NULL ,
    PRIMARY KEY ('id')
    ) ENGINE=InnoDB;
This SQL code will create our projects table. To ensure our tables are unique, and we do not clash with other extensions using similar table names, we can use an extra prefix with the name of our component. In our case, we will use#__spm_projects. Also, remember that before using this code to create your database, you need to replace #_ with your database prefix, as explained in the previous section.
Finally, note the change of casing in the field names. Though MySQL allows you to use caps in the field names, historically, database fields are all in lowercase. So, for our SQL code, we are replacing and renaming our fields from modifiedBy to modified_by and so on. So, why did I mention “modifiedBy” earlier? You can leave that out to make it less confusing.
To create the tasks table, we will use this code:
CREATE TABLE IF NOT EXISTS '#__spm_tasks' (
'id' int(11) UNSIGNED NOT NULL AUTO_INCREMENT,
    'title' VARCHAR(255) NOT NULL,
    'alias' VARCHAR(255) NOT NULL,
    'description' TEXT,
    'deadline' DATETIME,
    'state' INT(3) NOT NULL,
    'project' INT(11),
    'created' DATETIME DEFAULT NOW(),
    'modified' DATETIME DEFAULT NOW(),
    'created_by' INT(11)  NOT NULL ,
    'modified_by' INT(11)  NOT NULL ,
    PRIMARY KEY ('id')
    ) ENGINE=InnoDB;
In this SQL code, we are using an INT type for the project field. This indicates that the project field will store the value of the id field from the #__spm_projects table.
For our customers table, we use a similar code:
CREATE TABLE IF NOT EXISTS '#__spm_customers' (
    'id' int(11) UNSIGNED NOT NULL AUTO_INCREMENT,
    'firstname' VARCHAR(255) NOT NULL,
    'lastname' VARCHAR(255) NOT NULL,
    'email' VARCHAR(255) NOT NULL,
    'company_name' VARCHAR(255) NOT NULL,
    'company_id' VARCHAR(255) NOT NULL,
    'company_address' VARCHAR(255) NOT NULL,
    'phone' VARCHAR(25) NOT NULL,
    'user' INT(11),
    'created' DATETIME DEFAULT NOW(),
    'modified' DATETIME DEFAULT NOW(),
    'created_by' INT(11)  NOT NULL ,
    'modified_by' INT(11)  NOT NULL ,
    PRIMARY KEY ('id')
    ) ENGINE=InnoDB;
In this case, we use an INT field to store the id value of our user from the #__users table in the user field.
Finally, we will create our invoices table using this code:
CREATE TABLE IF NOT EXISTS '#__spm_invoices' (
    'id' int(11) UNSIGNED NOT NULL AUTO_INCREMENT,
    'items' TEXT NOT NULL,
    'number' VARCHAR(25) NOT NULL,
    'amount' FLOAT DEFAULT 0.0,
    'customer' INT(11),
    'created' DATETIME DEFAULT NOW(),
    'modified' DATETIME DEFAULT NOW(),
    'created_by' INT(11)  NOT NULL ,
    'modified_by' INT(11)  NOT NULL ,
    PRIMARY KEY ('id')
) ENGINE=InnoDB;
Once we have the code to create our tables, we can access our database and create them. So, go to your server hosting tools and access your database client. I recommend using phpMyAdmin, but other tools, such as dbadminer, are also an excellent choice. Once you are connected to your database, just execute the preceding SQL code.
After that, all your tables will be created and you will be ready to start adding data to your tables.


