


Understanding the types in ADO.NET
ADO.NET defines abstract types that represent minimal objects for working with data, like DbConnection, DbCommand, and DbDataReader. Database software manufacturers can inherit from and provide specific implementations that are optimized for and expose additional features for their database. Microsoft has done this for SQL Server. The most important types with their most used members are shown in Table 2.6:
|
Type |
Properties |
Methods |
Description |
|
|
|
|
Manage the connection to the database. |
|
|
|
|
Build a valid connection string for a SQL Server database. After setting all the relevant individual properties, get the |
|
|
|
|
Configure the command to execute. |
|
|
|
Configure a parameter for a command. |
|
|
|
|
|
Process the result set from executing a query. |
Table 2.6: Important types in ADO.NET SqlClient
SqlConnection has two useful events: StateChange and InfoMessage.
All the ExecuteXxx methods of SqlCommand will execute any command. The one you use depends on what you expect to get back:
- If the command includes at least one
SELECTstatement that returns a result set, then callExecuteReaderto execute the command. This method returns aDbDataReader-derived object for reading row-by-row through the result set. - If the command does not include at least one
SELECTstatement, then it is more efficient to callExecuteNonQuery. This method returns an integer for the number of rows affected. - If the command includes at least one
SELECTstatement that returns XML because it uses theAS XMLcommand, then callExecuteXmlReaderto execute the command.
Creating a console app for working with ADO.NET
First, we will create a console app project for working with ADO.NET:
- Use your preferred code editor to create a console app project, as defined in the following list:
- Project template: Console App /
console. - Solution file and folder:
Chapter02. - Project file and folder:
Northwind.Console.SqlClient. - Do not use top-level statements: Cleared.
- Enable native AOT publish: Cleared.
Good Practice: For all the projects that you create for this book, keep your root path short and avoid using
#in your folder and file names, or you might see compiler errors likeRSG002: TargetPath not specified for additional file. For example, do not useC:\My C# projects\as your root path! - Project template: Console App /
- In the project file, treat warnings as errors, add a package reference for the latest version of
Microsoft.Data.SqlClient, and statically and globally importSystem.Console, as shown highlighted in the following markup:<Project Sdk="Microsoft.NET.Sdk"> <PropertyGroup> <OutputType>Exe</OutputType> <TargetFramework>net8.0</TargetFramework> <ImplicitUsings>enable</ImplicitUsings> <Nullable>enable</Nullable> <TreatWarningsAsErrors>true</TreatWarningsAsErrors> </PropertyGroup> <ItemGroup> <PackageReference Include="Microsoft.Data.SqlClient" Version="5.1.2" /> </ItemGroup> <ItemGroup> <Using Include="System.Console" Static="true" /> </ItemGroup> </Project>You can check the most recent version of the package at the following link: https://www.nuget.org/packages/Microsoft.Data.SqlClient#versions-body-tab.
- Build the project to restore the referenced package.
- Add a new class file named
Program.Helpers.cs, and modify its contents to define a method to configure the console to enable special characters like the Euro currency symbol and set the current culture, and a method that will output some text to the console in a specified color, with a default color of black, as shown in the following code:using System.Globalization; // To use CultureInfo. partial class Program { private static void ConfigureConsole(string culture = "en-US", bool useComputerCulture = false) { // To enable Unicode characters like Euro symbol in the console. OutputEncoding = System.Text.Encoding.UTF8; if (!useComputerCulture) { CultureInfo.CurrentCulture = CultureInfo.GetCultureInfo(culture); } WriteLine($"CurrentCulture: {CultureInfo.CurrentCulture.DisplayName}"); } private static void WriteLineInColor(string value, ConsoleColor color = ConsoleColor.White) { ConsoleColor previousColor = ForegroundColor; ForegroundColor = color; WriteLine(value); ForegroundColor = previousColor; } }The default foreground color in the preceding code is white because I have assumed that most readers will have a default background color of black. On my computer, I set the default background color of the console to white so that I can take screenshots for this book. Set whatever default color is best for your computer.
- Add a new class file named
Program.EventHandlers.cs, and modify its contents to define methods that will act as event handlers for a database connection state change by showing the original and current states, and for when the database sends anInfoMessage, as shown in the following code:using Microsoft.Data.SqlClient; // To use SqlInfoMessageEventArgs. using System.Data; // To use StateChangeEventArgs. partial class Program { private static void Connection_StateChange( object sender, StateChangeEventArgs e) { WriteLineInColor( $"State change from {e.OriginalState} to {e.CurrentState}.", ConsoleColor.DarkYellow); } private static void Connection_InfoMessage( object sender, SqlInfoMessageEventArgs e) { WriteLineInColor($"Info: {e.Message}.", ConsoleColor.DarkBlue); } } - In
Program.cs, delete the existing statements. Add statements to connect to SQL Server locally, to Azure SQL Database, or to SQL Edge, using either SQL authentication with a user ID and password or Windows Authentication without a user ID and password, as shown in the following code:using Microsoft.Data.SqlClient; // To use SqlConnection and so on. ConfigureConsole(); #region Set up the connection string builder SqlConnectionStringBuilder builder = new() { InitialCatalog = "Northwind", MultipleActiveResultSets = true, Encrypt = true, TrustServerCertificate = true, ConnectTimeout = 10 // Default is 30 seconds. }; WriteLine("Connect to:"); WriteLine(" 1 - SQL Server on local machine"); WriteLine(" 2 - Azure SQL Database"); WriteLine(" 3 – Azure SQL Edge"); WriteLine(); Write("Press a key: "); ConsoleKey key = ReadKey().Key; WriteLine(); WriteLine(); switch (key) { case ConsoleKey.D1 or ConsoleKey.NumPad1: builder.DataSource = "."; break; case ConsoleKey.D2 or ConsoleKey.NumPad2: builder.DataSource = // Use your Azure SQL Database server name. "tcp:apps-services-book.database.windows.net,1433"; break; case ConsoleKey.D3 or ConsoleKey.NumPad3: builder.DataSource = "tcp:127.0.0.1,1433"; break; default: WriteLine("No data source selected."); return; } WriteLine("Authenticate using:"); WriteLine(" 1 – Windows Integrated Security"); WriteLine(" 2 – SQL Login, for example, sa"); WriteLine(); Write("Press a key: "); key = ReadKey().Key; WriteLine(); WriteLine(); if (key is ConsoleKey.D1 or ConsoleKey.NumPad1) { builder.IntegratedSecurity = true; } else if (key is ConsoleKey.D2 or ConsoleKey.NumPad2) { Write("Enter your SQL Server user ID: "); string? userId = ReadLine(); if (string.IsNullOrWhiteSpace(userId)) { WriteLine("User ID cannot be empty or null."); return; } builder.UserID = userId; Write("Enter your SQL Server password: "); string? password = ReadLine(); if (string.IsNullOrWhiteSpace(password)) { WriteLine("Password cannot be empty or null."); return; } builder.Password = password; builder.PersistSecurityInfo = false; } else { WriteLine("No authentication selected."); return; } #endregion #region Create and open the connection SqlConnection connection = new(builder.ConnectionString); WriteLine(connection.ConnectionString); WriteLine(); connection.StateChange += Connection_StateChange; connection.InfoMessage += Connection_InfoMessage; try { WriteLine("Opening connection. Please wait up to {0} seconds...", builder.ConnectTimeout); WriteLine(); connection.Open(); WriteLine($"SQL Server version: {connection.ServerVersion}"); } catch (SqlException ex) { WriteLineInColor($"SQL exception: {ex.Message}", ConsoleColor.Red); return; } #endregion connection.Close();Good Practice: In this coding task, we prompt the user to enter the password to connect to the database. In a real-world app you are more likely to store the password in an environment variable or secure storage like Azure Key Vault. You must definitely never store passwords in your source code!
- Run the console app, select options that work with your SQL Server setup, and note the results, including the state change event output written in dark yellow to make them easier to see, as shown in the following output:
Connect to:
  1 - SQL Server on local machine
  2 - Azure SQL Database
  3 - Azure SQL Edge
Press a key: 1
Authenticate using:
  1 - Windows Integrated Security
  2 - SQL Login, for example, sa
Press a key: 1
Data Source=.;Initial Catalog=Northwind;Integrated Security=True;Multiple Active Result Sets=True;Connect Timeout=10;Encrypt=True;Trust Server Certificate=True
Opening connection. Please wait up to 10 seconds...
State change from Closed to Open.
SQL Server version: 15.00.2101
State change from Open to Closed.
The following steps show the experience when connecting to Azure SQL Database or Azure SQL Edge, which require a username and password. If you are connecting to a local SQL Server using Windows Integrated Security, then you will not need to enter a password.
- Run the console app, select choices that require a user ID and password, for example, with Azure SQL Database, and note the result, as shown in the following output:
Enter your SQL Server user ID: markjprice Enter your SQL Server password: [censored] Data Source=tcp:apps-services-book.database.windows.net,1433;Initial Catalog=Northwind;Persist Security Info=False;User ID=markjprice;Password=[censored];Multiple Active Result Sets=True;Connect Timeout=10;Encrypt=True;Trust Server Certificate=True Opening connection. Please wait up to 10 seconds... State change from Closed to Open. SQL Server version: 12.00.5168 State change from Open to Closed. - Run the console app, select choices that require a user ID and password, enter a wrong password, and note the result, as shown in the following output:
Enter your SQL Server user ID: markjprice Enter your SQL Server password: 123456 Data Source=tcp:apps-services-book.database.windows.net,1433;Initial Catalog=Northwind;Persist Security Info=False;User ID=markjprice;Password=123456;Multiple Active Result Sets=True;Connect Timeout=10;Encrypt=True;Trust Server Certificate=True Opening connection. Please wait up to 10 seconds... SQL exception: Login failed for user 'markjprice'. - In
Program.cs, change the server name (theDataSourceproperty) to something wrong. - Run the console app and note the result (depending on where your database is hosted, the exception message might be slightly different), as shown in the following output:
SQL exception: A network-related or instance-specific error occurred while establishing a connection to SQL Server. The server was not found or was not accessible. Verify that the instance name is correct and that SQL Server is configured to allow remote connections. (provider: TCP Provider, error: 0 - No such host is known.)
When opening a SQL Server connection, the default timeout is 30 seconds for server connection problems, so be patient! We changed the timeout to 10 seconds to avoid having to wait so long.
Executing queries and working with data readers using ADO.NET
Now that we have a successful connection to the SQL Server database, we can run commands that retrieve rows from a table and process the results using a data reader:
- In
Program.cs, import the namespace for working with ADO.NET command types, as shown in the following code:using System.Data; // To use CommandType.Good Practice: To save space in this book, I will use the names
cmdandrto represent an SQL command and an SQL data reader. In your code, give variables proper word names likecommandandreader.
- Before the statement that closes the connection, add statements to define a command that selects the ID, name, and price from the
Productstable, executes it, and outputs the product IDs, names, and prices using a data reader, as shown in the following code:SqlCommand cmd = connection.CreateCommand(); cmd.CommandType = CommandType.Text; cmd.CommandText = "SELECT ProductId, ProductName, UnitPrice FROM Products"; SqlDataReader r = cmd.ExecuteReader(); string horizontalLine = new string('-', 60); WriteLine(horizontalLine); WriteLine("| {0,5} | {1,-35} | {2,10} |", arg0: "Id", arg1: "Name", arg2: "Price"); WriteLine(horizontalLine); while (r.Read()) { WriteLine("| {0,5} | {1,-35} | {2,10:C} |", r.GetInt32("ProductId"), r.GetString("ProductName"), r.GetDecimal("UnitPrice")); } WriteLine(horizontalLine); r.Close();We format the unit price using the
Cformat, which uses the current culture to format currency values. The call toConfigureConsolesets the current culture to US English so the output for all readers uses$. To test alternative cultures like French that use the Euro currency symbol, modify the call at the top of theProgram.csfile, as shown in the following code:ConfigureConsole("fr-FR");.
- Run the console app and note the results, as shown in the following partial output:
---------------------------------------------------------- | Id | Name | Price | ---------------------------------------------------------- | 1 | Chai | $18.00 | | 2 | Chang | $19.00 | ... | 76 | Lakkalikööri | $18.00 | | 77 | Original Frankfurter grüne Soße | $13.00 | ---------------------------------------------------------- - In
Program.cs, modify the SQL statement to define a parameter for the unit price and use it to filter the results to products that cost more than that unit price, as shown highlighted in the following code:Write("Enter a unit price: "); string? priceText = ReadLine(); if(!decimal.TryParse(priceText, out decimal price)) { WriteLine("You must enter a valid unit price."); return; } SqlCommand cmd = connection.CreateCommand(); cmd.CommandType = CommandType.Text; cmd.CommandText = "SELECT ProductId, ProductName, UnitPrice FROM Products" + " WHERE UnitPrice >= @minimumPrice"; cmd.Parameters.AddWithValue("minimumPrice", price); - Run the console app, enter a unit price like
50, and note the results, as shown in the following partial output:Enter a unit price: 50 ---------------------------------------------------------- | Id | Name | Price | ---------------------------------------------------------- | 9 | Mishi Kobe Niku | $97.00 | | 18 | Carnarvon Tigers | $62.50 | | 20 | Sir Rodney's Marmalade | $81.00 | | 29 | Thüringer Rostbratwurst | $123.79 | | 38 | Côte de Blaye | $263.50 | | 51 | Manjimup Dried Apples | $53.00 | | 59 | Raclette Courdavault | $55.00 | ----------------------------------------------------------
Outputting statistics
An ADO.NET connection can track useful statistics during its lifetime, including those listed in Table 2.7:
|
Key |
Description |
|
|
Data is transmitted as bytes stored in buffers. |
|
|
Cursors are an expensive operation because they require state on the server, and should be avoided when possible. |
|
|
Number of prepares (compilations), executions of prepared commands, and executions of unprepared commands. |
|
|
Number of |
|
|
Number of server round trips, result sets, and transactions. |
|
|
Time in milliseconds spent connected, executing commands, or due to the network. |
Table 2.7: Connection statistics that can be tracked
Let’s enable this and output some of those statistics:
- In
Program.Helpers.cs, import the namespaces for working with ADO.NET and common collections, as shown in the following code:using Microsoft.Data.SqlClient; // To use SqlConnection. using System.Collections; // To use IDictionary. - In
Program.Helpers.cs, in the partialProgramclass, add a method to output statistics about the current connection, with an array of string values to control which of the dozen or more statistics we want to output, as shown in the following code:private static void OutputStatistics(SqlConnection connection) { // Remove all the string values to see all the statistics. string[] includeKeys = { "BytesSent", "BytesReceived", "ConnectionTime", "SelectRows" }; IDictionary statistics = connection.RetrieveStatistics(); foreach (object? key in statistics.Keys) { if (!includeKeys.Any() || includeKeys.Contains(key)) { if (int.TryParse(statistics[key]?.ToString(), out int value)) { WriteLineInColor($"{key}: {value:N0}", ConsoleColor.Cyan); } } } } - In
Program.cs, after writing the SQL Server version to the console, add a statement to enable statistics for the connection, as shown highlighted in the following code:WriteLine($"SQL Server version: {connection.ServerVersion}"); connection.StatisticsEnabled = true; - In
Program.cs, before closing the connection, add a statement to output statistics for the connection, as shown highlighted in the following code:OutputStatistics(connection); connection.Close(); - Run the console app and note the statistics, as shown in the following partial output:
BytesReceived: 3,888
BytesSent: 336
SelectRows: 77
ExecutionTime: 25
Working with ADO.NET asynchronously
You can improve the responsiveness of data access code by making it asynchronous. You will see more details of how asynchronous operations work in Chapter 5, Multitasking and Concurrency. For now, just enter the code as instructed.
Let’s see how to change the statements to work asynchronously:
- In
Program.cs, change the statement to open the connection to make it asynchronous, as shown highlighted in the following code:await connection.OpenAsync(); - In
Program.cs, change the statement to execute the command to make it asynchronous, as shown highlighted in the following code:SqlDataReader r = await cmd.ExecuteReaderAsync(); - In
Program.cs, change the statements to read the next row and get the field values to make them asynchronous, as shown highlighted in the following code:while (await r.ReadAsync()) { WriteLine("| {0,5} | {1,-35} | {2,8:C} |", await r.GetFieldValueAsync<int>("ProductId"), await r.GetFieldValueAsync<string>("ProductName"), await r.GetFieldValueAsync<decimal>("UnitPrice")); } - In
Program.cs, change the statements to close the data reader and connection to make them asynchronous, as shown highlighted in the following code:await r.CloseAsync(); await connection.CloseAsync(); - Run the console app and confirm that it has the same results as before, but it would run better in a multithreaded system, for example, not blocking the user interface in a GUI app, and not blocking I/O threads in a website.
Executing stored procedures using ADO.NET
If you need to execute the same query or another SQL statement multiple times, it is best to create a stored procedure, often with parameters, so that it can be precompiled and optimized. Stored procedure parameters have a direction to indicate if they are inputs, outputs, or return values.
Let’s see an example that uses all three types of parameter direction. First, we will create the stored procedure in the database:
- In your preferred database tool, connect to the
Northwinddatabase. - In your preferred database tool, add a new stored procedure:
- If you are using SQL Server Management Studio, then in Object Explorer, navigate to Databases | Northwind | Programmability, right-click Stored Procedures, and select New | Stored Procedure.
- If you are using Visual Studio 2022, then in Server Explorer, right-click Stored Procedures and select Add New Stored Procedure.
- If you are using Visual Studio Code, then in SQL Server, right-click your connection profile and select New Query.
- If you are using JetBrains Rider, then in the Database toolbar, click the Jump to Query Console… button, and then remove any existing statements. As well as the following SQL statements, start with a command to set the active database to Northwind:
USE Northwind GO. This should prevent JetBrains Rider from creating the stored procedure in themasterdatabase!
- Modify the SQL statements to define a stored procedure named
GetExpensiveProductswith two parameters, an input parameter for the minimum unit price and an output parameter for the row count of matching products, as shown in the following code:CREATE PROCEDURE [dbo].[GetExpensiveProducts] @price money, @count int OUT AS PRINT 'Getting expensive products: ' + TRIM(CAST(@price AS NVARCHAR(10))) SELECT @count = COUNT(*) FROM Products WHERE UnitPrice >= @price SELECT * FROM Products WHERE UnitPrice >= @price RETURN 0The stored procedure uses two
SELECTstatements. The first sets the@countoutput parameter to a count of the matching product rows. The second returns the matching product rows. It also calls thePRINTcommand, which will raise theInfoMessageevent.
- Right-click in the SQL statements and select Execute or Execute Query.
- Right-click Stored Procedures and select Refresh. In JetBrains Rider, it is named routines.
- Expand GetExpensiveProducts and note the
@price moneyinput,@count intinput/output, and return value parameters, as shown in SQL Server Management Studio in Figure 2.13:
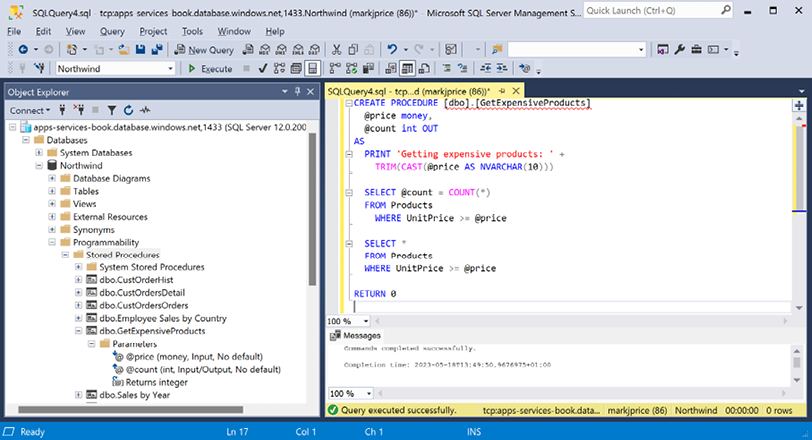
Figure 2.13: Parameters of the GetExpensiveProducts stored procedure
- Close the SQL query without saving changes.
- In
Program.cs, add statements to allow the user to choose between running the text command and the stored procedure. Add statements defining the stored procedure and its parameters, and then execute the command, as shown highlighted in the following code:SqlCommand cmd = connection.CreateCommand(); WriteLine("Execute command using:"); WriteLine(" 1 - Text"); WriteLine(" 2 - Stored Procedure"); WriteLine(); Write("Press a key: "); key = ReadKey().Key; WriteLine(); WriteLine(); SqlParameter p1, p2 = new(), p3 = new(); if (key is ConsoleKey.D1 or ConsoleKey.NumPad1) { cmd.CommandType = CommandType.Text; cmd.CommandText = "SELECT ProductId, ProductName, UnitPrice FROM Products" + " WHERE UnitPrice >= @minimumPrice"; cmd.Parameters.AddWithValue("minimumPrice", price); } else if (key is ConsoleKey.D2 or ConsoleKey.NumPad2) { cmd.CommandType = CommandType.StoredProcedure; cmd.CommandText = "GetExpensiveProducts"; p1 = new() { ParameterName = "price", SqlDbType = SqlDbType.Money, SqlValue = price }; p2 = new() { Direction = ParameterDirection.Output, ParameterName = "count", SqlDbType = SqlDbType.Int }; p3 = new() { Direction= ParameterDirection.ReturnValue, ParameterName = "rv", SqlDbType = SqlDbType.Int }; cmd.Parameters.AddRange(new[] { p1, p2, p3 }); } SqlDataReader r = await cmd.ExecuteReaderAsync(); - After the statement that closes the data reader, add statements to output the output parameter and the return value, as shown highlighted in the following code:
await r.CloseAsync();
if (key is ConsoleKey.D2 or ConsoleKey.NumPad2)
{
  WriteLine($"Output count: {p2.Value}");
  WriteLine($"Return value: {p3.Value}");
}
await connection.CloseAsync();
If a stored procedure returns result sets as well as parameters, then the data reader for the result sets must be closed before the parameters can be read.
- Run the console app and note the results if the price entered is
60, and note theInfoMessageevent handler writes a message in dark blue, as shown in the following output:Enter a unit price: 60 Execute command using: 1 - Text 2 - Stored Procedure Press a key: 2 Info: Getting expensive products: 60.00. ---------------------------------------------------------- | Id | Name | Price | ---------------------------------------------------------- | 9 | Mishi Kobe Niku | $97.00 | | 18 | Carnarvon Tigers | $62.50 | | 20 | Sir Rodney's Marmalade | $81.00 | | 29 | Thüringer Rostbratwurst | $123.79 | | 38 | Côte de Blaye | $263.50 | ---------------------------------------------------------- Output count: 5 Return value: 0 State change from Open to Closed.
Outputting streams with a data reader
In a real app or service, we would likely not output to the console. More likely, as we read each row with a data reader, we might output to a stream that writes HTML tags inside a web page, or text formats like XML and JSON for returning data from a service.
Let’s add the ability to generate a JSON file:
- In
Program.cs, import the namespace for working efficiently with JSON and to statically import theEnvironmentandPathclasses, as shown in the following code:using System.Text.Json; // To use Utf8JsonWriter, JsonSerializer. using static System.Environment; using static System.IO.Path; - In
Program.cs, before thewhilestatement that processes the data reader, add statements to define a file path for a JSON file, create a file stream, and start a JSON array, then in thewhileblock, write a JSON object that represents each product row, and finally, end the array and close the stream, as shown highlighted in the following code:// Define a file path to write to. string jsonPath = Combine(CurrentDirectory, "products.json"); await using (FileStream jsonStream = File.Create(jsonPath)) { Utf8JsonWriter jsonWriter = new(jsonStream); jsonWriter.WriteStartArray(); while (await r.ReadAsync()) { WriteLine("| {0,5} | {1,-35} | {2,10:C} |", await r.GetFieldValueAsync<int>("ProductId"), await r.GetFieldValueAsync<string>("ProductName"), await r.GetFieldValueAsync<decimal>("UnitPrice")); jsonWriter.WriteStartObject(); jsonWriter.WriteNumber("productId", await r.GetFieldValueAsync<int>("ProductId")); jsonWriter.WriteString("productName", await r.GetFieldValueAsync<string>("ProductName")); jsonWriter.WriteNumber("unitPrice", await r.GetFieldValueAsync<decimal>("UnitPrice")); jsonWriter.WriteEndObject(); } jsonWriter.WriteEndArray(); jsonWriter.Flush(); jsonStream.Close(); } WriteLineInColor($"Written to: {jsonPath}", ConsoleColor.DarkGreen); - Run the console app, enter a price of
60, and note the path to the JSON file, as shown in the following output:Written to: C:\apps-services-net8\Chapter02\Northwind.Console.SqlClient\bin\Debug\net8.0\products.json - Open the
products.jsonfile and note that the JSON is written with no whitespace, so it all appears on one line, as shown in the following file:[{"productId":9,"productName":"Mishi Kobe Niku","unitPrice":97.0000},{"productId":18,"productName":"Carnarvon Tigers","unitPrice":62.5000},{"productId":20,"productName":"Sir Rodney\u0027s Marmalade","unitPrice":81.0000},{"productId":29,"productName":"Th\u00FCringer Rostbratwurst","unitPrice":123.7900},{"productId":38,"productName":"C\u00F4te de Blaye","unitPrice":263.5000}] - If you are using Visual Studio 2022, then you can right-click and select Format Document, and note that it is now easier to read, as shown in Figure 2.14:
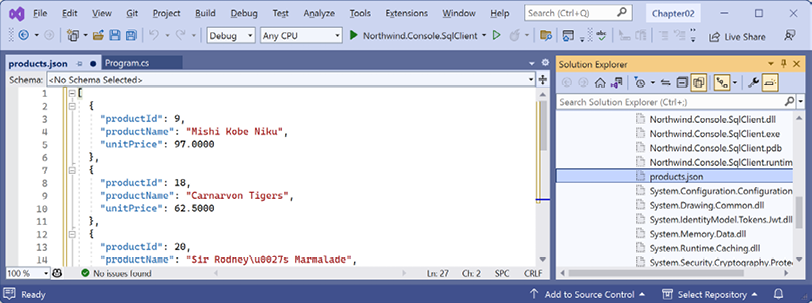
Figure 2.14: The products.json file generated from a data reader
Generating objects with a data reader
For maximum flexibility, we likely want to convert the rows in a data reader into object instances stored in an array or collection. After that, we could serialize the object graph however we want. ADO.NET does not have a built-in ability to map a data reader row to an object, so we will have to do it manually.
Let’s see an example:
- Add a new class file named
Product.cs, and modify its contents to define a class to represent just the three columns we want from each row in theProductstable, as shown in the following code:namespace Northwind.Models; public class Product { public int ProductId { get; set; } public string? ProductName { get; set; } public decimal? UnitPrice { get; set; } }Good Practice: In this task, we will use this type only for read-only instances, so we could have used an immutable
record. But later we will need to change property values after the object is created, so we have to define aclassinstead.
- At the top of
Program.cs, import theNorthwind.Modelsnamespace so we can useProduct. - In
Program.cs, before creating the file stream, instantiate a list of products with an initial storage for 77 items (but this is not a limit) because when first created the Northwind database has 77 products, as shown highlighted in the following code:List<Product> products = new(capacity: 77); await using (FileStream jsonStream = File.Create(jsonPath)) - In the
whileblock, add statements to instantiate theProducttype per row in the data reader and add it to the list, as shown highlighted in the following code:while (await r.ReadAsync()) { Product product = new() { ProductId = await r.GetFieldValueAsync<int>("ProductId"), ProductName = await r.GetFieldValueAsync<string>("ProductName"), UnitPrice = await r.GetFieldValueAsync<decimal>("UnitPrice") }; products.Add(product); ... } - Before closing the data reader, add a statement to use the static
Serializemethod of theJsonSerializerclass to write the list of products to the console, as shown highlighted in the following code:WriteLineInColor(JsonSerializer.Serialize(products), ConsoleColor.Magenta); await r.CloseAsync(); - Run the console app, enter a price of
60, and note the JSON generated from the list of products, as shown in the following output:Written to: C:\apps-services-net8\Chapter02\Northwind.Console.SqlClient\bin\Debug\net8.0\products.json [{"ProductId":9,"ProductName":"Mishi Kobe Niku","UnitPrice":97.0000},{"ProductId":18,"ProductName":"Carnarvon Tigers","UnitPrice":62.5000},{"ProductId":20,"ProductName":"Sir Rodney\u0027s Marmalade","UnitPrice":81.0000},{"ProductId":29,"ProductName":"Th\u00FCringer Rostbratwurst","UnitPrice":123.7900},{"ProductId":38,"ProductName":"C\u00F4te de Blaye","UnitPrice":263.5000}]
Instead of manually instantiating objects, to simplify even more, we can use a simple object-relational mapper (ORM) like Dapper.

