Creating applications
Now all the definitions are in place and preparation work is done, we can finally start building our applications. Go to the Application Builder in your workspace and create an application, either by making a copy of the template application or by clicking on the Create button.
List of values
One of the first things that we need to tackle is the creation of list of values. There are two kinds of list of values—static and dynamic. A static list of values consists of a limited number of possible values. A dynamic list of values is defined by a query that returns the possible values. For dynamic list of values, it's also possible to make them even more dynamic, by just typing in a function that returns (dynamically) a query.
Most of the list of values will be dynamic, but we can easily think of a few static list of values that will be used in almost every system and thus are a good candidate for the template application. Two examples of them are the Yes/No and the Male/Female list of values.
If for some reason we create a list of values definition for an item by typing in a query, instead of referencing a pre-created shared component list of values, we can easily create a real reusable list of values for it, by clicking on the Convert LOV task. This wizard will create a reusable component list of values and replace the hand-made query with a reference to the new list of values.
There are two sources to identify our first set of application-specific list of values. The first one is for short domains, used in check constraints of a column in a table. These values can be used in static list of values. The second source is to identify base tables and create dynamic list of values of them. To identify them, see the Base Tables section discussed later in this chapter.
When creating list of values, always use the aliases d and r or display_value and return_value for the two columns in the query, just to be clear which values are displayed and returned.
After creating our first set of list of values, we need to add more list of values as we build our system. For more performance-related information on list of values, refer to Chapter 2, Leveraging the Database.
Mapping the model to pages
The next step is to map our data model to APEX pages. With mapping we mean that for every table in the data model we must define pages (with respect to the desired functionality) to manipulate or query the data. There could be exceptions, such as parameter or logging tables, although pages for those tables could also be very useful, though not necessary for a properly functioning application.
We have some guidelines regarding pages:
If we are just selecting and if we want the user to enhance and adjust the resulting (report) page, we should use interactive reports, otherwise we should use normal reports.
Don't confuse the user with too many objects on a page. On the other hand, we don't want to create too many pages for simple tasks.
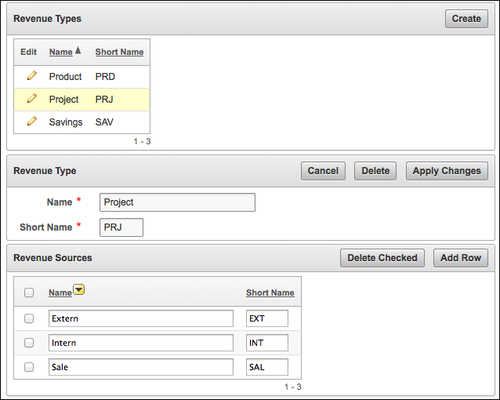
Basic tables should be maintained on a single page.
Forms can always be put on a separate screen and if necessary, can be called from a link in a report.
Be sure to use User Interface Defaults for consistency.
Use region columns where appropriate.
Use nested region where appropriate.
Some other points to take into account are as follows:
At the moment, it's not possible to put more than one tabular form or more than one interactive report on a single page.
Drawback of having everything on a single page is the number of buttons with the same name, and so on. Rename some of them, but be consistent with that renaming throughout the application. Also, some kind of current record indicator is needed. This can be accomplished by manipulating the report template.
Basically we use the following regions for building or composing a page:
SQL report
Interactive report
Form on a table or view
Tabular form
Form on table with report
Master detail form
When we build a page, we look at the data model and along with the requirements we try to combine one or more of these regions. Also we link those regions to each other where appropriate. While building the pages we also create the processes, validations, computations, extra items, dynamic actions, and so on, which we need to achieve the desired functionality.
Base tables
We begin with base tables that we have to maintain. These base tables are often used in LOVs. A way to recognize a base table is to look at the number of foreign keys. If there are no foreign keys in the table, it's a good candidate for a base table. Another characteristic of base tables is that the data is more or less static. It's also good practice to group these pages together on a separate tab with a name such as Basic Data or System.

Base table with one list of values
Depending on the number of columns in the base table we have two choices regarding the layout:
If there are a few columns in the base table, we can use a tabular form if the total width of all the columns is not too wide when placed side by side. We don't want the user to scroll horizontally.
If we have too many columns, we can use a form on the table with a report to layout the columns neatly in the form. We could also use this approach when we have a few columns. If we do not want the user to switch between too many pages, we can generate both the form and report on one single page. We can accomplish that by filling in the same page number for the form and report in the wizard. After that we may want to place the report above the form.

Form on a table with report
Master detail
By looking at the model, we can identify possible candidate tables for a master detail table.

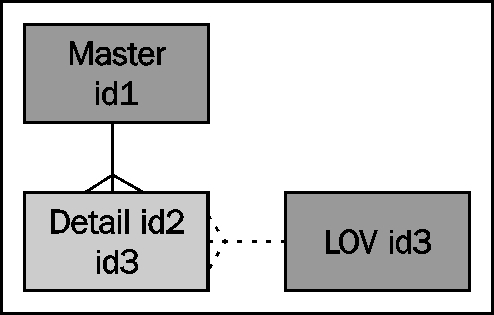
Master detail tables with one LOV
In the Master Detail wizard, we have a lot of decisions to make. Always use a master report for navigation and don't use master row navigation, because it's a little bit confusing when navigating. We can choose to edit the detail as a tabular form on the same page.

Master detail page, detail as tabular form
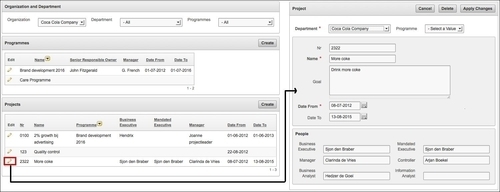
Another option is to generate a report as a detail region with a form on a separate page or the same page. As with base table pages, it depends on the number of columns in the detail table.

Master detail page, detail on separate page as a form
If we do not want the user to switch between too many pages, we fill in the same page number for the components that we want to appear on the same page. After that we need to place the report above the form. Beware of using breadcrumbs when we put all the regions on one page. In that case, we will get the ORA-00001: unique constraint (APEX_040000.WWV_FLOW_UNIQUE_MENU_OPT) violated error.
Depending on whether the master is already a base table with its own page we can maintain that table here. If we don't want to maintain it here, we can hide that generated region, so the form will never be shown. We don't have to delete it, so that we can always use it later, if necessary. After the wizard, we have to rearrange some regions to get the right page.
Another variant is master detail detail. In that case, we have to link the regions together manually.
Intersection
An intersection table can be recognized by the fact that they also have—besides their own ID—two IDs from the foreign keys. It's also possible that the intersection table contains other foreign keys or columns.

Intersection table
We can implement an intersection table as a master detail page with an LOV, but APEX also offers two alternatives to implement an intersection table—a shuttle and a multiselect list. We can implement one of the driving tables as a base table and use the other table as a lookup table. In the following screenshot we see an example of a shuttle:

Shuttle
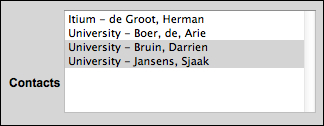
In the following screenshot, we can see the use of a multiselect list:

Multiselect list
Unfortunately, APEX doesn't offer standard processes for populating and maintaining shuttles or multiselect lists. The following function and procedure can be used as a generic solution for these processes. You should put them in a package and write exception handlers to log and deal with the errors that can occur (see next chapters in this book). The
function get_selectlist
can be used to populate the item. We call this function in the On Load - After Header process and after the Fetch Row process, which is generated by the wizard (if present):
FUNCTION GET_SELECTLIST
  (P_INTERSECTION_TABLE IN VARCHAR2
  ,P_LOOKUP_FK_NAME IN VARCHAR2
  ,P_MASTER_FK_NAME IN VARCHAR2
  ,P_MASTER_FK_VALUE IN VARCHAR2
  )
  RETURN VARCHAR2
  IS
-- Get the selectlist value as a list e.g. 1:2:4 .
-- Create the process to fire After Header and after
-- the wizard generated Fetch Row process.

  l_selected      APEX_APPLICATION_GLOBAL.VC_ARR2;
  l_sql_statement VARCHAR2(1000);
  l_dummy_number  NUMBER;


BEGIN

-- Check if master foreign key value is a number
  l_dummy_number := TO_NUMBER(p_master_fk_value);

  IF p_lookup_fk_name     IS NOT NULL AND
    p_intersection_table IS NOT NULL AND
    p_master_fk_name     IS NOT NULL AND
    p_master_fk_value    IS NOT NULL THEN

    l_sql_statement :=
      'SELECT ' || p_lookup_fk_name     || ' ' ||
      'FROM '   || p_intersection_table || ' ' ||
      'WHERE '  || p_master_fk_name     ||
      '=' || p_master_fk_value ;

    EXECUTE IMMEDIATE l_sql_statement BULK COLLECT INTO l_selected;

  END IF;

  -- Assign the colon separated list to l_selected
  RETURN APEX_UTIL.TABLE_TO_STRING(l_selected);

  EXCEPTION WHEN OTHERS THEN
    NULL; -- logging can be done here!

END;
If the intersection item P250_shuttle is called and the driving table ID is stored in P250_id, the call to this function could look as follows:
: P250_shuttle := get_selectlist
    ( p_intersection_table => 'dep_pages'
    , p_lookup_fk_name => 'pag_id'
    , p_master_fk_name => 'dep_id'
    , P_master_fk_value => :P250_id);
Beware of SQL injection and keep P250_id hidden and protected.
The
procedure set_selectlist can be used to store the changes made in the shuttle or multiselect list. We call the function On Submit - After Validations and Computations and after that we call the DML processes generated by the wizard. Be aware of a reset process. If such a process is present, we have to call our procedure before the reset process. Otherwise, we lose all our changes and nothing is saved.
PROCEDURE SET_SELECTLIST
  (P_LIST IN VARCHAR2
  ,P_INTERSECTION_TABLE IN VARCHAR2
  ,P_LOOKUP_FK_NAME IN VARCHAR2
  ,P_MASTER_FK_NAME IN VARCHAR2
  ,P_MASTER_FK_VALUE IN VARCHAR2
  )
  IS
-- Insert the selectlist value (as a list e.g. 1:2:4) into
-- the intersection table. This process fires After Submit
-- and after the wizard generated process that handles
-- inserts, updates and deletes on the master table.
  l_selected      APEX_APPLICATION_GLOBAL.VC_ARR2;
  l_sql_statement VARCHAR2(1000);
  l_id            NUMBER;
  l_dummy_number  NUMBER;

BEGIN

  -- Check if master foreign key value is a number
  l_dummy_number := TO_NUMBER(p_master_fk_value);

  IF p_lookup_fk_name     IS NOT NULL AND
    p_intersection_table IS NOT NULL AND
    p_master_fk_name     IS NOT NULL AND
    p_master_fk_value    IS NOT NULL THEN

    -- Convert the colon separated string of values
    -- into a PL/SQL array
    l_selected := HTMLDB_UTIL.STRING_TO_TABLE(p_list);

    -- Clean up the intersection table first
    -- Delete necessary records only
    l_sql_statement :=
      'DELETE FROM ' || p_intersection_table || ' ' ||
      'WHERE '  || p_master_fk_name || '=' ||
      p_master_fk_value || ' ' ||
      'AND  instr('':'|| p_list ||':'','':''||TO_CHAR('||
      p_lookup_fk_name||')||'':'' )=0'
    EXECUTE IMMEDIATE l_sql_statement;

    -- Loop over the array to insert lookup_ids and
    -- master_id into the intersection table
    FOR i IN 1..l_selected.count LOOP

      -- Check if the record already exists
      l_sql_statement :=
        'SELECT ' || l_selected(i) ||' ' ||
        'FROM ' || p_intersection_table || ' ' ||
        'WHERE '  || p_master_fk_name || '=' ||
        p_master_fk_value || ' ' ||
        'AND ' || p_lookup_fk_name ||'='|| l_selected(i);

    BEGIN
      -- when the record exists do nothing
      EXECUTE IMMEDIATE l_sql_statement INTO l_id;
      EXCEPTION WHEN OTHERS THEN
      -- In case there is no record, insert it
      l_sql_statement :=
      'INSERT INTO ' || p_intersection_table || ' ' ||
      '(' || p_master_fk_name || ',' ||
      p_lookup_fk_name || ') ' ||
      'VALUES (' || p_master_fk_value || ',' ||
      l_selected(i) || ')';
       -- no parent key exception
      BEGIN
        EXECUTE IMMEDIATE l_sql_statement;
        EXCEPTION WHEN OTHERS THEN
        NULL; -- logging can be done here!
      END;
    END;

    END LOOP;

  END IF;

  EXCEPTION WHEN OTHERS THEN
    NULL; -- logging can be done here!

END;
If the intersection item P250_shuttle is called and the driving table ID is stored in P250_id, the call to this procedure could look as follows:
set_selectlist ( p_list => :P250_shuttle
               , p_intersection_table => 'dep_pages'
               , p_lookup_fk_name => 'pag_id'
               , p_master_fk_name => 'dep_id'
               , p_master_fk_value => :P250_ID );
Simple report
If we have only one simple read-only table or query for a page, we can use a SQL report or an interactive report. With the latter, the user has a lot of possibilities, including the presentation and filtering of the data.
Other pages
There are always certain pages that don't fall in the aforementioned categories, with special functionality—for example, parameter sections or charts with management information. These pages must be built up with separate regions and after that those must be attached together. Another example is a wizard for the end user that can be used to accomplish rather complex input tasks with validations between the sub-screens.


