Exploring the .NET MAUI framework
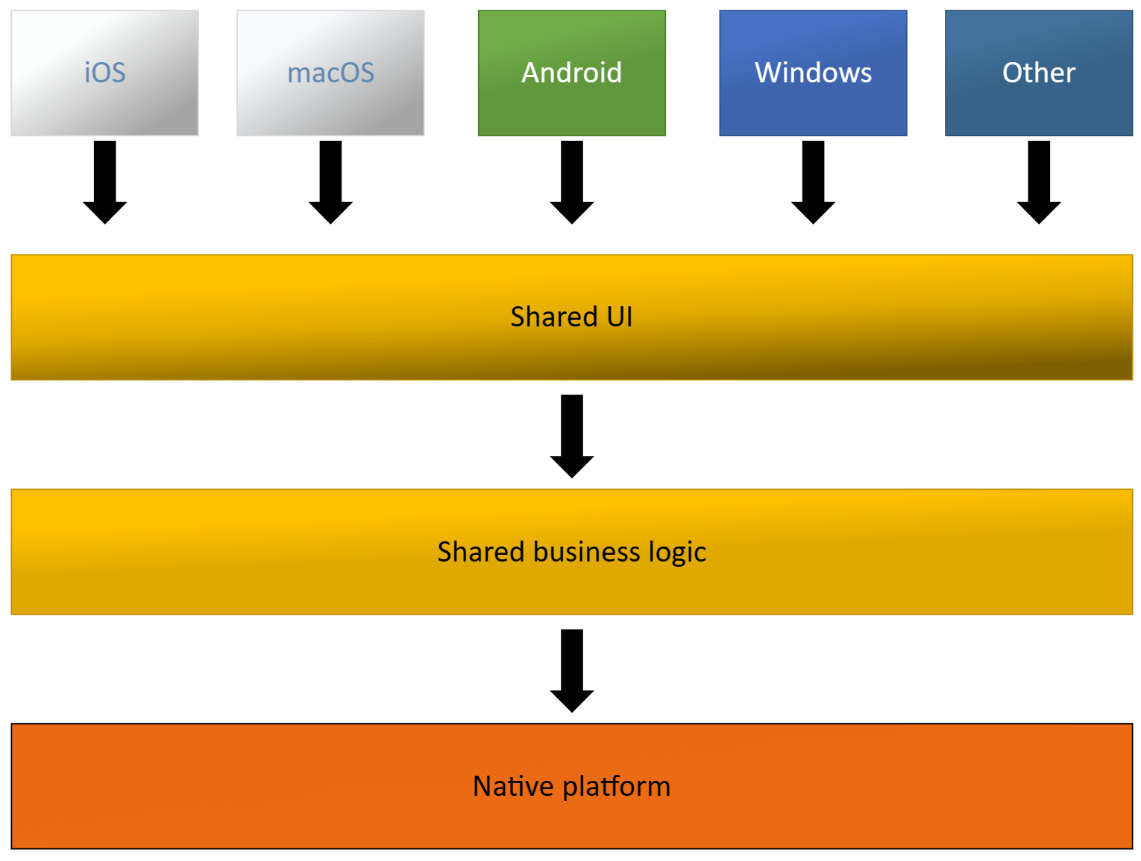
.NET MAUI is a cross-platform framework that is built on top of .NET mobile (for iOS and Android) and the Windows UI (WinUI) library. .NET MAUI allows developers to create a UI for iOS, Android, and WinUI in XAML. .NET MAUI improves on Xamarin.Forms by placing all platform-specific functionality in the same project as cross-platform functionality, making it easier to find and edit your code. .NET MAUI also includes all of what used to be in Xamarin.Essentials, which provides cross-platform capabilities, such as permissions, location, photos and camera, contacts, and maps, and leverages that cross-platform functionality with one shared code base, as illustrated in the following diagram:

Figure 1.5 – .NET MAUI architecture
If we build an app with .NET MAUI, we can use XAML, C#, or a combination of both to create the UI.
The architecture of .NET MAUI
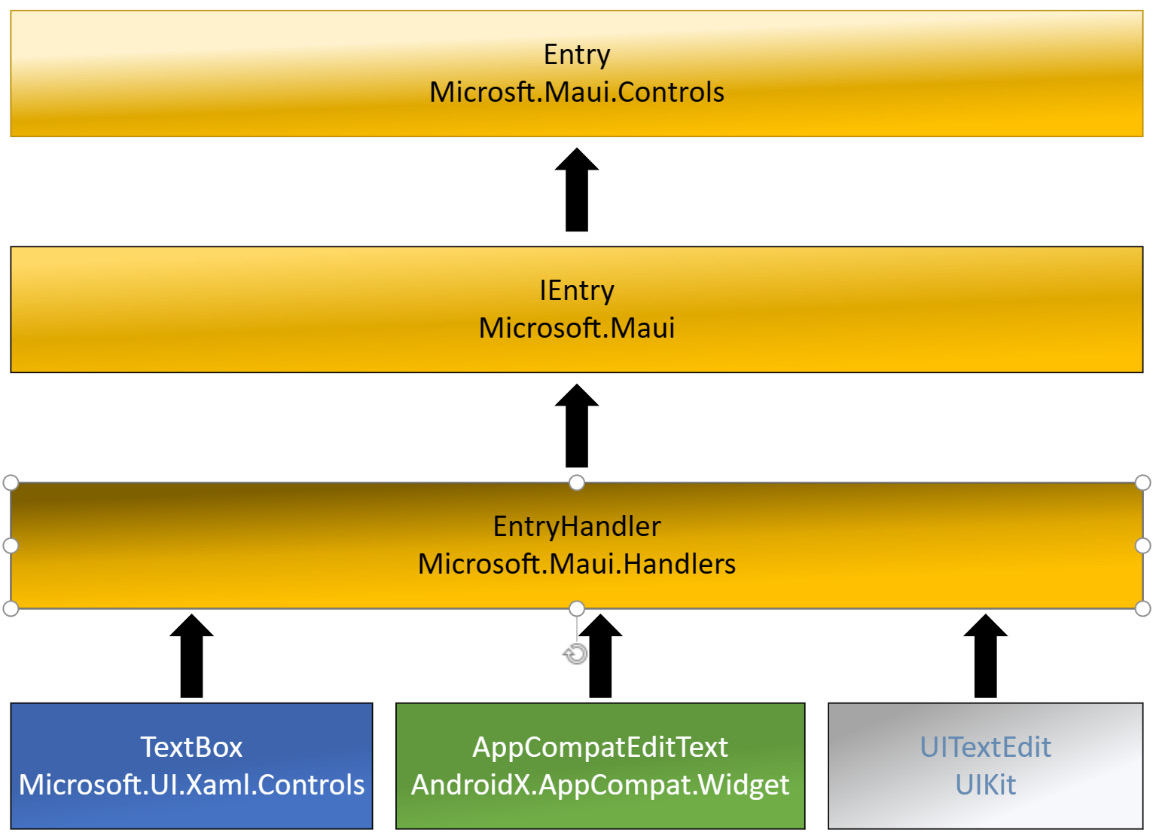
.NET MAUI is an abstraction layer on top of each platform. .NET MAUI has a shared layer that is used by all platforms, as well as a platform-specific layer. The platform-specific layer contains handlers. A handler is a class that maps a .NET MAUI control to a platform-specific native control. Each .NET MAUI control has a platform-specific handler.
The following diagram illustrates how the entry control in .NET MAUI is mapped to the correct native control for each platform. The entry control is mapped to a UITextField control from the UIKit namespace when the shared .NET MAUI code is used in an iOS app. On Android, the entry control is mapped to an EditText control from the AndroidX.AppCompat.Widget namespace. Finally, for Windows, .NET MAUI Entry handlers map to TextBox from the Microsoft.UI.Xaml.Controls namespace.

Figure 1.6 – .NET MAUI control architecture
With a firm grasp of .NET MAUI architecture and .NET mobile platforms, it is time to explore how to create UIs in .NET MAUI.
Defining a UI using XAML
The most common way to declare our UI in .NET MAUI is by defining it in a XAML document. It is also possible to create the GUI in C#, since XAML is a markup language for instantiating objects. We could, in theory, use XAML to create any type of object, provided it has a parameterless constructor. A XAML document is an Extensible Markup Language (XML) document with a specific schema.
Over the next few sections, we are going to learn about a few controls in .NET MAUI to get us started. Then, we will compare different ways that you can construct the UI using .NET MAUI.
Defining a Label control
As a simple example, let’s look at the following snippet of a XAML document:
<Label Text="Hello World!" />
When the XAML parser encounters this snippet, it creates an instance of a Label object and then sets the properties of the object that correspond to the attributes in the XAML. This means that if we set a Text property in XAML, it sets the Text property on the instance of the Label object that is created. The XAML in the preceding example has the same effect as the following:
var obj = new Label()
{
    Text = "Hello World!"
};
XAML exists to make it easier to view the object hierarchy that we need to create in order to make a GUI. An object model for a GUI is also hierarchical by design, so XAML supports adding child objects. We can simply add them as child nodes, as follows:
<StackLayout>
    <Label Text="Hello World" />
    <Entry Text="Ducks are us" />
</StackLayout>
StackLayout is a container control that organizes the children vertically or horizontally within a container. Vertical organization is the default value and is used unless we specify otherwise. There are other containers, such as Grid and FlexLayout.
These will be used in many of the projects in the following chapters.
Creating a page in XAML
A single control is no use unless it has a container that hosts it. Let’s see what an entire page would look like. A fully valid ContentPage object defined in XAML is an XML document. This means that we must start with an XML declaration. After that, we must have one—and only one—root node, as shown:
<?xml version="1.0" encoding="UTF-8"?>
<ContentPage xmlns="http://schemas.microsoft.com/dotnet/2021/maui"
xmlns:x="http://schemas.microsoft.com/winfx/2009/xaml" x:Class="MyApp.
MainPage">
    <StackLayout>
        <Label Text="Hello world!" />
    </StackLayout>
</ContentPage>
In the preceding example, we defined a ContentPage object that translates into a single view on each platform. In order to make it valid XAML, we need to specify a default namespace (xmlns="http://schemas.microsoft.com/dotnet/2021/maui") and then add the x namespace (xmlns:x="http://schemas.microsoft.com/winfx/2009/xaml").
The default namespace lets us create objects without prefixing them, such as the StackLayout object. The x namespace lets us access properties such as x:Class, which tells the XAML parser which class to instantiate to control the page when the ContentPage object is created.
A ContentPage object can have only one child. In this case, it’s a StackLayout control. Unless we specify otherwise, the default layout orientation is vertical. A StackLayout object can, therefore, have multiple children. Later in the book, we will touch on more advanced layout controls, such as the Grid and FlexLayout controls.
As the first child of StackLayout, we will create a Label control.
Creating a page in C#
For clarity, the following code shows you how the previous example would look in C#:
public class MainPage : ContentPage
{
}
MainPage is a class that inherits from .NET MAUI’s ContentPage. This class is automatically generated for us if we create a XAML page, but if we just use code, we will need to define it ourselves.
Let’s create the same control hierarchy as the XAML page we defined earlier using the following code:
var page = new MainPage();
var stacklayout = new StackLayout();
stacklayout.Children.Add(
    new Label()
    {
        Text = "Welcome to .NET MAUI"
    });
page.Content = stacklayout;
The first statement creates a page object. We could, in theory, create a new ContentPage page directly, but this would prohibit us from writing any code behind it. For this reason, it’s good practice to subclass each page that we plan to create.
The block following this first statement creates the StackLayout control, which contains the Label control that is added to the Children collection.
Finally, we need to assign StackLayout to the Content property of the page.
Since XAML is a markup language that mainly instantiates objects for us, we can see how easy it is to replicate that in C#. Next, we will take a look at some extensions that make developing your UI in C# a little better.
Using the .NET MAUI Markup Community Toolkit
The Community Toolkit organization on GitHub has a project to add Fluent extensions to MAUI for creating the UI in C#. The project .NET MAUI Markup Community Toolkit (https://github.com/CommunityToolkit/Maui.Markup), or MAUI.Markup for short, is described on the website as follows:
Using MAUI Markup to create the same page we did in the previous two sections would look something like the following:
public class MainPage: ContentPage
{
    public MainPage()
    {
        Build();
    }
    public void Build() {
        Content = new StackLayout()
        {
            Children =
            {
                new Label()
                {
                    Text = "Welcome to .NET MAUI"
                }
            }
        };
    }
}
For more information on how to use MAUI Markup in your applications, visit https://github.com/CommunityToolkit/Maui.Markup using your favorite web browser.
So, what is better for creating our UI, XAML or C#?
XAML or C#?
Generally, using XAML provides a much better overview, since the page is a hierarchical structure of objects, and XAML is a very nice way of defining that structure. In code, the structure is flipped around as we need to define the innermost object first, making it harder to read the structure of our page. This was demonstrated in the Creating a page in XAML section of this chapter. Having said that, it is generally a matter of preference as to how we decide to define the GUI. This book will use XAML rather than C# in the projects to come.
Now that we’ve explored how to create our pages using .NET MAUI, it is time to review how .NET MAUI and .NET mobile compare.
.NET MAUI versus traditional .NET mobile
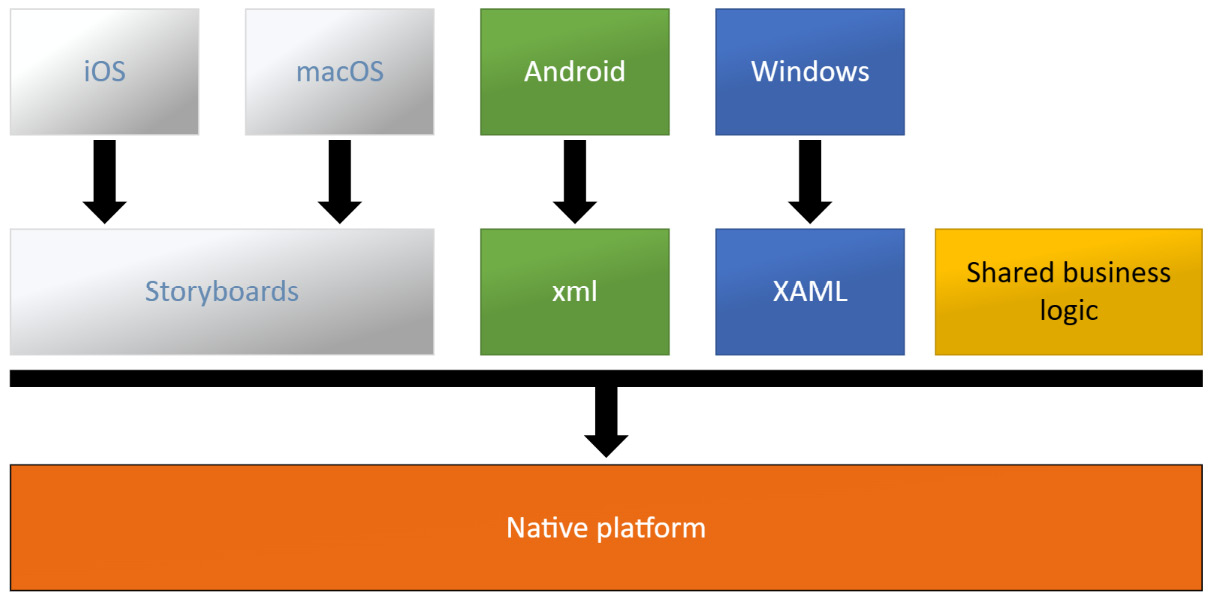
While this book is about .NET MAUI, we will also highlight the differences between using traditional .NET mobile and .NET MAUI. Traditional .NET mobile is used when developing UIs that use the iOS or Android software development kit (SDK) without any means of abstraction. For example, we can create an iOS app that defines its UI in a storyboard or in the code directly. This code would not be reusable for other platforms, such as Android. Apps built using this approach can still share non-platform-specific code by simply referencing a .NET standard library. This relationship is shown in the following diagram:

Figure 1.7 – Traditional .NET UI
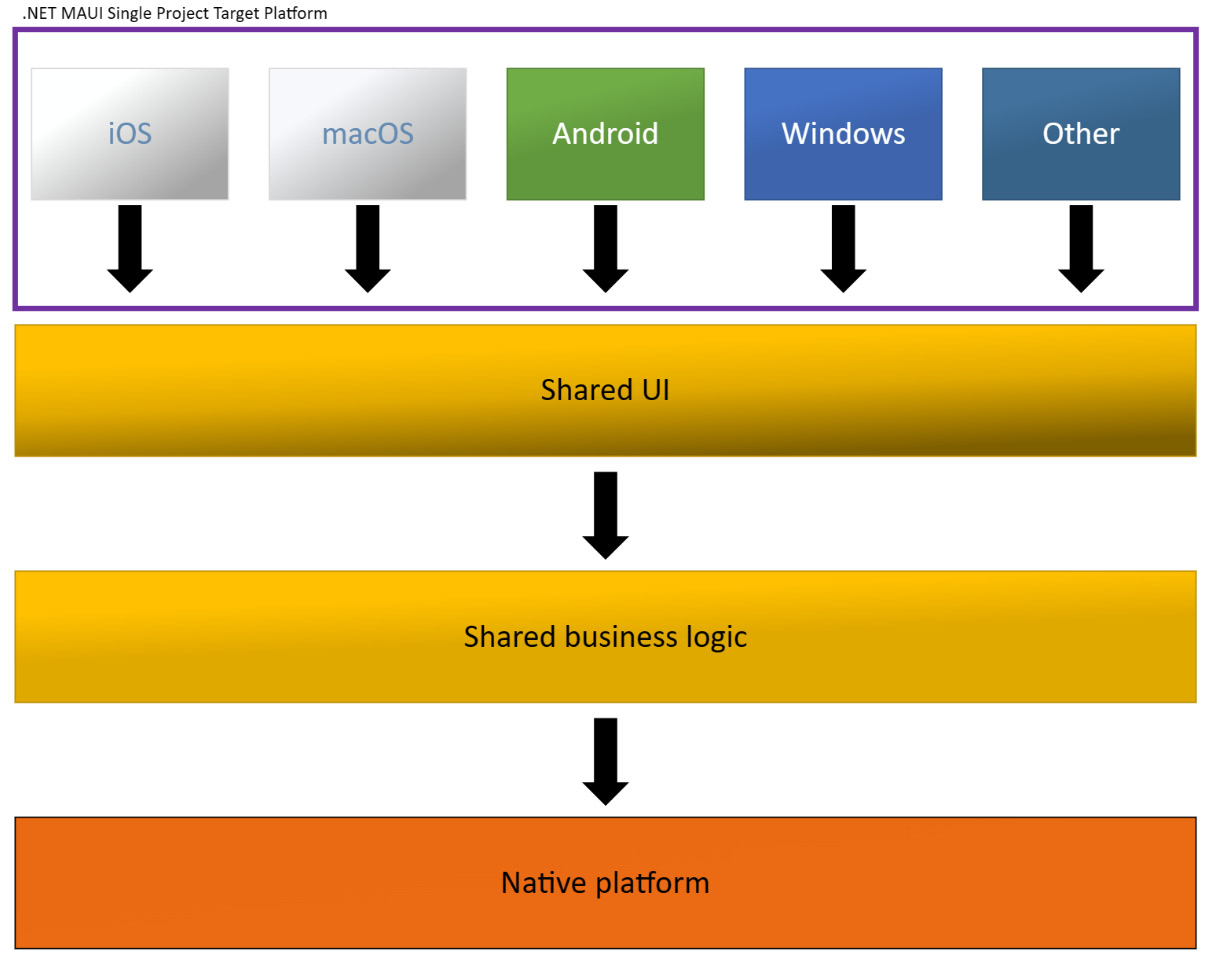
.NET MAUI, on the other hand, is an abstraction of the GUI, which allows us to define UIs in a platform-agnostic way. It still builds on top of .NET for iOS, .NET for Android, and all the other supported platforms. The .NET MAUI app is created as a .NET standard library where the shared source files and platform-specific source files are all built within the same project for the platform we are currently building for. This relationship is shown in the following diagram:

Figure 1.8 – .NET MAUI UI with a single project
Having said that, .NET MAUI cannot exist without traditional .NET mobile since it’s bootstrapped through an app for each platform. This gives us the ability to extend .NET MAUI on each platform using custom renderers and platform-specific code that can be exposed to our shared code base through interfaces. We’ll look at these concepts in more detail later in this chapter.
When to use .NET MAUI
We can use .NET MAUI in most cases and for most types of apps. If we need to use controls that are not available in .NET MAUI, we can always use the platform-specific APIs. There are, however, cases where .NET MAUI is not useful. The most common situation where we might want to avoid using .NET MAUI is if we build an app that should look very different across our different target platforms.
Enough theory for now; let’s get our development machines ready to develop using .NET MAUI.


