Search icon CANCEL
Subscription
0
Cart icon
Your Cart (0 item)
Close icon
You have no products in your basket yet
Arrow left icon
Explore Products
Best Sellers
New Releases
Books
Videos
Audiobooks
Learning Hub
Free Learning
Arrow right icon
Arrow up icon
GO TO TOP
.NET MAUI Cookbook

You're reading from   .NET MAUI Cookbook Build a full-featured app swiftly with MVVM, CRUD, AI, authentication, real-time updates, and more

Arrow left icon
Product type Paperback
Published in Dec 2024
Publisher Packt
ISBN-13 9781835461129
Length 384 pages
Edition 1st Edition
Languages
Arrow right icon
Author (1):
Arrow left icon
Alexander Russkov Alexander Russkov
Author Profile Icon Alexander Russkov
Alexander Russkov
Arrow right icon
View More author details
Toc

Table of Contents (11) Chapters Close

Preface 1. Chapter 1: Crafting the Page Layout FREE CHAPTER 2. Chapter 2: Mastering the MVVM Design Pattern 3. Chapter 3: Advanced XAML and UI Techniques 4. Chapter 4: Connecting to a Database and Implementing CRUD Operations 5. Chapter 5: Authentication and Authorization 6. Chapter 6: Real-Life Scenarios: AI, SignalR, and More 7. Chapter 7: Understanding Platform-Specific APIs and Custom Handlers 8. Chapter 8: Optimizing Performance 9. Index 10. Other Books You May Enjoy

Signing in with a Google account

Have you ever found an interesting web service but closed the browser page as soon as you realized you’d need to go through the entire registration process to use it? On the other hand, if the service offers single-click sign-up options, such as using your Google or Facebook account, you’re more likely to continue using it, right?

Signing in and signing up are among the first actions your app users will take, so it’s important to make this process as easy as possible by offering social identity authentication options.

In this recipe, we’ll implement Google-based authentication. We’ll add an endpoint to ASP.NET Core Identity that will start a Google authentication flow and create a new user if they haven’t registered before. Additionally, we’ll develop the client-side UI for user authentication in our .NET MAUI app.
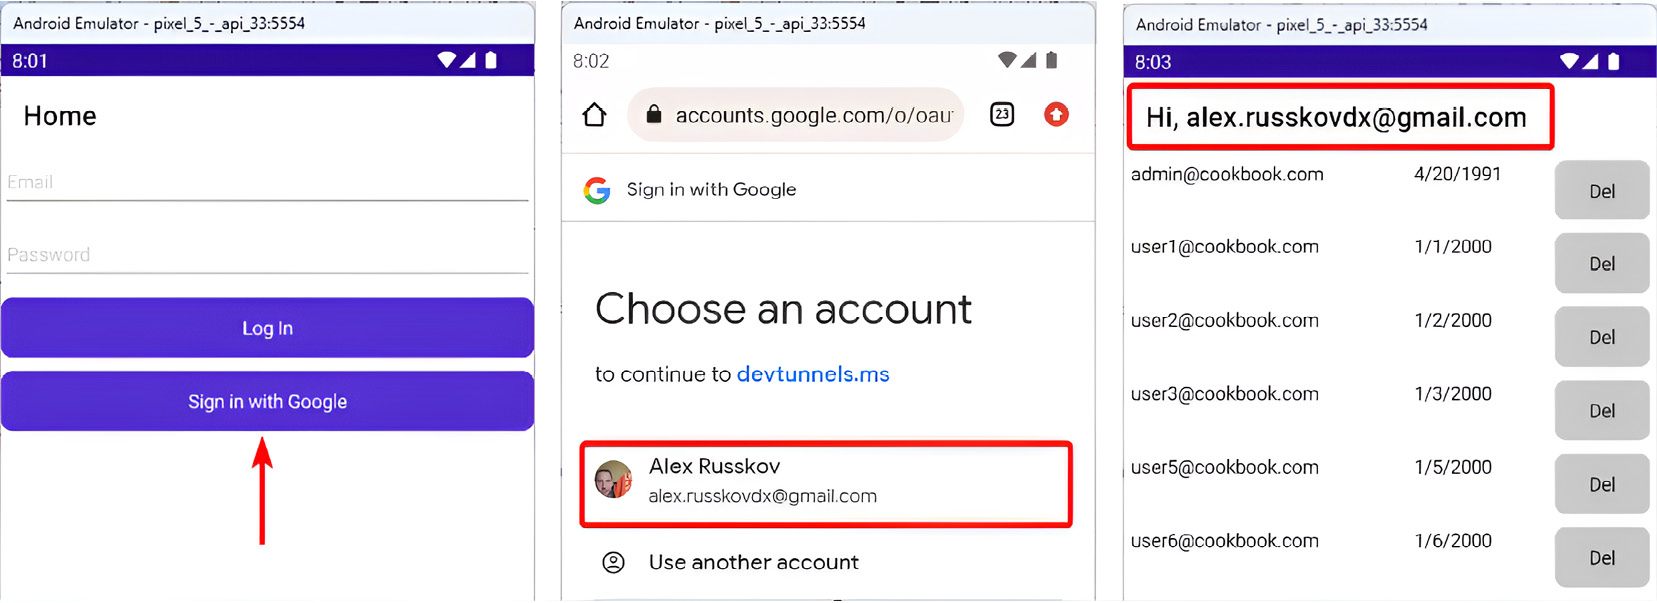
Figure 5.17 – Google sign-in

Figure 5.17 – Google sign-in

Getting ready

Start with the project you completed in the previous recipe (Accessing endpoints with role-based access in the client application). This project is available at https://github.com/PacktPublishing/.NET-MAUI-Cookbook/tree/main/Chapter05/c5-RoleBasedAccessPart2.

The code for this recipe is available at https://github.com/PacktPublishing/.NET-MAUI-Cookbook/tree/main/Chapter05/c5-GoogleAuth.

How to do it…

This recipe consists of three main parts:

  • Configuring the Google Developer Console. Before you can use Google OAuth, you’ll need to specify some basic settings related to your project.
  • Adjusting an ASP.NET Core Identity service for the Google authentication flow. We’ll add middleware that knows how to work with Google OAuth.
  • Incorporating WebAuthenticator into the .NET MAUI project. WebAuthenticator is a default component that implements a browser-based authentication flow for OAuth providers.

Let’s begin:

  1. Open the Google Developer Console in your browser using the following URL: https://console.cloud.google.com/. If you don’t have a Google account, create one. Once logged in, click Select a project in the top-left corner:
Figure 5.18 – Select a project menu in the Google Developer Console

Figure 5.18 – Select a project menu in the Google Developer Console

  1. In the opened dialog, click the NEW PROJECT button:
Figure 5.19 – NEW PROJECT button

Figure 5.19 – NEW PROJECT button

  1. Enter a name for your project. You can leave the Location field set to No organization:
Figure 5.20 – New project details

Figure 5.20 – New project details

  1. Select the newly created project from the dropdown menu in the top-left corner:
Figure 5.21 – Selecting a created project

Figure 5.21 – Selecting a created project

  1. In the search field, type credentials and select Credentials under the APIs & Services category:
Figure 5.22 – Credentials in search

Figure 5.22 – Credentials in search

  1. Click the CREATE CREDENTIALS button and select OAuth client ID:
Figure 5.23 – New credentials (OAuth client ID)

Figure 5.23 – New credentials (OAuth client ID)

  1. You’ll be prompted to create a consent screen. The information you configure on this screen will be displayed when a user signs in for the first time using their Google account. Select the External user type:
Figure 5.24 – User type in consent screen settings

Figure 5.24 – User type in consent screen settings

  1. On the next screen, enter your full application URL provided by dev tunnels in all the App domain fields. In the Authorized domains section, click ADD DOMAIN and enter devtunnels.ms:
Figure 5.25 – Registering authorized domains

Figure 5.25 – Registering authorized domains

You can leave other settings in their default state.

  1. Return to the Credentials tab and click CREATE CREDENTIALS again (as in step 6). Select the Web Application type. In the Authorized redirect URIs section, click ADD URI and enter a URI that contains the dev tunnel base address and the signin-google endpoint. This endpoint is automatically created by ASP.NET Core Identity when the Google module is used:
Figure 5.26 – Registering authorized redirect URIs

Figure 5.26 – Registering authorized redirect URIs

  1. Complete the other fields and click Create. You should see a dialog indicating that your OAuth client has been created:

Figure 5.27 – Client ID and client secret

Figure 5.27 – Client ID and client secret

Save the Client ID and Client secret values to a text file or download the JSON. We will use these values later when configuring our ASP.NET Core Identity service.

  1. Navigate to the c5-AuthenticationService project in the c5-GoogleAuth solution and add the Microsoft.AspNetCore.Authentication.Google NuGet package. This package contains core parts and middleware required for Google authentication.
  2. Update your authentication configuration by adding the AddCookie and AddGoogle methods. In the options used with AddGoogle, specify the client ID and client secret strings that you obtained in step 10:
    builder.Services.AddAuthentication(options =>
    {
        options.DefaultSignInScheme =
          IdentityConstants.BearerScheme;
        options.DefaultAuthenticateScheme =
          IdentityConstants.BearerScheme;
        options.DefaultScheme =
          IdentityConstants.BearerScheme;
    })
       .AddCookie(CookieAuthenticationDefaults
          .AuthenticationScheme)
       .AddGoogle(options =>
       {
           options.ClientId = "[Client ID from Step 10]";
           options.ClientSecret = "[Client Secret from Step 10]";
           options.SignInScheme =
             CookieAuthenticationDefaults
             .AuthenticationScheme;
       }).AddBearerToken(IdentityConstants.BearerScheme);

    We’ll need the cookie authentication scheme because the Google authentication middleware relies on it.

  3. Next, add an endpoint that the mobile application will use to start the Google authentication flow. This endpoint will be called from the client application when a user taps Sign in with Google. Set the AuthenticationProperties.RedirectUri property to a URL where the user will be redirected after signing in with Google. We’ll create the corresponding endpoint in the next step. Call the Challenge method to initiate the Google authentication flow. When Challenge is called, the user will be redirected to the Google authentication page, where they can select their Google account:
    app.MapGet("/mauth/google", (HttpContext httpContext) =>
    {
        var props = new AuthenticationProperties {
          RedirectUri = "mauth/google/callback" };
        return Results.Challenge(props, new List<string> {
          GoogleDefaults.AuthenticationScheme });
    });

    Note that RedirectUri is different from the authorized redirect URI we set up in the Google Developer Console (which we configured as signin-google). RedirectUri will come into play after visiting the default signin-google endpoint created by the middleware. Multiple redirections might seem a bit confusing now, but we’ll clarify it in the How it works… section.

  4. Add an endpoint that the Google middleware will automatically call as the final step in its authentication flow. This is the endpoint we specified as RedirectUri in the previous step. Use this endpoint to authenticate a user with the cookie scheme and create a corresponding identity user by calling CreateUserWithRoleAsync (which we set up in the Implementing role-based access rules on the server recipe):
    app.MapGet("/mauth/google/callback", async (
        HttpContext context,
        UserManager<User> userManager,
        RoleManager<IdentityRole> roleManager) =>
    {
        var authResult =
          await context.AuthenticateAsync(
            CookieAuthenticationDefaults
            .AuthenticationScheme);
        if (!authResult.Succeeded)
        {
            return Results.Redirect("myapp://");
        }
        var email = authResult.Principal.FindFirstValue(
          ClaimTypes.Email);
        await userManager.CreateUserWithRoleAsync(
          roleManager, email, null,
          new DateOnly(2000, 1, 1), "User");
        //…
    });
  5. Afterward, sign in the user to generate and get an access token. The SignInAsync method writes the token to the response body of the HttpContext object. To read it, assign a memory stream to the response body before calling SignInAsync, and then read the stream:
    app.MapGet("/mauth/google/callback", async (…) =>
    {
        //…
        using var responseBody = new MemoryStream();
        context.Response.Body = responseBody;
        await context.SignInAsync(
          IdentityConstants.BearerScheme,
            new ClaimsPrincipal(
             authResult.Principal.Identity));
        context.Response.Body.Seek(0, SeekOrigin.Begin);
        var responseText = await new
          StreamReader(context.Response.Body)
          .ReadToEndAsync();
        JsonNode tokenData = JsonSerializer
          .Deserialize<JsonNode>(responseText);
    });
  6. Read the accessToken, refreshToken, and expiresIn values from the JSON obtained from the stream:
    app.MapGet("/mauth/google/callback", async (…) =>
    {
        //…
        string token = tokenData["accessToken"]
          .GetValue<string>();
        string refreshToken = tokenData["refreshToken"]
          .GetValue<string>();
        int expiresIn = tokenData["expiresIn"]
          .GetValue<int>();
        var redirectUrl = $"myapp://?access_token={token}&refresh_
          token={refreshToken}&expires_in={expiresIn}";
        return Results.Redirect(redirectUrl);
    });
  7. Go to the c5-AuthenticationClient project within the c5-GoogleAuth solution and add a Sign in with Google button to the main page. Bind this button to GoogleSignInCommand:

    MainPage.xaml

    <VerticalStackLayout Spacing="10">
        …
        <Button Text="Sign in with Google"
        Command="{Binding GoogleSignInCommand}"/>
    </VerticalStackLayout>

    You can find Google guidelines related to the signing-in UI on the following page: https://developers.google.com/identity/branding-guidelines.

  1. In the WebService class, create a method that uses WebAuthenticator to access the mauth/google endpoint, which was created in step 13:
    public async Task GoogleAuthAsync()
    {
        WebAuthenticatorResult authResult =
          await WebAuthenticator.Default
            .AuthenticateAsync(
              new Uri($"{baseAddress}mauth/google"),
              new Uri("myapp://")
            );
        BearerTokenInfo tokenInfo = new BearerTokenInfo
        {
            AccessToken = authResult.AccessToken,
            RefreshToken = authResult.RefreshToken,
            ExpiresIn = int.Parse(
              authResult.Properties["expires_in"]),
            TokenTimestamp = DateTime.UtcNow
        };
        SetAuthHeader(tokenInfo.AccessToken);
    }

    The WebAuthenticator component handles authentication in a browser when AuthenticateAsync is called. You can obtain the access and refresh tokens using the AccessToken and RefreshToken properties. To get the expires_in value, use the Properties dictionary. This is necessary because the default WebAuthenticatorResult.ExpiresIn property has a DateTimeOffset type, but we passed a string there.

  2. Create a GoogleSignInAsync command in the MainViewModel class and invoke WebService.GoogleAuthAsync. Handle any potential exceptions using try/catch blocks:
    [RelayCommand]
    async Task GoogleSignInAsync()
    {
        try
        {
            await webService.GoogleAuthAsync();
            await Shell.Current.GoToAsync(nameof(UsersPage));
        }
        catch (Exception ex) when (!(ex is TaskCanceledException))
        {
            await Shell.Current.DisplayAlert("Sign in failed", 
              ex.Message, "OK");
        }
    }

    Note that we excluded the TaskCanceledException exception type because this exception occurs when a user closes the browser window opened by WebAuthenticator.

  3. Now, we need to inform WebAuthenticator that it should navigate back to the application when a user is redirected to the myapp:// address. For Android, go to the Platforms/Android folder in your project, add a class named WebAuthCallbackActivity, and inherit from WebAuthenticatorCallbackActivity. Create a const string field named CALLBACK_SCHEME and assign the Activity and IntentFilter attributes to the WebAuthCallbackActivity class:
     namespace c5_AuthenticationClient.Platforms
    {
        [Activity(NoHistory = true, LaunchMode =
          LaunchMode.SingleTop, Exported = true)]
        [IntentFilter(new[] {
          Android.Content.Intent.ActionView },
          Categories = new[] {
            Android.Content.Intent.CategoryDefault,
            Android.Content.Intent.CategoryBrowsable },
          DataScheme = CALLBACK_SCHEME)]
        public class WebAuthCallbackActivity :
          Microsoft.Maui.Authentication
          .WebAuthenticatorCallbackActivity
        {
            const string CALLBACK_SCHEME = "myapp";
        }
    }

Important note

The namespace where WebAuthCallbackActivity is defined should only include your main namespace (c5_AuthenticationClient) followed by the Platforms suffix. There should not be an Android part after Platforms.

  1. For iOS, go to the Platforms/iOS/Info.plist file in Solution Explorer, right-click on it, and select Open With | XML (Text) Editor. Then, add the following key:
    <dict>
        <!--other keys above-->
        <array>
            <dict>
                <key>CFBundleURLName</key>
                <string>My App</string>
    <key>CFBundleURLSchemes</key>
                <array>
                    <string>myapp</string>
                </array>
                <key>CFBundleTypeRole</key>
                <string>Editor</string>
            </dict>
        </array>
    </dict>

That’s it! Now, you can test your project. As usual, make sure to activate your dev tunnel and run the server app first. One of the most common errors during Google OAuth testing is redirect_uri_mismatch. If you encounter this error, check the There’s more… section for potential causes and solutions.

How it works…

As you may have noticed, the entire OAuth flow involves a series of redirects, which can be confusing when you’re first learning about it. These redirects occur because the authentication process is actually delegated to a third-party server – in our case, Google’s servers. However, the whole process becomes much easier to understand when we visualize it:

Figure 5.28 – Google sign-in flow

Figure 5.28 – Google sign-in flow

Here’s a detailed breakdown of the preceding diagram:

  1. In the .NET MAUI application, we create a WebAuthenticator component with a URL and a callback URL. When we call WebAuthenticator.AuthenticateAsync, it opens a browser window with the mauth/google endpoint, which was created in our ASP.NET Core server.
  2. The mauth/google endpoint triggers the Google authentication scheme. The Google authentication middleware in our ASP.NET Core app then initiates the Google authentication flow.
  3. The user is redirected to a Google page where Google displays a consent and login screen.
  4. If the user successfully signs in to a Google account or already has an active session, Google calls the signin-google endpoint. This is the default endpoint created by the middleware when we call AddGoogle during service configuration.
  5. The signin-google endpoint handles all the OAuth-related logic behind the scenes, including exchanging a secret code for a token from Google, among other operations.
  6. Once the sign-in process is complete, the middleware redirects the user to our mauth/google/callback endpoint, which we specified in the AuthenticationProperties.RedirectUri parameter.

There’s more…

As described in the How it works… section, the OAuth flow involves redirecting to the OAuth authentication server (Google’s server) and then back to your application. Because of this flow, you might frequently encounter the redirect_uri_mismatch error if you overlook small but important steps:

  • Configuring authorized redirect URIs in the Google Developer Console: For security reasons, Google requires that when a user is authenticated, they are redirected to one of the URIs registered in advance. If you forget to update the authorized redirect URI after changing the address used by your server, you’ll run into the redirect_uri_mismatch error. Keep in mind that if you are running multiple ASP.NET Core apps using different ports, the dev tunnels feature will create different addresses for each app. It’s crucial to ensure that the address currently used by your debugged project is registered in the Google Developer Console.
  • Configuring the tunnel to keep the original host header: By default, when you use a tunnel, it replaces the host header with localhost. The host header specifies the domain name that the client is trying to communicate with, which allows the server to distinguish between different websites hosted on the same IP address. When the host header is replaced with localhost, the resulting redirect URI – taking into account the host header – will not match the URI registered in the Google Developer Console. To fix this issue, make sure you enable the Use Tunnel Domain option, as shown in Figure 5.10.
lock icon The rest of the chapter is locked
Register for a free Packt account to unlock a world of extra content!
A free Packt account unlocks extra newsletters, articles, discounted offers, and much more. Start advancing your knowledge today.
Unlock this book and the full library FREE for 7 days
Get unlimited access to 7000+ expert-authored eBooks and videos courses covering every tech area you can think of
Renews at $19.99/month. Cancel anytime
Banner background image