Learning about core data
Saving data is an important feature of almost all iOS apps. Apple has provided one more option for developers to save data using the native database, which is called Core data. This section will introduce us to the basics of core data with an example project. In the previous section, you learned about SQLite, and in this section, we will migrate from the same database to core data. The objectives will be to allow the user to save data in the database and fetch it.
Getting ready
In order to proceed with this exciting topic, we will create a new project. To create a new project, open Xcode and perform the following functions:
- From the File menu, select the option to create a new project.
- Then, select the Single View Application option. Make sure that while creating the project, the Use Core Data checkbox is checked.
- Then, click on Next and select a location to save your project. Now you will see that the Xcode has created a new project for us and will launch the project window.
While having a closer look at the project files on the right-hand panel, we will observe an additional file named CoreData.xcdatamodeld. This is the file that is going to hold all our entity-level descriptions for data models.
How to do it...
Perform the following steps to learn the implementation of core data in iOS applications:
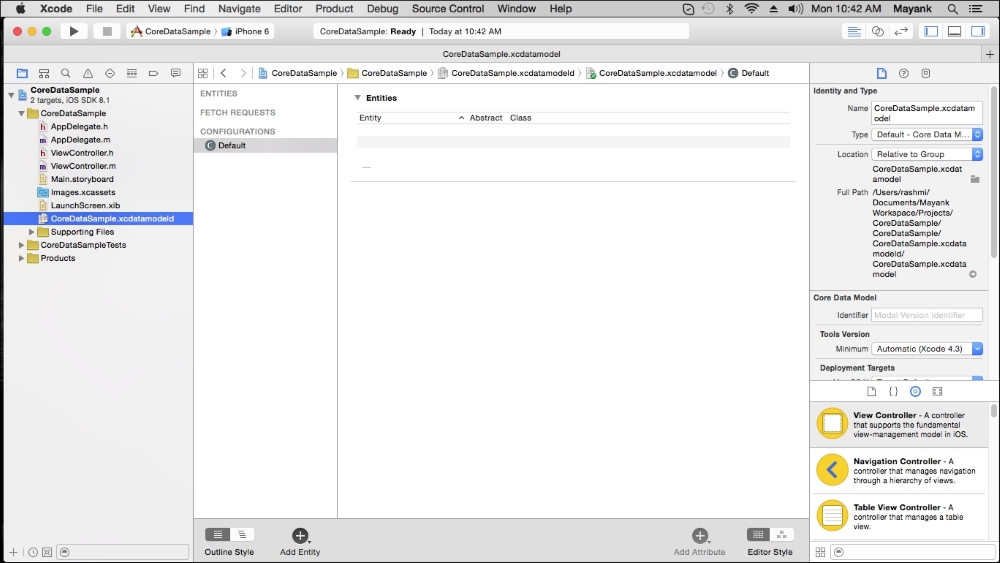
- To use the core data in an application, first we will have to create the entity for the
CoreDataapplication. For this, select theCoreData.xcdatamodeldfile and load it in the entity editor:
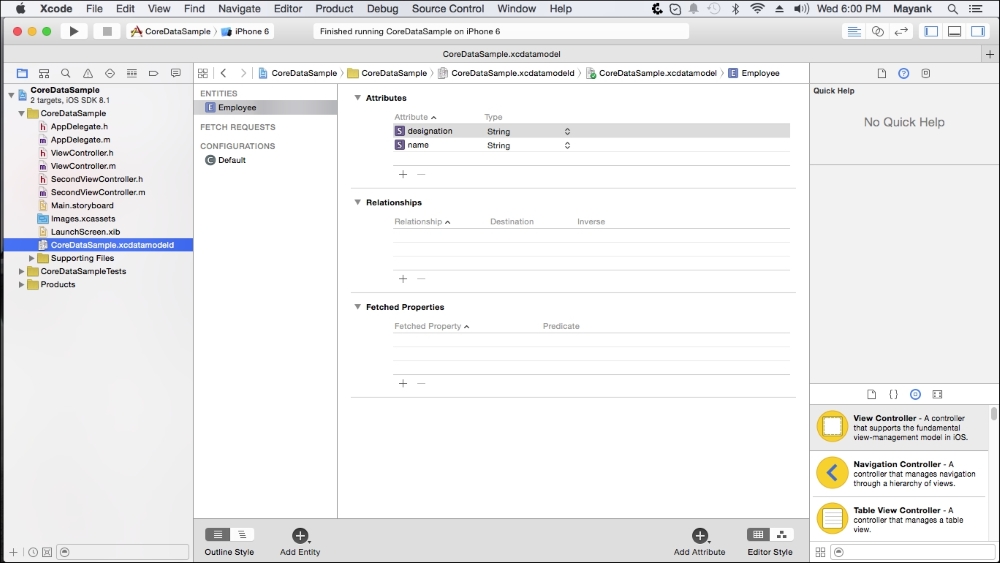
- In order to add new entities to the data model, click on the Add Entity button, which is located in the bottom bar. Once the entity is created, double-click on New Entity and change its name to
Employee. - Once the entity is created, we can now add attributes for it in order to represent the data for the model. Click on the Add Attribute button (+) to add attributes to the entity. For each attribute that is added, set the appropriate type of data. Similarly, add all the attributes one after another.

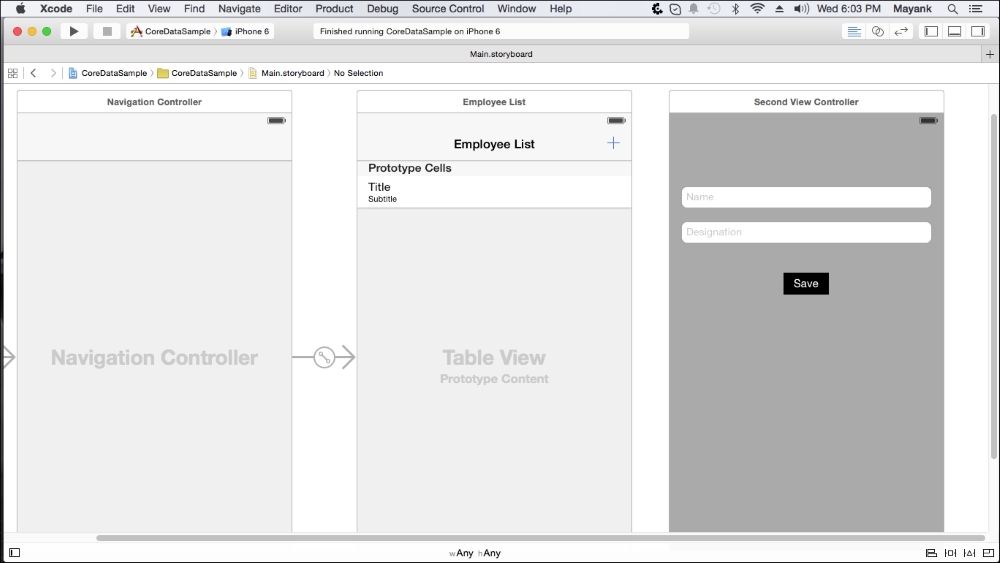
- Now we will create the user interface for the application and will connect all the UI components with their respective
IBOutletsand actions. Here, we are following a design similar to our SQLite sample; over and above design, we will add one more class, which isSecondViewController:
- Check all the
IBOutletconnections in theSecondViewController.hfile, all the properties should have a dark circle indicator. Then we need to import theAppDelegate.hfile at the top. After all the changes the class will look similar to following code:#import <UIKit/UIKit.h> #import "AppDelegate.h" @interface SecondViewController : UIViewController @property (weak, nonatomic) IBOutlet UITextField *nameTextField; @property (weak, nonatomic) IBOutlet UITextField *designationTextField; - (IBAction)saveButton:(id)sender; @end
- When the user touches the Save button, the
savemethod is called. We need to implement the code to obtain the managed object context and create and store managed objects containing the data entered by the user. Select theViewController.mfile, scroll down and save the method, and implement the code as follows:- (IBAction)saveButton:(id)sender { AppDelegate *appDelegate = [[UIApplication sharedApplication] delegate]; NSManagedObjectContext *context = [appDelegate managedObjectContext]; NSManagedObject *newContact; newContact = [NSEntityDescription insertNewObjectForEntityForName:@"Employee" inManagedObjectContext:context]; [newContact setValue: _nameTextField.text forKey:@"name"]; [newContact setValue: _designationTextField.text forKey:@"designation"]; _nameTextField.text = @""; _designationTextField.text = @""; }In the preceding code, we created a shared instance of [
UIApplication sharedApplication]. This code snippet will always give the same instance every time. Afterwards, it will creatensmanagedobjectwith the entity we created inCoreData.xcdatamodel, and then it will set the values for the keys. - Now we need to populate the same data in our
tableview. To achieve that, go toViewController.m, create one mutable array (for example,dataFromCore) to save our data fromCoreDatato local, and modifyviewWillAppear:-(void)viewWillAppear:(BOOL)animated { [super viewWillAppear:animated]; [dataFromCore removeAllObjects]; [self.tableView reloadData]; AppDelegate *appDelegate = [[UIApplication sharedApplication] delegate]; NSManagedObject *matches = nil; NSManagedObjectContext *context = [appDelegate managedObjectContext]; NSEntityDescription *entityDesc = [NSEntityDescription entityForName:@"Employee" inManagedObjectContext:context]; NSFetchRequest *request = [[NSFetchRequest alloc] init]; [request setEntity:entityDesc]; NSError *error1 = nil; NSArray *results = [context executeFetchRequest:request error:&error1]; if (error1 != nil) { NSLog(@"%@", error1); } else { for (matches in results) { NSLog(@"%@.....%@", [matches valueForKey:@"name"],[matches valueForKey:@"designation"]); NSString *string = [NSString stringWithFormat:@"%@,%@",[matches valueForKey:@"name"],[matches valueForKey:@"designation"]]; [dataFromCore addObject:string]; } } [self.tableView reloadData]; }Again, it will create the shared instance of [
UIApplication sharedApplication] and it will return the same instance as previously. Now, we are fetching the data fromNSFetchRequestusingNSEntityDescriptionand saving the result in one array. After that, we retrieve the values from the keys, one by one, and add them to our mutable array (dataFromCore), and at last, reload ourtableview. - Our
tableviewmethods should look similar to the following code. If they do not, then modify the code:- (NSInteger)tableView:(UITableView *)tableView numberOfRowsInSection:(NSInteger)section { return dataFromCore.count; } - (UITableViewCell *)tableView:(UITableView *)tableView cellForRowAtIndexPath:(NSIndexPath *)indexPath { static NSString *CellIdentifier = @"GBInboxCell"; UITableViewCell *cell = [tableView dequeueReusableCellWithIdentifier:CellIdentifier]; if (cell == nil) { cell = [[UITableViewCell alloc] initWithStyle:UITableViewCellStyleSubtitle reuseIdentifier:CellIdentifier]; } if (dataFromCore.count>0) { NSString *string = [dataFromCore objectAtIndex:indexPath.row]; NSArray *array = [string componentsSeparatedByString:@","]; cell.textLabel.text = array[0]; cell.detailTextLabel.text =array[1]; } return cell; } - The final step is to build and run the application. Enter the text in the second view and hit Save to save your contact details in our database:

Now, when you go back to the Employee List view, you will see the newly saved data in your table view as shown in the following screenshot:


