Nessus is a popular tool for automating vulnerability scans within a network, with some added functionality of scanning web applications as well. In the first section, we shall set up Nessus on our PentestBox on EC2. Then we shall use it to run basic and advanced scans on the lab that we set up earlier.
Configuring and running Nessus
Installing Nessus on Kali
The first step to performing automated pentesting and vulnerability assessment using Nessus, is obviously to install it on Kali. To make things easy, Nessus comes in a .deb package that can be directly installed using dpkg.
- To install Nessus, the first step is to download the .deb package from the tenable website, on https://www.tenable.com/downloads/nessus:
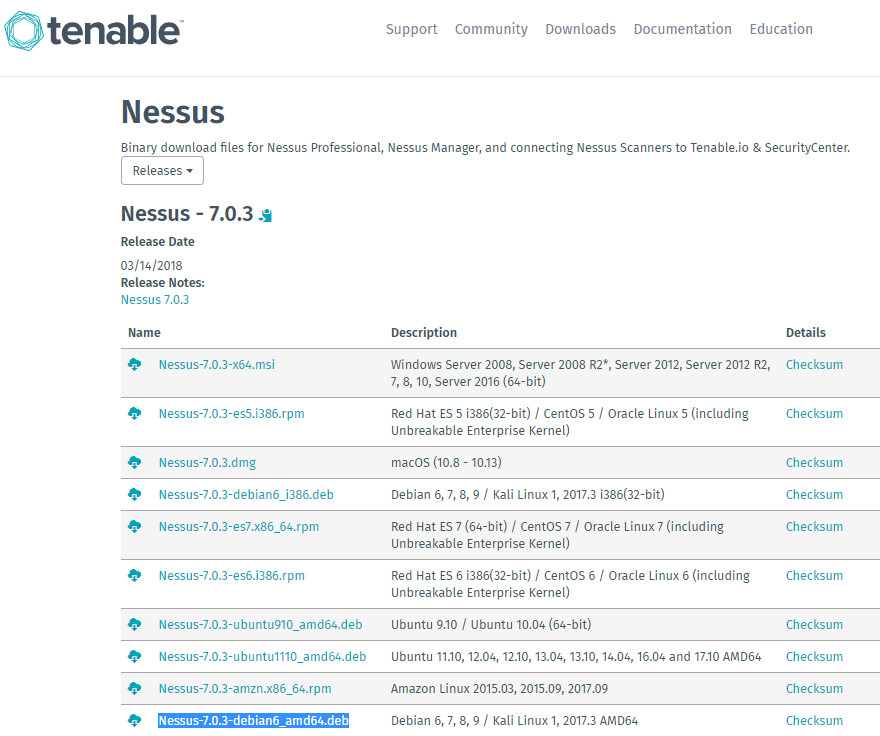
- Once downloaded, we need to transfer this to our Kali PentestBox on AWS. We can do this file transfer using WinSCP on Windows. On Linux/macOS, the native SCP utility can be used. The setup is available at https://winscp.net/eng/download.php
- Once WinSCP is installed, we need to set up a connection to our Kali PentestBox. First, we need to add a new site:
- Next, we need to add the public key, downloaded from AWS, for authentication. To do this, we need to click on Advanced and set the path to the key on SSH | Authentication:
- Once done, it's a simple matter of saving the site and then connecting to it to see a folder listing on the remote host:
- From here, it's a simple matter of dragging the .deb package into the root folder that we just accessed in the previous step. Once done, we can get started with installing the package. This can be achieved using dpkg through an SSH shell to the AWS EC2 instance:
- Once done, we start the Nessus service and confirm that it is running:
sudo /etc/init.d/nessusd start
sudo service nessusd status
- If the status command returns a status of running, we have successfully started the service. Next, we need to set up SSH tunneling to forward port 8834 from the Kali PentestBox to our localhost over the SSH connection. On a Linux Terminal, the following syntax needs to be used:
ssh -L 8834:127.0.0.1:8834 ec2-user@<IP address>
- On Windows, if you're using PuTTY, the SSH Tunnels can be configured here, by clicking on the Tunnels option after launching PuTTY:
- Once done, reconnect to the instance and you can now access Nessus on your local machine on https://127.0.0.1:8834.
Configuring Nessus
Once Nessus has been installed and the SSH tunnel configured, we can access Nessus on the browser by pointing at https://127.0.0.1:8834. We will need to go through a set of first steps to set up Nessus now.
- The very first screen prompts the user to Create an account:
- Enter suitable credentials and proceed to the next step. Now we need to activate a home license. We can grab one at https://www.tenable.com/products/nessus-home by filling in the following form:
- Once you've received the activation code by email, enter it into the web interface and trigger the initialization process. Now Nessus goes through the process of downloading data that is needed for the scanning of network assets:
This process usually takes a few minutes, so there's enough time to go grab a cup of coffee while this is happening.
Performing the first Nessus scan
Once the initialization is complete, we're welcomed by the Nessus home screen. Here, we need to click on New Scan to start a new scan on the pentesting lab that we set up earlier.
- Once on the new scan tab, we need to start a Basic Network Scan:
- After clicking on Basic Network Scan, we need to give a scan name and enter the IPs of the two other hosts that we set up in the lab:
- Next up, we configure the DISCOVERY and ASSESSMENT options. For discovery, let's request a scan of all services:
This has the advantage of enumerating all services running on a host and discovers hosts if no traditional services are running on them.
- Let's configure Nessus to scan web applications as well:
- Finally, we Launch the scan:
Once again, scanning is a time-consuming process, so this would take around 15 to 20 minutes to complete on average, if not more.