Viewing the MSI database
I mentioned before that an MSI file is really a sort of relational database. WiX does all the work of creating tables, inserting rows, and matching up keys in this database. However, as we progress through the rest of the book, I encourage you to explore how it looks behind the scenes. For example, we discussed the File and Component elements. Sure enough, there are two tables called File and Component in the MSI that contain the definitions you've set with your XML markup. To get inside the installer, you'll need a tool called Orca.
Orca.exe
Once you've compiled your project in Visual Studio, you'll have a working MSI package that can be installed by double-clicking it. If you'd like to see the database inside, install the MSI viewer, Orca.exe. Orca is provided as part of the Windows SDK and despite the icon of a whale on the shortcut, stands for One Really Cool App. You can find versions of the SDK at Microsoft's Windows Development Center website:
http://msdn.microsoft.com/en-us/windows/bb980924.aspx
After you've installed the SDK (specifically, the .NET tools that are included), you can find the installer for Orca—Orca.msi—in the Microsoft SDKs folder in Program Files. On my machine, it can be found in C:\Program Files\Microsoft SDKs\Windows\v7.0\Bin.
Install Orca and then right-click on your MSI file and select Edit with Orca.

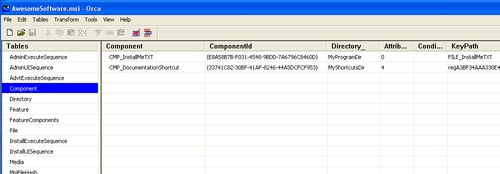
Orca lets you view the database structure of your installer. This can be a big help in troubleshooting problems or just to get a better idea about how different elements work together. Following is a screenshot of the Component database:

If you wanted to, you could edit your MSI package directly with Orca. This is helpful when learning or trying out different concepts. You'll need to know exactly which tables and rows to modify. Sometimes, though, you'll be able to just change a single value and check its effect.


