


Creating a UI Button to move between scenes
The majority of games include menu screens that display settings, buttons to start the game playing, messages to the user about instructions, high scores, the level they have reached so far, and so on. Unity provides UI Buttons to offer users a simple way to interact with the game and its settings.
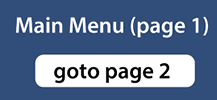
Figure 2.5: Example of a main menu UI Button
In this recipe, we’ll create a very simple game consisting of two screens, each with a button to load the other one, as illustrated in the preceding screenshot.
How to do it...
To create a button-navigable multi-scene game, follow these steps:
- Create a new Unity 2D project.
- Save the current (empty) scene in a new folder called
Scenes, naming the scene page1. - Load the TextMeshPro Essential Resources, by choosing Window | TextMeshPro | Import TMP Essential Resources.
- In the Hierarchy panel, add a Text (TMP) GameObject to the scene positioned at the top center of the scene containing large white text that says Main Menu (page 1). Having added a Text (TMP) GameObject to the scene, in the Inspector for the Rect Transform component, click on the Anchor Presets square icon, which will result in several rows and columns of preset position squares appearing. Holding down Shift + Alt, click on the top row and the center column.
- Add a UI Button-TextMeshPro to the scene positioned in the middle-center of the screen.
- In the Hierarchy window, click on the Tree View toggle triangle to display the Text child of this GameObject button. Select the
TextGameObject and, in the Inspector window for the Text Input property, enter the text goto page 2:
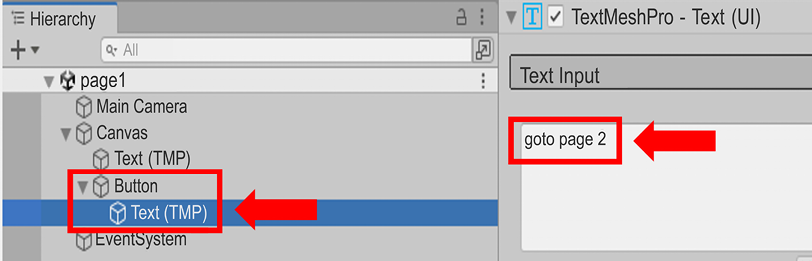
Figure 2.6: UI Button Text child
- Create a second scene, named
page2, with the UI text Instructions (page 2) and a UI Button-TextMeshPro with the textgoto page 1. You can either repeat the preceding steps or duplicate thepage1scene file, name the duplicate page2, and then edit the UI TMP text and UI Button text appropriately. - Add both scenes to the build, which is the set of scenes that will end up in the actual application built by Unity. Open the Build Settings panel by choosing File | Build Settings.... Then drag the two scenes from the Project panel into the top section (Scenes in Build) of the Build Settings panel. Ensure the sequence goes
page1first, thenpage2second – drag to rearrange them if necessary.We cannot tell Unity to load a scene that has not been added to the list of scenes in the build. This makes sense since when an application is built, we should never try to open a scene that isn’t included as part of that application. The scene that appears first (index 0) in the Build Settings panel will be the first scene opened when the game is run.
- Ensure you have the
page1scene open. - Create a new empty GameObject named
SceneManager. - Create a C# script class called
SceneLoader,in a new folder called_Scripts, that contains the following code. Then, add an instance ofSceneLoaderas a scripted component to theSceneManagerGameObject:using UnityEngine; using UnityEngine.SceneManagement; public class SceneLoader : MonoBehaviour { public void LoadOnClick(int sceneIndex) { SceneManager.LoadScene(sceneIndex); } } - Select the Button GameObject in the Hierarchy panel and click on the plus (+) button at the bottom of the Button (Script) component in the Inspector. This will create a new OnClick event handler for this button (that is, a method to execute when the button is clicked).
- Drag the
SceneManagerGameObject from the Hierarchy window over the Object slot immediately below the menu that says Runtime Only. This means that when the button receives an OnClick event, we can call a public method from a scripted object insideSceneManager. - Select the LoadOnClick(int) method from the SceneLoader drop-down list. Type
1(the index of the scene we want to be loaded when this button is clicked) in the text box, below the method’s drop-down menu.This integer,
1, will be passed to the method when the button receives anOnClickevent message, as shown here:
Figure 2.7: Button (Script) settings
Save the current scene (page1).
- Open page2 and follow the same steps to make the page2 button load page1. That is, create a new empty
SceneManagerGameObject, add an instance of theSceneLoaderscript class toSceneManager, and then add anOnClickevent action to the button that callsLoadOnClickand passes an integer of0so that page1 is loaded. - Save page2.
- When you run the page1 scene, you will be presented with your Main Menu text and a button that, when clicked, makes the game load the page2 scene. On page2, you’ll have a button to take you back to page1.
How it works...
In this recipe, you created two scenes and added both of these scenes to the game’s build. You added a UI Button and some UI Text to each scene.
When a UI Button is added to the Hierarchy window, a child UI Text object is also automatically created, and the content of the Text Input property of this UI Text child is the text that the user sees on the button.
Here, you created a script class and added an instance as a component to GameObject SceneManager. In fact, it didn’t really matter where this script instance was added, so long as it was in one of the GameObjects of the scene. This is necessary since the OnClick event action of a button can only execute a method (function) of a component in a GameObject in the scene.
For the buttons for each scene, you added a new OnClick() event handler that invokes (executes) the LoadOnClick() method of the SceneLoader scripted component in SceneManager. This method inputs the integer index of the scene in the project’s Build Settings so that the button on the page1 scene gives integer 1 as the scene to be loaded and the button for page2 gives integer 0.
There’s more...
There are several ways in which we can visually inform the user that the button is interactive when they move their mouse over it. The simplest way is to add a Color Tint that will appear when the mouse is over the button – this is the default Transition. With Button selected in the Hierarchy window, choose a tint color (for example, red), for the Highlighted Color property of the Button (Script) component in the Inspector panel:
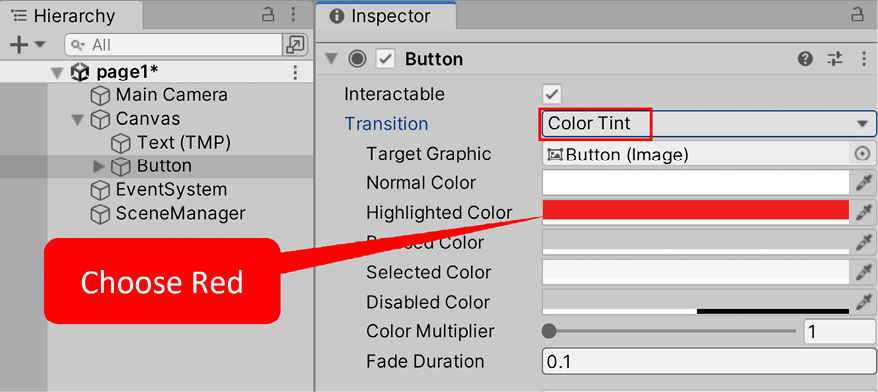
Figure 2.8: Adjusting the mouseover settings for buttons
Another form of visual transition to inform the user of an active button is Sprite Swap. In this case, the properties of different images for Targeted/Highlighted/Pressed/Disabled are available in the Inspector window. The default target graphic is the built-in Unity Button (Image) – this is the gray rounded rectangle default when GameObject buttons are created. Dragging in a very different-looking image for the highlighted sprite is an effective alternative to setting a Color Tint:

Figure 2.9: Example of an image as a button
We have provided a rainbow.png image in a folder named 02_02 that can be used for the button mouseover’s Highlighted sprite. You will need to ensure this image asset has its Texture Type set to Sprite (2D and UI) in the Inspector window. The preceding screenshot shows the button with this rainbow background image.


