The interface
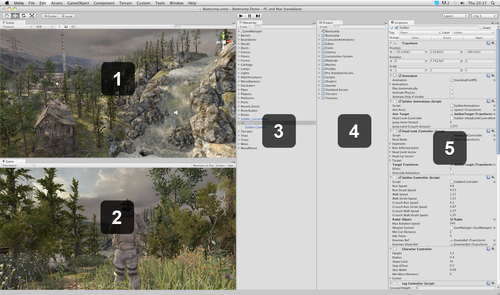
The Unity interface, like many other working environments, has a customizable layout. Consisting of several dockable spaces, you can pick which parts of the interface appear where. Let's take a look at a typical Unity layout:

This layout can be achieved by going to Window | Layouts | 2 by 3 in Unity.
As the previous image demonstrates (Mac version shown), there are five different panels or views you'll be dealing with, which are as follows:
Scene [1]—where the game is constructed.
Game [2]—the preview window, active only in play mode.
Hierarchy [3]—a list of GameObjects in the scene.
Project [4]—a list of your project's assets; acts as a library.
Inspector [5]—settings for currently selected asset/object/setting.
The Scene view and Hierarchy
The Scene view is where you will build the entirety of your game project in Unity. This window offers a perspective (full 3D) view, which is switchable to orthographic (top-down, side-on, and front-on) views. When working in one of the orthographic views, rotating the view will display the scene isometrically. The Scene view acts as a fully rendered 'Editor' view of the game world you build. Dragging an asset to this window (or the Hierarchy) will create an instance of it as a GameObject in the Scene.
The Scene view is tied to the Hierarchy, which lists all GameObjects in the currently open scene in ascending alphabetical order.
Control tools
The Scene window is also accompanied by four useful control tools, as shown in the following image:

Accessible from the keyboard using keys Q, W, E, and R, these keys perform the following operations:
The Hand tool [Q]: This tool allows navigation of the Scene window. By itself, it allows you to drag around in the Scene window with the left mouse button to pan your view. Holding down Alt with this tool selected will allow you left click to orbit your view around a central point you are looking at, and holding the Alt key with right click will allow you to zoom, as will scrolling the mouse wheel. Holding the Shift key down also will speed up both of these functions.
The Translate tool [W]: This is your active selection tool. As you can completely interact with the Scene window, selecting objects either in the Hierarchy or Scene means you'll be able to drag the object's axis handle in order to reposition them.
The Rotate tool[E]: This works in the same way as Translate, using visual 'handles' to allow you to rotate your object around each axis.
The Scale tool [R]: Again, this tool works as the Translate and Rotate tools do. It adjusts the size or scale of an object using visual handles.
Having selected objects in either the Scene or Hierarchy, they immediately get selected in both. Selection of objects in this way will also show the properties of the object in the Inspector. Given that you may not be able to see an object you've selected in the Hierarchy in the Scene window, Unity also provides the use of the F key, to focus your Scene view on that object. Simply select an object from the Hierarchy, hover your mouse cursor over the Scene window, and press F. You can also achieve this by double-clicking the name of a game object in the Hierarchy.
Flythrough Scene navigation
To move around your Scene view using the mouse and keys you can use Flythrough mode. Simply hold down the right mouse button and drag to look around in first-person style, then use W, A, S and D to move and Q and E to descend and ascend (respectively).
Control bar
In addition to the control tools, there is also a bar of additional options to help you work with your Unity scenes, which is shown as follows:

Known as the Scene View Control Bar, this bar allows you to adjust (left to right):
Draw mode (default is 'Textured')
Render mode (default is 'RGB')
Toggle scene lighting
Toggle overlays—shows and hides GUI elements and Skyboxes and toggles the 3D grid
Toggle audition mode—previews audio sources in the current scene
Gizmos—use this pop-out menu to show or hide Gizmos, the 2D icons of cameras, lights, and other components shown in the scene.
Search box
While the Scene view is intrinsically linked with the Hierarchy, often you may need to locate an item or type of item in the Scene view itself by searching. Simply type the name or data type (in other words, an attached component) of an object into the search, and the Scene view will grey out other objects in order to highlight the item you have searched for. This becomes very useful when dealing with more complex scenes, and should be used in conjunction with F on the keyboard to focus on the highlighted object in the Scene window itself.
Create button
As many of the game assets you'll use in Unity will be created by the editor itself, the Hierarchy has a Create button that allows you to create objects that are also located within the top GameObject menu. Similar to the Create button on the Project panel, this drop-down menu creates items and immediately selects them so that you may rename or begin working with them in the Scene or Inspector.
The Inspector
Think of the Inspector as your personal toolkit to adjust every element of any GameObject or asset in your project. Much like the Property Inspector concept utilized by Adobe in Flash and Dreamweaver, this is a context-sensitive window. All this means is that whatever you select, the Inspector will change to show its relevant properties—it is sensitive to the context in which you are working.
The Inspector will show every component part of anything you select, and allow you to adjust the variables of these components, using simple form elements such as text input boxes, slider scales, buttons, and drop-down menus. Many of these variables are tied into Unity's drag-and-drop system, which means that rather than selecting from a drop-down menu, if it is more convenient, you can drag-and-drop to choose settings or assign properties.
This window is not only for inspecting objects. It will also change to show the various options for your project when choosing them from the Edit menu, as it acts as an ideal space to show you preferences—changing back to showing component properties as soon as you reselect an object or asset.

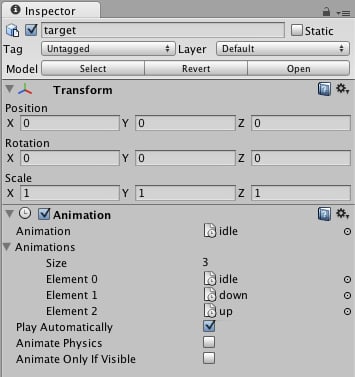
In this image, the Inspector is showing properties for a target object in the game. The object itself features two components—Transform and Animation. The Inspector will allow you to make changes to settings in either of them. Also note that in order to temporarily disable any component at any time, which will become very useful for testing and experimentation—you can simply deselect the checkbox to the left of the component's name. Likewise, if you wish to switch off an entire object at a time, then you may deselect the checkbox next to its name at the top of the Inspector window.
The Project window
The Project window is a direct view of the Assets folder of your project. Every Unity project is made up of a parent folder, containing three subfolders—Assets, Library, and while the Unity Editor is running, a Temp folder. Placing assets into the Assets folder means you'll immediately be able to see them in the Project window, and they'll also be automatically imported into your Unity project. Likewise, changing any asset located in the Assets folder, and resaving it from a third-party application, such as Photoshop, will cause Unity to reimport the asset, reflecting your changes immediately in your project and any active scenes that use that particular asset.
Note
Asset management
It is important to remember that you should only alter asset locations and names using the Project window—using Finder (Mac) or Windows Explorer (PC) to do so may break connections in your Unity project. Therefore, to relocate or rename objects in your Assets folder, use Unity's Project window instead of your operating system.
The Project window, like the Hierarchy, is accompanied by a Create button. This allows the creation of any assets that can be made within Unity, for example, scripts, prefabs, and materials.
The Game view
The Game view is invoked by pressing the Play button and acts as a realistic test of your game. It also has settings for screen ratio, which will come in handy when testing how much of the player's view will be restricted in certain ratios, such as 4:3 (as opposed to wide) screen resolutions. Having pressed Play, it is crucial that you bear in mind the following advice:
Note
Play mode—testing only!
In play mode, the adjustments you make to any parts of your game scene are merely temporary. It is meant as a testing mode only, and when you press Play again to stop the game, all changes made to active GameObjects during play mode will be undone. This can often trip up new users, so don't forget about it!
The Game view can also be set to Maximize when you invoke play mode, giving you a better view of the game at nearly fullscreen—the window expands to fill the interface. It is worth noting that you can expand any part of the interface in this way, simply by hovering over the part you wish to expand and pressing the Space bar.
In addition to using Play to preview your game, the live game mode can also be paused by pressing the Pause button at the top of the interface, and play can be advanced a frame at a time using the third button, Advance Frame, next to Pause. This is useful when Debugging—the process of finding and solving problems or 'bugs' with your game development.


