Adding a domain
To personalize or brand your tenant to your company, you can integrate a custom domain, such as contoso.com, with Microsoft 365. This elevates your organizational identity by replacing the generic onmicrosoft.com addresses (e.g., nate@contoso.onmicrosoft.com) with a branded email format (e.g., nate@contoso.com). This adjustment also extends to utilizing your domain with Microsoft 365 services, such as Outlook. In this recipe, we outline how to add the natechamberlain.com domain (or any custom domain) to your Microsoft 365 tenant.
Getting ready
To add a domain, having the Global Administrator role is required. It’s not necessary to own a domain prior to this process, as there’s an option to purchase during the setup.
How to do it…
- Access the Microsoft 365 admin center by visiting http://admin.microsoft.com.
- Navigate through Show all | Settings | Domains.
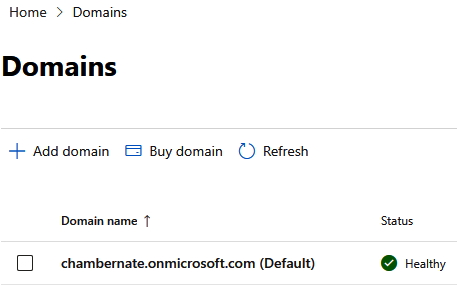
- Here, as seen in Figure 1.17, you can either add an existing domain you own or purchase a new one. Select Add domain for this recipe.

Figure 1.17 – Domains screen of Microsoft 365 admin center
- Submit the domain name you wish to add, for instance,
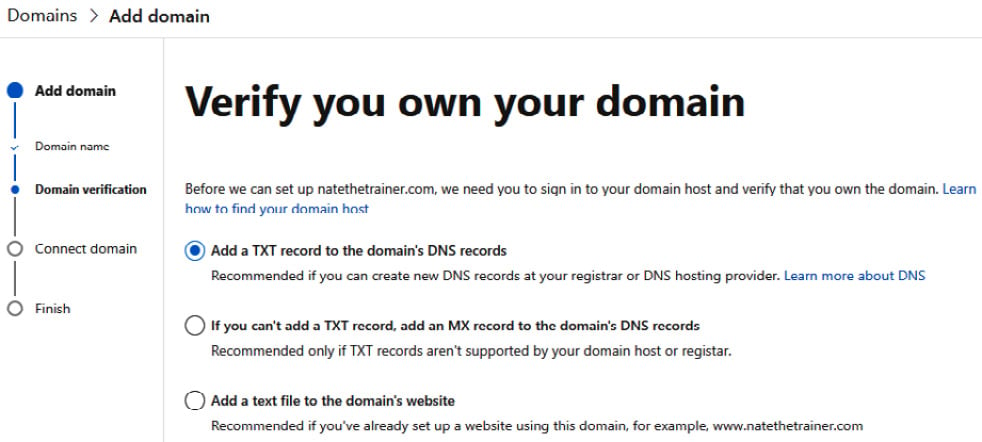
natechamberlain.com, and then choose Use this domain. - To enable features such as email, you must update your Domain Name System (DNS) records at your domain registrar or hosting provider. Microsoft 365 can automate this for supported registrars (e.g., WordPress, GoDaddy). If this is possible for you, it will ask you to sign in to your registrar to verify before returning you to the wizard. You can also manually enter the required DNS records provided by Microsoft 365. The wizard screen shown in Figure 1.18 will guide you to the appropriate action for your specific scenario if it can’t be automated, or you choose not to use the automated method.

Figure 1.18 – Domain verification steps of adding a domain
- After updating DNS records, proceed through the setup wizard to finalize the domain’s integration with services such as Exchange and Teams, concluding by selecting Done.
How it works…
Adding your domain to Microsoft 365 directs your domain’s email traffic to Microsoft 365, facilitating the use of Outlook for email services and allowing users to log in to Microsoft 365 services with your branded domain. This setup enhances your organizational presence and user experience.
Important note
For organizations with multiple domains or subdomains, Microsoft 365 supports the management of secondary email addresses, policies, and licenses. This flexibility is particularly useful in scenarios involving acquisitions, where integrating and managing new domains or creating specific subdomains (e.g., staff.contoso.com) is required.
There’s more…
An alternative method to set up a custom domain you or your company already own is to follow these steps:
- Access the Microsoft 365 admin center by visiting http://admin.microsoft.com.
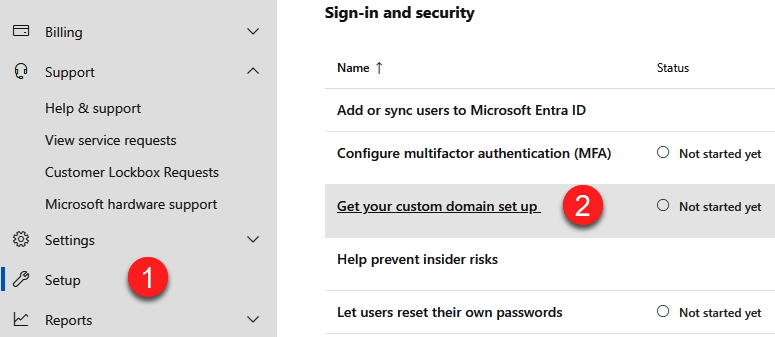
- Navigate through Show all | Setup and then select Get your custom domain set up from the Sign-in and security section, as shown in Figure 1.19.

Figure 1.19 – Custom domain setup location
- Select Get started. The same wizard from this section’s recipe opens to guide you through the process of connecting your existing domain. All remaining steps are the same.
Note that this method does not permit you to purchase a new domain – only to connect your existing one.
See also
- For a comprehensive guide on adding a domain to your Microsoft 365 subscription, including detailed DNS configuration steps, visit https://learn.microsoft.com/en-us/microsoft-365/admin/setup/add-domain
- Complete a short learning module on custom domains where you can learn more about custom domains and DNS zones and records, as well as subdomains at https://learn.microsoft.com/en-us/training/modules/add-custom-domain-microsoft-365/


