Search icon CANCEL
Subscription
0
Cart icon
Your Cart (0 item)
Close icon
You have no products in your basket yet
Save more on your purchases! discount-offer-chevron-icon
Savings automatically calculated. No voucher code required.
Arrow left icon
Explore Products
Best Sellers
New Releases
Books
Videos
Audiobooks
Learning Hub
Newsletter Hub
Free Learning
Arrow right icon
timer SALE ENDS IN
0 Days
:
00 Hours
:
00 Minutes
:
00 Seconds
Arrow up icon
GO TO TOP
Java 9 Programming Blueprints

You're reading from   Java 9 Programming Blueprints Master features like modular programming, Java HTTP 2.0, and REPL by building numerous applications

Arrow left icon
Product type Paperback
Published in Jul 2017
Publisher Packt
ISBN-13 9781786460196
Length 466 pages
Edition 1st Edition
Languages
Tools
Arrow right icon
Author (1):
Arrow left icon
Jason Lee Jason Lee
Author Profile Icon Jason Lee
Jason Lee
Arrow right icon
View More author details
Toc

Table of Contents (13) Chapters Close

Preface 1. Introduction FREE CHAPTER 2. Managing Processes in Java 3. Duplicate File Finder 4. Date Calculator 5. Sunago - A Social Media Aggregator 6. Sunago - An Android Port 7. Email and Spam Management with MailFilter 8. Photo Management with PhotoBeans 9. Taking Notes with Monumentum 10. Serverless Java 11. DeskDroid - A Desktop Client for Your Android Phone 12. What is Next?

Bootstrapping the project


How you create a NetBeans RCP project will have a very fundamental impact on how the rest of the project will be approached. By default, NetBeans uses Ant as the build system for all RCP apps. Almost all of the online documentation from the NetBeans project, and blog entries from the NetBeans evangelists, often reflect this preference as well. We've been using Maven for every other project, and we're not going to change that here. Fortunately, NetBeans does allow us to create an RCP project with Maven, which is what we'll do.
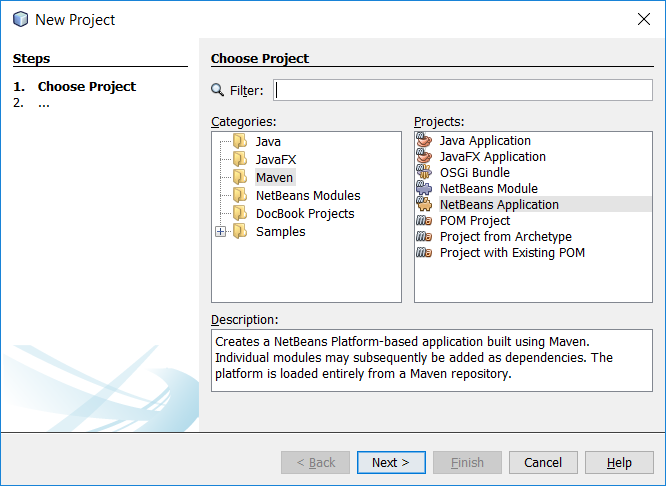
In the New Project window, we select Maven, then NetBeans Application. On the next screen, we configure the project as usual, specifying the project name, photobeans, project location, package, and so on.

When we click on Next, we'll be presented with the Module Options step of the New Project wizard. In this step, we configure some basic aspects of the RCP application. Specifically, we need to specify the version of the NetBeans APIs we'll use...

lock icon The rest of the chapter is locked
Register for a free Packt account to unlock a world of extra content!
A free Packt account unlocks extra newsletters, articles, discounted offers, and much more. Start advancing your knowledge today.
Unlock this book and the full library FREE for 7 days
Get unlimited access to 7000+ expert-authored eBooks and videos courses covering every tech area you can think of
Renews at $19.99/month. Cancel anytime
Banner background image