Search icon CANCEL
Subscription
0
Cart icon
Your Cart (0 item)
Close icon
You have no products in your basket yet
Arrow left icon
Explore Products
Best Sellers
New Releases
Books
Videos
Audiobooks
Learning Hub
Free Learning
Arrow right icon
Arrow up icon
GO TO TOP
Design Made Easy with Inkscape

You're reading from   Design Made Easy with Inkscape A practical guide to your journey from beginner to pro-level vector illustration

Arrow left icon
Product type Paperback
Published in Apr 2023
Publisher Packt
ISBN-13 9781801078771
Length 360 pages
Edition 1st Edition
Concepts
Arrow right icon
Author (1):
Arrow left icon
Christopher Rogers Christopher Rogers
Author Profile Icon Christopher Rogers
Christopher Rogers
Arrow right icon
View More author details
Toc

Table of Contents (21) Chapters Close

Preface 1. Part 1: Finding Your Way Around
2. Chapter 1: The Inkscape Interface FREE CHAPTER 3. Chapter 2: Moving and Styling Shapes 4. Chapter 3: Drawing Shapes with the Shape Tools 5. Chapter 4: Automatic Shape Alignment in Inkscape 6. Chapter 5: Node Editing – Modifying Your Shapes with Nodes and Curves 7. Part 2: Advanced Shape Editing
8. Chapter 6: Fast Shape Editing with Path Operations and the Shape Builder Tool 9. Chapter 7: Using Text in Inkscape 10. Chapter 8: Advanced Shading and Coloring 11. Chapter 9: Clips and Masks 12. Chapter 10: Automation with Clones and Linked Files 13. Part 3: Inkscape’s Power Tools
14. Chapter 11: Organization Using Layers 15. Chapter 12: Live Path Effects 16. Chapter 13: Filters and Extensions 17. Chapter 14: Vectorizing with Trace Bitmap 18. Chapter 15: Document Properties, Pages, Exporting, and Printing 19. Index 20. Other Books You May Enjoy

Clips and clipping groups

We got to play with clips a little in the last chapter when we used them to clip our blur, making a hard edge at the bottom of our shape to get rid of what looked like a shadow. Let’s take another example. Say we want to subtract the background from an image. This is a common photo editing task that we can do right in Inkscape with vector precision!

As you can see in Figure 9.1, we can use our Bezier Curve tool to trace the periphery of this fetching mannequin and select both the shape and the picture, but instead of Object > Clip > Set Clip, as we did before, we’re going to right-click on our selected objects and just choose Set Clip from the context menu that pops up. Easy, right?
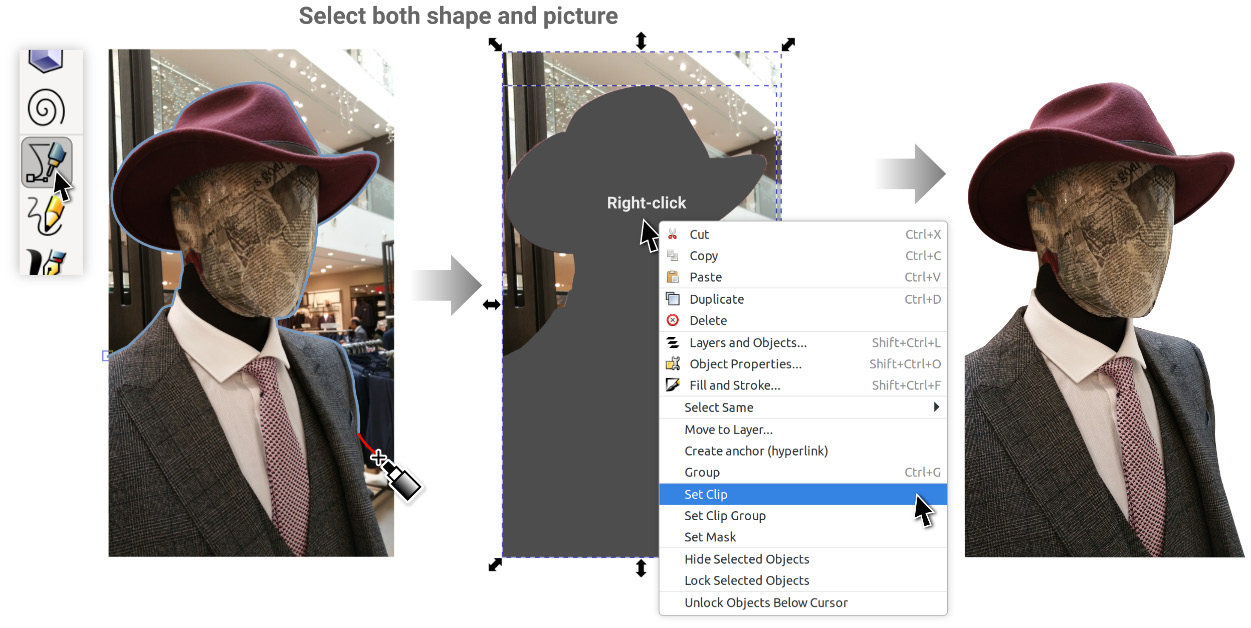
Figure 9.1 – Using the context menu (also known as the right-click menu) to set a clip

Figure 9.1 – Using the context menu (also known as the right-click menu) to set a clip

Note that there are other clipping options in that context menu, but before we dive too deep, let’s explore some neat tricks...

lock icon The rest of the chapter is locked
Register for a free Packt account to unlock a world of extra content!
A free Packt account unlocks extra newsletters, articles, discounted offers, and much more. Start advancing your knowledge today.
Unlock this book and the full library FREE for 7 days
Get unlimited access to 7000+ expert-authored eBooks and videos courses covering every tech area you can think of
Renews at $19.99/month. Cancel anytime
Banner background image