Styling the app
Now, let us style the application to make it look a little better. We'll go back to our index.html and add a few CSS classes as follows:
<!DOCTYPE html>
<html ng-app>
   <head>
         <title>Address Book</title>
<link rel="stylesheet" type="text/css" href="styles.css">
   </head>
   <body ng-controller="PeopleController">
      <h1>Address Book</h1>
   <div class="wrapper"
          <div class="contact-item" ng-repeat="person in people">
                <div class="name">{{person.name}} - {{person.phone}}</div>
                <div class="city">{{person.city}} </div>

          </div>
   </div>

   <script src= "angular.min.js" type="text/javascript"></script>
   <script src= "scripts.js" type="text/javascript"></script>
   </body>
</html>
Now let's create our styles.css with the following CSS styling:
body{
   font-family: sans-serif;
   font-weight: 100;
   background:#ccc;
}
h1{
   text-align: center;
   color:#666;
   text-shadow:0px 2px 0px #fff;

}

.name{
   font-size:18px;
}

.city{
   font-style: italic;
   font-size: 13px;
}

.wrapper{
   width:550px;
   margin: 0 auto;
   box-shadow:5px 5px 5px #555;
   background: #fff;
   border-radius: 15px;
   padding: 10px;

}
.contact-item{
   border-bottom: thin solid #ccc;
   padding:10px;
}
As you can see from the CSS styles, we first style the body to give it a light gray background color using the #ccc (#ccc is the short code for #cccccc) hex code.
The H1 heading tag is styled to align center, with a dark gray text color and a text shadow. The styling for .name and .city is straightforward. Now, let us look at the styles for .wrapper using the following code:
.wrapper{
   width:650px;
   margin: 0 auto;
   box-shadow:5px 5px 5px #555;
   background: #fff;
   border-radius: 15px;
   padding: 10px;

}
Here, we are setting width of the div to 650px. The margin with 0 auto is used to place the div to the center of the screen irrespective of the screen resolution.
Tip
Downloading the example code
You can download the example code files for all Packt books you have purchased from your account at http://www.packtpub.com. If you purchased this book elsewhere, you can visit http://www.packtpub.com/support and register to have the files e-mailed directly to you.
Now to make it look a little better, we'll give it a box-shadow and border radius. The following diagram explains what the options of the border radius mean:

For the .contact-item list, we give a border-bottom and some padding so that things stay a little spaced out.
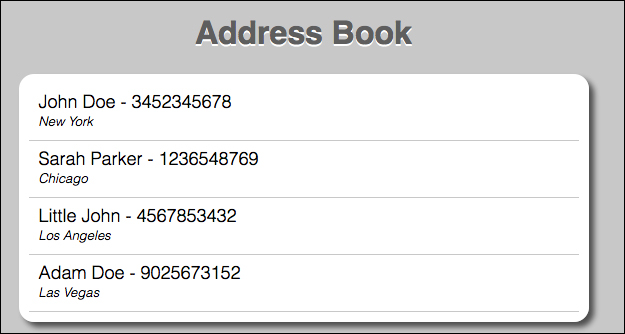
With all this CSS in place, your app should be looking like this:

Sorting the contacts alphabetically
This looks nice, but it would be a good idea to have the names sorted alphabetically. For this, we will use AngularJS's built-in filter called orderBy.
In AngularJS, filters are used to format the data. One can use AngularJS's predefined filters or create your own. We'll learn more about filters later in this book.
All we need to do is modify the following section of the index.html as follows:
<div class="contact-item" ng-repeat="person in people| orderBy:'name'">
<div class="name">{{person.name}} - {{person.phone}}</div>
<span class="city">{{person.city}} </span>
</div>
Refresh your Index.html in the browser and you should notice the names are now sorted alphabetically.


