


The crucial role of solutions in Power Apps
In Power Apps, solutions are vital for organizing, managing, and deploying your apps, flows, and customizations. They act as containers that streamline the development process and ensure that changes can be efficiently moved across different environments, such as development, testing, and production. Understanding how to use solutions effectively is key to maintaining a well-organized and scalable Power Apps environment.
Creating publishers
To effectively manage and track your solutions, it’s important to define publishers. Publishers help identify the origin of the components within a solution and maintain consistency across different environments. Here is a closer look at the key aspects:
- Publishers: Before creating a solution, define a publisher. This helps in identifying the origin of the components and maintaining consistency. A well-defined publisher enhances organization and clarity within your development and deployment processes.
- Naming conventions: Establish clear naming conventions for solutions to ensure consistency and clarity. Proper naming helps in identifying and managing solutions effectively, reducing confusion and ensuring that components are easily recognizable and manageable.
Example scenario – creating an Event Planning Engineers publisher
Let’s walk through how to create a publisher and define naming conventions specifically tailored for event planning solutions. This example will illustrate the practical steps involved in setting up a publisher and applying naming conventions to organize and manage your solutions effectively.
Creating a publisher
To start, follow these steps to create a publisher in the Power Apps Maker Portal:
- Access the Power Apps Maker Portal: Go to Power Apps Maker Portal and log in with your credentials.
- Select the environment: Choose the environment where you want to manage your event planning solutions, such as Development or Production. In this case, choose the Event Planning Sandbox environment.
- Navigate to Publishers: In the left-hand menu, click on Solutions and then select Publishers.
- Create a new publisher: Click on New publisher to begin creating a new publisher.
- Enter the following details:
- Display name:
EventPlanning Engineers - Name:
EventPlanningEngineers - Description: Optionally, describe the purpose, such as
Engineers dedicated to building the eventplanning application. - Prefix:
epe - Choice value prefix:
11111
- Display name:

Figure 2.1 – Publisher form example
- Save the publisher: Click Save to finalize and create the publisher.
- Verify the publisher: Ensure that the new publisher, Event Planning Engineers, is successfully created and listed under publishers for the chosen environment.
Naming conventions
Establishing consistent naming conventions is crucial for maintaining clarity and organization across your event planning solutions. By following a standardized approach to naming, you ensure that all components are easily identifiable, manageable, and aligned with your organizational practices. Here’s how you can define naming conventions for Event Planning Engineers (EPE):
Example scenario – naming conventions
- Prefix: Use
EPE-to identify solutions developed by Event Planning Engineers. - Descriptive names: Choose descriptive names indicating the purpose of each solution, such as
EPE-EventManagement-v1.0for the initial version of an event management solution. - Versioning: Incorporate version numbers (e.g., v1.0, v2.0, etc.) to distinguish different iterations of solutions.
- Documentation: Document these conventions to maintain consistency and facilitate future management.
By following these steps, EPE ensures that its event planning solutions are well-organized and easily identifiable within Power Apps. Clear naming conventions and a proper publisher setup contribute to streamlined management and improved clarity throughout the development and deployment processes.
Defining and creating solutions
A solution is a container for apps, flows, and customizations in Power Apps. It helps in managing, packaging, and deploying changes efficiently.
Managed versus unmanaged solutions
Understanding the difference between managed and unmanaged solutions is essential for effective solution management. Here’s a breakdown of each type:
- Managed solutions: These are intended for deployment to production environments. They are locked to prevent modifications, ensuring consistency and stability.
- Unmanaged solutions: These are used in development environments where changes are still being made. They allow for full customization and modifications.
Example scenario – unmanaged event planning solution
By default, when you create a solution in a development environment, it will be unmanaged. The choice between managed and unmanaged solutions is made during the export process.
- Navigate to the Power Apps Maker Portal.
- Click on Solutions in the left-hand menu.

Figure 2.2 – Left navigation with Solutions highlighted
- Click on New Solution.
- Enter
Event Planning Projectas the name of the solution. - Unmanaged will be selected as the default package type.
- Choose Event Planning Engineers as the publisher.

Figure 2.3 – Example of the New solution form with the fields filled in
- Click Create to initialize the solution.
So far, we have created a solution and a publisher, establishing the structure, which is currently empty. Next, we will focus on building our apps and showcase how we can add data. This will allow us to develop the event planning solution further and illustrate how various components are integrated.
Dataverse and ALM
To fully leverage Power Apps, it’s crucial to understand how data is managed and how applications are developed and maintained. This includes grasping the role of Dataverse in data storage and the principles of ALM for managing app development and deployment:
- Dataverse overview: Dataverse is the backbone for data storage and management in Power Apps. It provides a scalable, secure, and versatile platform for storing application data. Dataverse and ALM are interconnected because Dataverse’s robust data management capabilities provide a reliable foundation for managing the entire lifecycle of solutions. Dataverse ensures consistent data handling, security, and integrity, which is essential for the smooth deployment and operation of solutions as they transition through various environments, from development to testing and production. This integration allows for a seamless data flow and helps maintain the quality and stability of applications throughout their lifecycle.
- Application Lifecyle Management (ALM): ALM is important in managing the lifecycle of apps from development to production. Effective ALM practices ensure that changes are systematically tested, documented, and deployed. ALM is closely tied to environments such as
DEV,TEST, andPROD, as well as to solutions, which are packaged artifacts that move between these environments. This alignment ensures that applications are developed, tested, and released in a controlled manner, maintaining their quality and performance across different stages of the lifecycle.
Example scenario – event table in Dataverse
In our event planning scenario, Dataverse serves as the centralized data storage and management platform within Power Apps. It provides a structured and scalable environment to store, organize, and manage all data related to our event planning application.
- Create the event table: Navigate to the solution named Event Planning Project within Power Apps.

Figure 2.4 – Displaying the Event Planning Project solution
- Create a new table called
Eventsto store information about various events managed by our application.

Figure 2.5 – Table button within the New tab
- Define table columns: Add relevant columns to the
Eventstable to capture essential details such as the following:- Event name: Text field to store the name of the event
- Event start date: Date field to record the start date of the event
- Event end date: Date field to record the end date of the event
- Description: Memo field to include a detailed description of the event
- Organizer: Text field to identify the person or team responsible for organizing the event
- Attendee count: Number field to track the number of attendees registered for the event
- Event status: Choice field (e.g., Draft, Confirmed, or Canceled) to indicate the current status of the event

Figure 2.6 – Event table form
Benefits of using Dataverse for event planning
When managing event data, choosing the right data storage and management solution is crucial for ensuring that your application remains efficient, secure, and adaptable. Dataverse offers several advantages that make it an ideal choice for event planning solutions:
- Scalability: As your event planning needs grow, Dataverse accommodates the growth and expansion of event data as the application scales to manage larger events and increased volumes of data. Whether you’re handling a single small event or managing large-scale events, Dataverse scales with your needs, ensuring that performance remains optimal and data management remains efficient.
- Security: Dataverse provides robust security features to protect your event data. With granular role-based permissions, you can ensure that sensitive information is accessible only to authorized users. This built-in security of Dataverse helps safeguard against unauthorized access and ensures that data integrity is maintained throughout your event management process.
- Versatility: Dataverse supports a wide range of data types and complex relationships, making it highly versatile for comprehensive event management. Beyond basic event information, you can manage intricate details such as attendee interactions, scheduling conflicts, and more, all within a unified platform. This versatility allows for a more holistic approach to event planning and management.
Experience tips
Here are some tips for your better understanding:
- Why not use SharePoint Lists? SharePoint Lists is often considered for data management due to its integration with other Microsoft products. However, there are significant differences when compared to Dataverse. With Dataverse, your data is automatically synchronized across environments (
DEV,TEST, andPROD) without additional effort. In contrast, using SharePoint Lists requires manually recreating and duplicating your data multiple times. This process involves managing variables inside your solutions to adjust addresses, which increases the risk of manipulation errors and complicates data management. - Consistency and automation: Dataverse ensures that data handling is consistent and automated, which reduces the risk of errors and streamlines the development process. This automation is especially beneficial in complex scenarios where manual data handling could lead to inconsistencies and inefficiencies.
By leveraging Dataverse, you streamline your event planning processes, ensure data integrity, and support scalable and secure management of event data, making it a superior choice for managing comprehensive event planning solutions.
Setting relationships in Dataverse
In the Event Planning Project solution developed using Power Apps and Dataverse, setting relationships between tables is crucial for organizing and managing event data effectively. Let’s explore how to establish relationships between the Events table and the Attendees table to track attendees for specific events.
Example scenario – setting relationships in the event planning solution
Let’s start with the context. As part of the event planning application, we need to manage various aspects of events, including attendee information. Establishing relationships allows us to link attendee data with specific events, facilitating comprehensive event management. Imagine a scenario where an event planner needs to view attendee lists for upcoming events within Event Planning Project. By navigating to the Events table and accessing the Attendees lookup field, they can quickly retrieve and manage attendee details associated with each event. This streamlined approach ensures that event data remains organized and accessible throughout the planning and execution phases:
- Open Event Planning Project: Select Event Planning Project where the
Eventstable is defined. - Access Data and Tables: Navigate to the Data or Tables section within Power Apps.
- Add an Attendees table: Create a new table named
Attendeeswithin the same solution.

Figure 2.7 – Attendee table
- Open the Events table: Locate and open the
Eventstable that was previously created for storing event details. - Create a lookup field:
- Within the
Eventstable, create a new column to establish a relationship with theAttendeestable - Name this field appropriately, such as
AttendeesorEvent Attendees
- Within the
- Define the lookup relationship:
- Specify that the field type is Lookup
- Configure the lookup to reference the
Attendeestable - Select the relevant field in the
Attendeestable that will be linked to events (e.g.,Attendee IDorName)

Figure 2.8 – Attendee lookup column within the Event table
- Save and validate: Save the relationship configuration to establish the lookup relationship between the
EventsandAttendeestables. - Let’s create a Venue table with the same relationship as Attendee. Follow the same steps to create the Venue table that you just did for Attendee.
Benefits of setting relationships
In event management, establishing relationships between different data entities is essential for maintaining an organized and efficient system. By linking related data, such as attendees with specific events, you can enhance data accuracy, accessibility, and reporting capabilities. Here’s how setting these relationships benefits your event planning process:
- Data integrity: Ensures that attendee information is accurately associated with specific events, avoiding duplication or inconsistency. Properly set relationships prevent data anomalies and ensure that each piece of information is correctly linked to its corresponding event, maintaining the reliability of your data.
- Efficient data access: Facilitates easy access to attendee details directly from the event record, enhancing usability for event planners. When relationships are well-defined, event planners can quickly retrieve relevant attendee information without having to search through multiple data sources, streamlining their workflow and improving efficiency.
- Enhanced reporting: Simplifies reporting and analytics by providing structured data relationships, allowing for insights into attendee participation across events. Well-established relationships enable more accurate and comprehensive reports, helping you analyze trends, measure engagement, and make informed decisions based on structured data.
Defining views and forms in Dataverse
To effectively manage and interact with event data, it is crucial to create and customize views and forms within Dataverse. These elements allow you to tailor how data is presented and edited, ensuring that the interface aligns with specific user workflows and requirements:
- Create custom views and forms within Dataverse to display and interact with event data effectively. Custom views allow you to define which fields are visible and how they are presented, while custom forms enable users to enter and edit information according to their needs.
- Customize the layout and fields displayed on forms to match the workflow and user requirements for managing events. This customization enhances usability by ensuring that users have access to relevant information and tools for their tasks.
Example scenario – views and forms in the Events table
Here is the context. As part of the event planning application, custom views and forms allow event planners to visualize and interact with event data efficiently. This customization ensures that the user interface aligns with specific workflow requirements and enhances usability. Consider an event planner using Event Planning Project to manage a series of corporate conferences. By accessing the custom Event Details view, they can instantly see scheduled events, including details such as event names, dates, locations, and status. When editing event details, the customized Event Details form allows them to update attendee lists, venue information, and event statuses seamlessly. This personalized approach ensures that event data is organized and accessible, supporting efficient planning and execution of corporate events.
- Open the Event table: Locate and open the
Eventtable that was previously created for storing event details. - Create custom views: Click on Views within the
Eventtable settings to manage views and forms. - Define custom views:
- Click on New View to create a custom view tailored for event management.
- Name the view appropriately, such as
Event Details. - Select which fields from the
Eventtable should be displayed in this view, such asEvent Name,Date,Location,Organizer,Attendee Count, andStatus. - Arrange the fields in a logical order that suits the user’s needs, ensuring easy readability and access to critical information.
- Click Save and publish then go back to the
Eventtable.

Figure 2.9 – Event details view
- Configure the form layout: Click on Forms to define the layout and fields displayed when viewing or editing event records. Create a new form,
Event Details, or modify an existing form (main form), if available. - Customize form fields:
- Drag and drop fields from the
Eventtable onto the Form canvas to include them in the Form layout. - Adjust field properties such as label names, data types, and validation rules to match specific user requirements.
- Use sections and tabs to organize related fields and improve form usability.
- Drag and drop fields from the
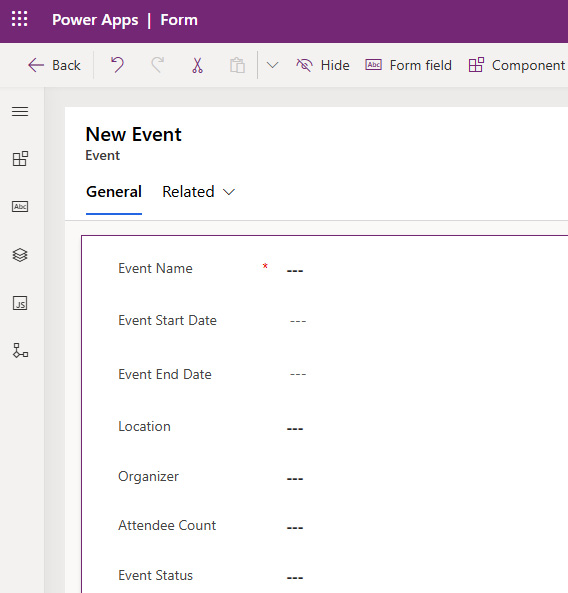
Figure 2.10 – Event form under the main form
- Save and publish:
- Save the custom views and forms to apply the configurations to Event Planning Project
- Publish the changes to make the updated views and forms available for use by event planners
Benefits of custom views and forms
Custom views and forms in Dataverse offer several advantages that significantly enhance the management and interaction with event data. By tailoring these elements to fit specific user needs and workflows, you can achieve the following benefits:
- User-centric design: Tailoring views and forms ensures that event planners can quickly access and interact with relevant event data, enhancing productivity. For example, a custom view might highlight upcoming events and key deadlines, allowing planners to focus on their most pressing tasks. This targeted approach enhances productivity by reducing the time spent searching for necessary information.
- Improved data visibility: Custom views provide focused insights into critical information such as upcoming events, attendee lists, and event details. By filtering and organizing data according to specific criteria, these views facilitate informed decision-making. For instance, a view showing only upcoming events helps planners prioritize their efforts and track progress more effectively.
- Enhanced user experience: Optimized form layouts and intuitive interfaces streamline data entry and management tasks. Custom forms designed with user needs in mind can reduce errors and increase efficiency. For example, a form with clearly labeled fields and logical flow can simplify the process of updating event details, making it easier for users to input accurate information quickly.
Implementing business rules in Dataverse
Business rules in Dataverse automate processes and enforce data integrity, ensuring consistent behavior across applications. Let’s walk through the steps to apply a business rule in the Event Planning Project scenario.
Example scenario – setting the event status to Confirmed
In our event planning application, we want to automatically update the status of an event to Confirmed when the number of registered attendees reaches a predefined threshold. Imagine a scenario where an event planner updates the attendee list for a conference in Event Planning Project. As the attendee count reaches or exceeds the predefined threshold (e.g., 100 attendees), the system automatically updates the event status from Pending to Confirmed. This automated process ensures that event statuses accurately reflect registration progress, allowing planners to focus on other aspects of event management with confidence in data accuracy and system reliability.
- Open Event Planning Project: Select Event Planning Project where the
Eventtable and related components are defined. - Access Business Rules: Navigate to the
Eventtable within the Data or Tables section. - Define the business rule: Click on Business Rules to manage rules that apply to the
Eventtable. - Create a new business rule: Click on New Business Rule to create a new rule for setting the event status.
- Name the business rule: Provide a descriptive name for the business rule, such as
Set Event Statusto Confirmed. - Set conditions: Define the condition that triggers the business rule, as in this example:
- Condition: Number of Attendees >= Predefined Threshold (100) – Set the threshold number of attendees that triggers the status change.
- Click Apply

Figure 2.11 – Condition for business rule
- Define actions: Specify the actions to be performed when the condition is met:
- Action – Set Field Value:
- Choose the Status field of the
Eventtable - Set the value to Confirmed when the condition is satisfied
- Click Apply
- Choose the Status field of the
- Action – Set Field Value:

Figure 2.12 – Setting the status to Confirmed in the business rule
- Save and publish:
- Save the business rule configuration
- Publish the changes to apply the business rule to Event Planning Project
Testing and validation
To ensure that business rules are functioning correctly and that your event management system operates as intended, it is crucial to perform thorough testing and validation. Here’s how to effectively test and validate business rules in Dataverse:
- Test the business rule: Create or update event records to check that the status updates automatically when the attendee count reaches the defined threshold (e.g., 100 attendees). Ensure that the rule triggers as expected without any manual intervention.
- Verify data integrity: Ensure that the business rule correctly enforces the status update, maintaining data accuracy and integrity. Check that the event status changes to Confirmed precisely when the attendee count crosses the threshold, and verify that no erroneous updates occur.
Benefits of business rules
Implementing business rules in Dataverse offers several advantages that can significantly enhance the management of event planning processes:
- Automation: Business rules automate repetitive tasks and decision-making processes. By defining specific conditions and actions, you can reduce the need for manual intervention, such as manually updating event statuses. This automation not only saves time but also minimizes human error, allowing you to focus on more strategic aspects of event management.
- Consistency: By enforcing standardized processes, business rules ensure that certain actions are consistently applied across all event management operations. For instance, automatically updating the event status to Confirmed when the attendee count reaches a specific number helps maintain uniformity in how event statuses are managed. This consistency helps in maintaining reliable and predictable data across the application.
- Efficiency: Business rules streamline workflows by automating critical updates based on predefined conditions. This efficiency improves the overall operational performance by reducing the time and effort required to manage event data. For example, automatically changing event statuses reduces the manual effort needed to track and update event progress, leading to more efficient event planning and execution.
ALM considerations
Throughout the development and deployment phases of our event planning application, we’ll consider the following points for better understanding:
- Version control: Use versioning in Dataverse to track changes made to event data and configurations over time, ensuring transparency and facilitating rollback if needed.
- Testing and deployment: Utilize
DEV(development) andTEST(testing) environments within Dataverse for testing new features and updates before deploying them toPROD(production). - DEV environment: Primarily used for initial development and experimentation, where new features are built and tested in isolation.
- TEST environment: Used for rigorous testing, including User Acceptance Testing (UAT) and performance testing, to ensure that updates function as expected and do not introduce issues.
- PROD environment: This is the live environment where the final, stable version of the application is deployed. It is crucial to minimize risks and disruptions to ongoing event management activities by thoroughly testing in
DEVandTESTenvironments first. - Continuous improvement: Implement feedback loops and iterative development cycles to enhance the event planning application based on user feedback and evolving requirements.
Dataverse provides a robust foundation for developing and managing the event planning application. By leveraging its capabilities for data storage, relationships, and ALM practices, we ensure that our application meets the needs of event organizers effectively while maintaining scalability, security, and flexibility.
Versions and deployment pipelines
Managing versions and deployment pipelines is essential for maintaining the stability and evolution of your Power Apps solutions. Proper version control and a structured deployment process help ensure that updates are applied smoothly and efficiently, minimizing disruptions to your users.
Solution versions
Effective version management is crucial for tracking the development and progression of your solutions. Implementing a robust versioning strategy helps in identifying and managing different stages of your solution’s lifecycle:
- Versioning: Keeping track of changes and updates using version numbers is essential for maintaining a clear and organized development process. Versioning ensures that each iteration of your solution is distinctly identified, facilitating smooth upgrades and maintenance. For example, assigning a unique version number such as v1.0 for the initial release, v1.1 for minor updates, and v2.0 for major changes helps in clearly delineating each stage of your solution’s development.
Managing drafts and releases
In addition to versioning, differentiating between drafts and released versions is critical for effective solution management:
- Drafts and releases: Drafts are versions of your solution that are still in development and may not be stable or fully tested. These are typically used for ongoing work and internal testing. Released versions, on the other hand, are stable and ready for deployment to production environments. By clearly distinguishing between drafts and releases, you ensure that only fully tested and stable versions are deployed, reducing the risk of issues in production.
Example scenario – event management solution
To illustrate how versioning and draft management work in practice, consider the following example:
- Initial version: Create
EventManagement-v1.0as the initial version of your event management solution - Updates: Increment the version number for subsequent updates, such as
EventManagement-v1.1,EventManagement-v2.0, and so on - Documentation: Document changes made in each version to facilitate understanding and future updates
By following these guidelines, you can effectively implement versioning in your Power Apps solutions, ensuring smooth upgrades, maintenance, and transparency in change management processes.
Deployment pipelines
Effective management of solution deployments is crucial for maintaining the stability and reliability of applications as they move from development to production environments. Deployment pipelines play a key role in this process by automating and streamlining the transition of solutions, which helps to minimize errors and ensure that updates are delivered efficiently. We’ll use the following points to achieve this:
- Concept and importance: Deployment pipelines streamline the process of moving solutions from development to production, ensuring a smooth and error-free deployment. By automating the steps involved in deploying updates, pipelines help reduce manual effort and the potential for human error. This is essential for maintaining the integrity of your solutions and providing a seamless experience for end users.
- Evolution of pipelines: Deployment pipelines have evolved significantly over time, introducing advanced features such as Continuous Integration/Continuous Deployment (CI/CD), automated testing, and version control. These enhancements have transformed deployment practices by making them faster, more reliable, and more secure. Understanding these advancements is crucial for leveraging the full potential of deployment pipelines, which ultimately leads to more efficient and effective solution management.
Benefits of deployment pipelines for event planning solutions
Here are the benefits of deployment pipelines for even planning solutions:
- Faster deployment: Automated deployment processes reduce deployment time and ensure timely delivery of updates
- Improved reliability: Automated testing and validation mitigate risks associated with manual errors, ensuring reliable deployments
- Enhanced security: Controlled deployment stages and version control enhance security by preventing unauthorized changes
By leveraging deployment pipelines with CI/CD practices and automated testing, EPE can streamline the deployment of their Power Apps solutions. This approach not only accelerates time-to-market for new features but also improves overall application reliability and security.


