Search icon CANCEL
Arrow left icon
Explore Products
Best Sellers
New Releases
Books
Videos
Audiobooks
Learning Hub
Conferences
Free Learning
Arrow right icon
Arrow up icon
GO TO TOP
Learning Concurrency in Python

You're reading from   Learning Concurrency in Python Build highly efficient, robust, and concurrent applications

Arrow left icon
Product type Paperback
Published in Aug 2017
Publisher Packt
ISBN-13 9781787285378
Length 360 pages
Edition 1st Edition
Languages
Concepts
Arrow right icon
Author (1):
Arrow left icon
Elliot Forbes Elliot Forbes
Author Profile Icon Elliot Forbes
Elliot Forbes
Arrow right icon
View More author details
Toc

Table of Contents (13) Chapters Close

Preface 1. Speed It Up! FREE CHAPTER 2. Parallelize It 3. Life of a Thread 4. Synchronization between Threads 5. Communication between Threads 6. Debug and Benchmark 7. Executors and Pools 8. Multiprocessing 9. Event-Driven Programming 10. Reactive Programming 11. Using the GPU 12. Choosing a Solution

Multiprocessing

In Python, we can choose to run our code using either multiple threads or multiple processes should we wish to try and improve the performance over a standard single-threaded approach. We can go with a multithreaded approach and be limited to the processing power of one CPU core, or conversely we can go with a multiprocessing approach and utilize the full number of CPU cores available on our machine. In today's modern computers, we tend to have numerous CPUs and cores, so limiting ourselves to just the one, effectively renders the rest of our machine idle. Our goal is to try and extract the full potential from our hardware, and ensure that we get the best value for money and solve our problems faster than anyone else:
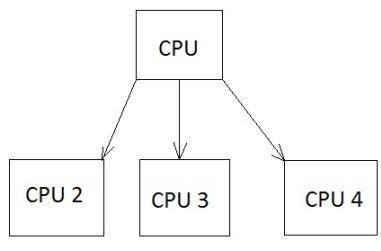
With Python's multiprocessing module, we can effectively utilize the full number of cores and CPUs, which can help us to achieve greater performance when it comes to CPU-bounded problems. The preceding figure shows an example of how one CPU core starts delegating tasks to other cores.

In all Python versions less than or equal to 2.6, we can attain the number of CPU cores available to us by using the following code snippet:

# First we import the multiprocessing module
import multiprocessing
# then we call multiprocessing.cpu_count() which
# returns an integer value of how many available CPUs we have
multiprocessing.cpu_count()

Not only does multiprocessing enable us to utilize more of our machine, but we also avoid the limitations that the Global Interpreter Lock imposes on us in CPython.

One potential disadvantage of multiple processes is that we inherently have no shared state, and lack communication. We, therefore, have to pass it through some form of IPC, and performance can take a hit. However, this lack of shared state can make them easier to work with, as you do not have to fight against potential race conditions in your code.

Event-driven programming

Event-driven programming is a huge part of our lives--we see examples of it every day when we open up our phone, or work on our computer. These devices run purely in an event-driven way; for example, when you click on an icon on your desktop, the operating system registers this as an event, and then performs the necessary action tied to that specific style of event.

Every interaction we do can be characterized as an event or a series of events, and these typically trigger callbacks. If you have any prior experience with JavaScript, then you should be somewhat familiar with this concept of callbacks and the callback design pattern. In JavaScript, the predominant use case for callbacks is when you perform RESTful HTTP requests, and want to be able to perform an action when you know that this action has successfully completed and we've received our HTTP response:

If we look at the previous image, it shows us an example of how event-driven programs process events. We have our EventEmitters on the left-hand side; these fire off multiple Events, which are picked up by our program's Event Loop, and, should they match a predefined Event Handler, that handler is then fired to deal with the said event.

Callbacks are often used in scenarios where an action is asynchronous. Say, for instance, you applied for a job at Google, you would give them an email address, and they would then get in touch with you when they make their mind up. This is, essentially, the same as registering a callback except that, instead of having them email you, you would execute an arbitrary bit of code whenever the callback is invoked.

Turtle

Turtle is a graphics module that has been written in Python, and is an incredible starting point for getting kids interested in programming. It handles all the complexities that come with graphics programming, and lets them focus purely on learning the very basics whilst keeping them interested.

It is also a very good tool to use in order to demonstrate event-driven programs. It features event handlers and listeners, which is all that we need:

import turtle
turtle.setup(500,500)
window = turtle.Screen()
window.title("Event Handling 101")
window.bgcolor("lightblue")
nathan = turtle.Turtle()
def moveForward():
nathan.forward(50)
def moveLeft():
nathan.left(30)
def moveRight():
nathan.right(30)
def start():
window.onkey(moveForward, "Up")
window.onkey(moveLeft, "Left")
window.onkey(moveRight, "Right")
window.listen()
window.mainloop()
if __name__ == '__main__':
start()

Breaking it down

In the first line of this preceding code sample, we import the turtle graphics module. We then go up to set up a basic turtle window with the title Event Handling 101 and a background color of light blue.

After we've got the initial setup out of the way, we then go on to define three distinct event handlers:

  • moveForward: This is for when we want to move our character forward by 50 units
  • moveLeft/moveRight: This is for when we want to rotate our character in either direction by 30 degrees

Once we've defined our three distinct handlers, we then go on to map these event handlers to the up, left, and right key presses using the onkey method.

Now that we've set up our handlers, we then tell them to start listening. If any of the keys are pressed after our program has started listening, then we will fire its event handler function. Finally, when you run the preceding code, you should see a window appear with an arrow in the center, which you can move about with your arrow keys.

You have been reading a chapter from
Learning Concurrency in Python
Published in: Aug 2017
Publisher: Packt
ISBN-13: 9781787285378
Register for a free Packt account to unlock a world of extra content!
A free Packt account unlocks extra newsletters, articles, discounted offers, and much more. Start advancing your knowledge today.
Unlock this book and the full library FREE for 7 days
Get unlimited access to 7000+ expert-authored eBooks and videos courses covering every tech area you can think of
Renews at $19.99/month. Cancel anytime