Bonus commands
Let’s look at the GROUP command options often overlooked in AutoCAD. The first is the GROUP command, which allows you to create on-the-fly block-like objects. So, when would this command be most useful? When editing multiple objects in a drawing, you can create a selection set of objects, and instead of creating a BLOCK of those objects, use the GROUP command to group the objects together temporarily or permanently with or without a name.
So, where do you find the GROUP command?
|
GROUP |
Command Locations |
|
Ribbon |
Home | Groups | Group |
|
Command Line |
GROUP (GRO) |
|
-GROUP to display Command Line options |
The GROUP command
In this exercise, we will learn how to use group objects to simplify multiple object manipulation.
- Open the
2-4_Bonus INTERFACECommands.dwgfile. - Select the three SQUARE objects in the TOP row.
- Using the Home ribbon and the Groups panel, select the Group command
 and press Enter to complete the command.
 - Hover over the TOP row objects and note how the three SQUARE objects now highlight as a single object, not three individual objects. They are now considered a single GROUP object.
Note
If the three SQUARE objects do not highlight as a GROUP, your GROUP toggle may be turned OFF. Use Ctrl + Shift + A to toggle the GROUP setting ON and OFF.
- Select the new GROUP object, right-click to access the right-click shortcut menu, and select the Properties command.
- Using the Properties dialog, notice that the three polylines are now considered a single GROUP object.
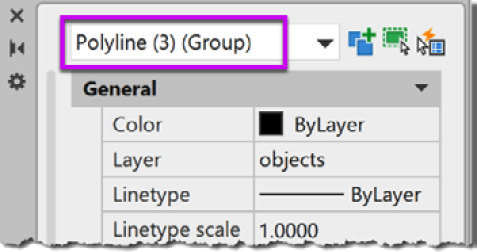
Figure 2.26: GROUP Properties
- Repeat Steps 3-4 and create new GROUPS for the MIDDLE row, BOTTOM row, and ALL nine square objects.
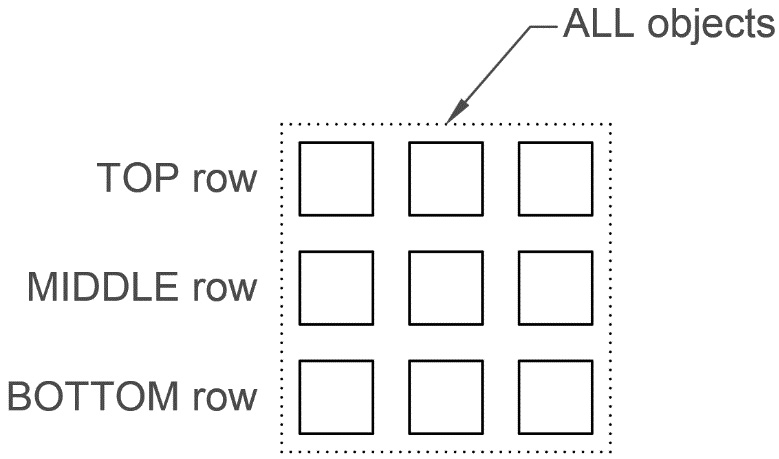
Figure 2.27: Create groups
- Using the newly created groups, select one of the three squares in the BOTTOM row. All nine objects are selected using the ALL Objects group, not just the objects in the BOTTOM row.
So, how do we work with the embedded BOTTOM row group?
- Select the GRIP (blue square) for the BOTTOM row group (three squares) and use the Move command to move the BOTTOM row DOWN 2-units.
- The BOTTOM row group is moved as a single object but is still a part of the ALL Objects group.
So, even with embedded GROUPS, you can easily move multiple objects as needed.
Depending on which object you select in the GROUP, the related GRIPS will display to enable you to use these GRIPS to perform the common Stretch, Move, Rotate, and Scale grip commands, as discussed earlier in this chapter.
Group Bounding Box
When you select a GROUP of objects, the boundary will display by default. You can control the boundary display by selecting the GROUPS ribbon drop-down or expanded panel and toggling the Group Bounding Box setting ON or OFF, or using the following system variable.
|
GROUPDISPLAYMODE |
|
|
Controls how grips display when GROUPS are enabled and an object in a group is selected. Type: Integer Saved in: Registry |
|
|
0 |
Displays grips on all objects in the selected group. |
|
1 |
Displays a single grip at the center of the grouped objects. |
|
2 (default) |
Displays a bounding box around the grouped objects, and displays a single grip at the center. |
The UNGROUP command
Next, we want to learn how to ungroup these objects.
- Continue using the
2-4_Bonus INTERFACECommands.dwgfile. - Select one of the SQUARE objects in the TOP row.
- Using the Home ribbon and the Groups panel, select the Ungroup command.

- Hover over one of the squares in the TOP row and notice that the group definition has been removed.
Removing the GROUP definition is not always the best solution when you want to manipulate the GROUP objects individually. I recommend using the GROUP SELECTION mode, ON or OFF, to toggle the ability to manipulate the objects as a GROUP or as individual objects.
GROUP selection mode
In this exercise, we will control the recognition of GROUP objects using the Group Selection ON and OFF toggle.
- Continue using the
2-4_Bonus INTERFACECommands.dwgfile. - Using the Home ribbon and the Groups panel, select the Group Selection On/Off command
 to turn the Group Selection OFF. Notice in the Command Line there is no indication that this command has been selected. The only way to tell whether Group Selection is ON or OFF is to check the ribbon button or hover over an object.
 - Using the ribbon, if the Group Selection ON/OFF button is “blue” in color, the selection mode is ON. If the button is “gray” in color, the selection mode is OFF.
- You can also hover over an object and review what objects highlight to determine whether Group Selection is ON or OFF.
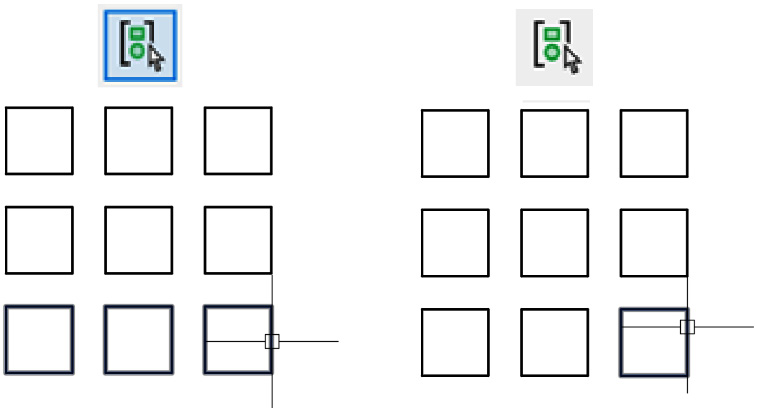
Figure 2.28: GROUP Selection ON/OFF
- Hover over a SQUARE object in the BOTTOM row and notice that only an individual object is highlighted.
- Using the Home ribbon and the Groups panel, select the Group Selection ON/OFF command again to turn Group Selection ON.
- Hover over the SQUARE object in the BOTTOM row again, and notice the group of three squares is highlighted.
The Group Selection ON/OFF command toggles the group recognition ON and OFF.
Note
You can use the Ctrl + Shift + A keyboard shortcut to also toggle the Group Selection ON/OFF command.
I also prefer to assign a keyboard shortcut key to the GROUP and UNGROUP commands. These shortcut keys make it much easier to work with these commands on the fly.
Group edit
Unless your selection operations are perfect and you never miss-select an object, you must learn how to edit an existing group to add and remove objects. This can be accomplished by using the GROUP EDIT command:
- Continue using the
2-4_Bonus INTERFACECommands.dwgfile. - Using the Home ribbon and the Groups panel, select the Group Edit command
 and select the TOP row group.
 - Using the Command Line, key in
Rto remove objects from the group. - Select the TOP LEFT SQUARE object to remove it from the group and press the Enter key to complete the command.
We can also use a right-click shortcut menu to access the GROUP EDIT command.
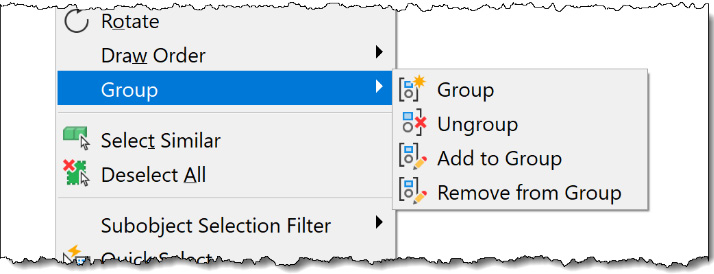
Figure 2.29: Using the Group menu
- Use the Esc key on the keyboard to cancel any running commands.
- Select the TOP RIGHT SQUARE object and right-click to access the GROUP | Add to Group command.
- Select the TOP RIGHT SQUARE object to add it back into the group.
- Use the Enter key to complete the command.
Using either of these two command methods will give you access to the GROUP commands. Choose the interface method that is most comfortable for you.
If you find you make numerous groups and maintain them in your drawing files, you will want to assign logical names to them so they are easier to identify using the Group Manager.
Using the Group Manager
The Group Manager allows you to assign logical names to your saved groups:
- Continue using the
2-4_Bonus INTERFACECommands.dwgfile. - Using the Home ribbon and the Groups panel, select the expanded Group panel, and select the Group Manager command.
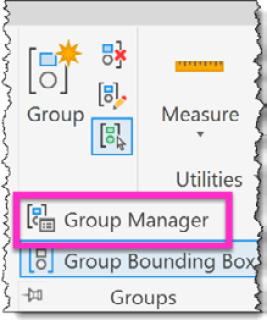
Figure 2.30: GROUP Manager
- Using the Object Grouping dialog, turn ON the Include Unnamed setting.
- Select the first group in the list (*A1) and use the Highlight < button to identify it in the drawing.
- Use the Continue button to close the Highlight dialog.
- With this group (*A1) still selected in the list, use the Group Name field and rename this group to TOP.
Note
The RENAME command in the Object Grouping dialog does not allow spaces, including variations or combinations of spaces.
- Click the Rename button to apply the new name to the selected group.
- Click OK to close the dialog.
To ensure your GROUPS are well organized, utilize the Group Manager and assign them logical names. Additionally, consider creating custom shortcut keys to automate the use of GROUP commands for better efficiency.
Using shortcut keys to Group and Ungroup
As you may have noticed, using groups is a convenient method to manage several objects at once. However, I personally utilize this function frequently enough that I use custom shortcut keys as a faster approach to access the GROUP and UNGROUP commands.
In this exercise, we will assign keyboard shortcuts to speed up the use of these commands.
First, let’s assign a shortcut key for the GROUP command:
- Continue using the
2-4_Bonus INTERFACECommands.dwgfile. - Using the Command Line dialog, key in the
CUIcommand, and using the Customize User Interface dialog, select the (current) workspace. - Expand the Keyboard Shortcuts item and expand the Shortcut Keys item.
- Using the Command List panel, located in the LOWER LEFT, select the Search field and key in
GROUPto filter the list of commands. - Select the GROUP command and left-click and drag it into the Keyboard Shortcuts list.
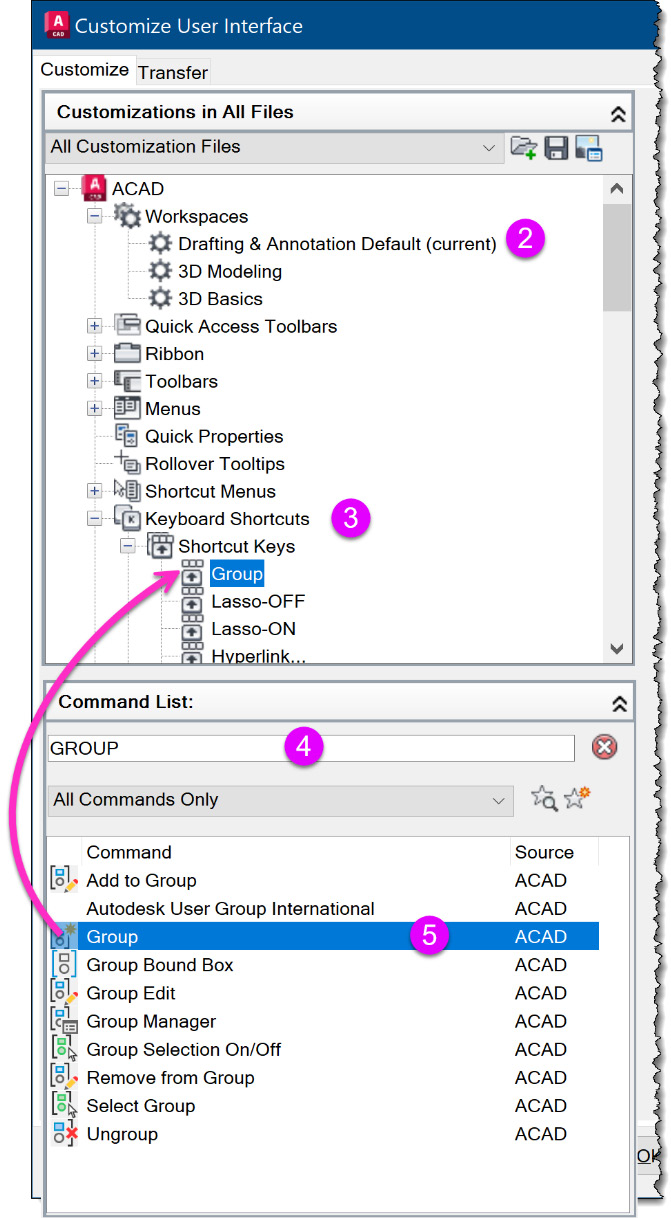
Figure 2.31: Create a GROUP shortcut key
- Select the Group command in the Shortcut Keys list.
- Using the Properties panel in this dialog, located in the LOWER RIGHT, select the Access | Keys | … to open the Shortcut Keys dialog.
- Key in
CTRL + Gfor the new shortcut key and click OK to close the dialog. - Click Apply to save this new shortcut key.
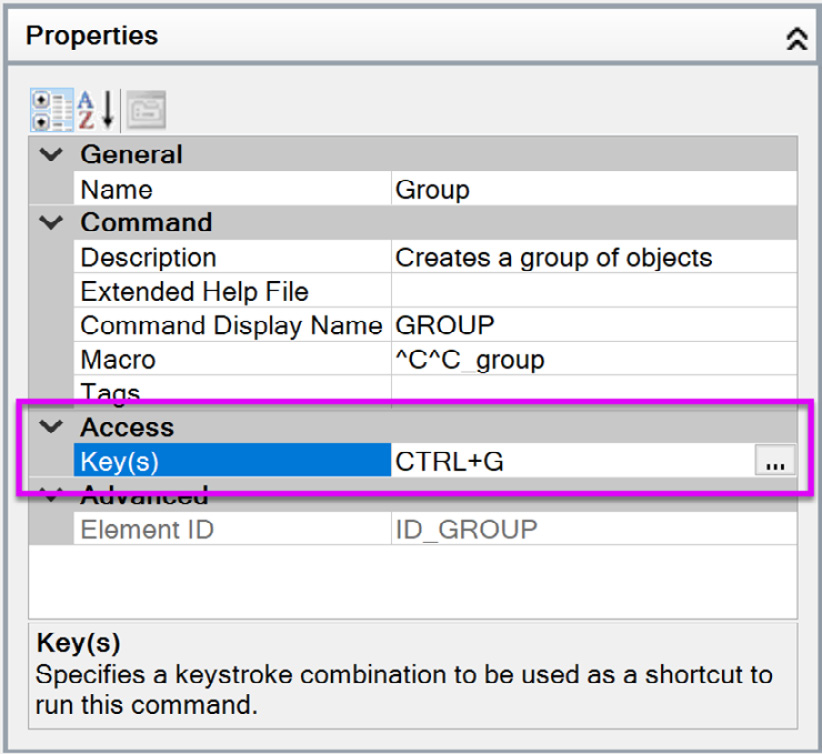
Figure 2.32: Assign a GROUP shortcut key
Now, let’s assign a shortcut key for the UNGROUP command:
- Using the Command List panel, located in the LOWER LEFT, select the SEARCH field and key in
UNGROUPto filter the list of commands. - Select the UNGROUP command and left-click and drag it into the Keyboard Shortcuts list.
- Select the UNGROUP command in the Shortcut Keys list.
- Using the Properties panel in this dialog, located in the LOWER RIGHT, select Access | Keys | … to open the Shortcut Keys dialog.
- Key in
CTRL + Ufor the new shortcut key and click OK to close the dialog. - Click Apply to SAVE this new shortcut key, and click OK to close the dialog.
Now, let’s try the new shortcut keys for the GROUP and UNGROUP commands:
- Continue using the
2-4_Bonus INTERFACECommands.dwgfile. - Select all nine SQUARE objects, and use the Ctrl + G shortcut key to make them into a group.
- Using the Home ribbon and the Groups panel, select the expanded Group panel, and verify the Group Selection command is ON (blue).
- Hover over one of the SQUARE objects to verify that all nine objects are highlighted as a group.
- Select the new GROUP of objects and use the shortcut key Ctrl + U to ungroup these objects.
- Press Enter key to accept this change.
- Hover over one of the SQUARE objects to verify that only one object highlights and the GROUP definition has been removed.
Using these shortcut keys will give you much quicker access to these extremely useful tools and encourage you to use them more often.


