Understanding decorators
Decorators provide a way to add additional functionality or conditions to the execution of a portion of a behavior tree. As you already know from previous chapters, decorators are attached to either a composite or a task node and determine whether a branch in the tree (or even a single node) can be executed. By combining decorators with composite nodes, you can create behavior trees with prioritized behavior allowing for powerful logic capable of handling intricate scenarios. In Chapter 8, Setting Up a Behavior Tree, we used some built-in decorators but, in this section, I will give you more detailed information about creating your own custom decorators.
Explaining the BTAuxiliaryNode class
Both decorators and services inherit from the BTAuxiliaryNode class, which will let you implement the following functions:
OnBecomeRelevant(): This will be called when the auxiliary node – the one the decorator or service is attached to – becomes activeOnCeaseRelevant(): This will be executed when the auxiliary node becomes inactiveTickNode(): This will be executed at each auxiliary node tick
In Chapter 8, Setting Up a Behavior Tree, I presented you with some of these functions, so it’s good to know where they come from.
Creating C++ decorators
A decorator extends from the BTDecorator class, and in C++, its main implementable functions are as follows:
OnNodeActivation(): This is called when the underlying node is activatedOnNodeDeactivation(): This is called when the underlying node is deactivatedOnNodeProcessed(): This is called when the underlying node is deactivated or fails to activateCalculateRawConditionalValue(): This computes the value of the decorator condition without considering the inverse condition
Additionally, you can use the IsInversed() function to check whether the decorator will handle the inversed conditional value.
Creating Blueprint decorators
Whenever creating a decorator with Blueprints Visual Scripting, you should extend from the BTDecorator_BlueprintBase class, which includes some additional code logic and events, in order to better manage it. You can create a decorator in the usual way – from Content Drawer – or you can select the New Decorator button from the behavior tree graph, as shown in Figure 9.9:

Figure 9.9 – Decorator creation
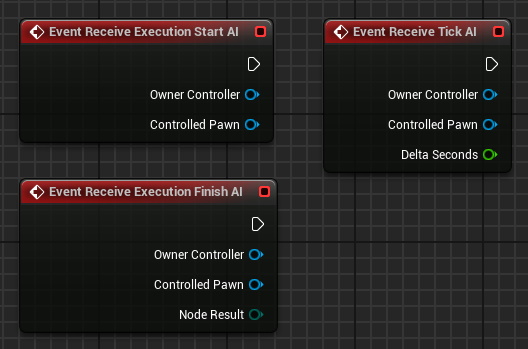
The main events you will have at your disposal when working with Blueprint-generated decorators are as follows:
- Receive Execution Start AI: This is called when the underlying node is activated
- Receive Execution Finish AI: This is called when the underlying node has finished executing its logic
- Receive Tick AI: This is called on each tick

Figure 9.10 – Decorator nodes
By keeping this in mind, you will have the ability to implement your own Blueprint decorators for your AI agents.
We are now going to implement our own decorator, one that will be checking a tag on an actor.
Implementing the CheckTagOnActor decorator
Now is the perfect time to create our first decorator. As you may recall, while implementing the BaseTarget class, we ensured that whenever a target gets hit, its tag is set to an undefined value. By implementing a decorator that checks an actor instance tag, we can determine whether the actor itself is a viable target.
So, let’s start by creating a new C++ class extending BTDecorator, and let’s call it BTDecorator_CheckTagOnActor. Once the class has been created, open the BTDecorator_CheckTagOnActor.h file and add the following declarations:
protected:
   UBTDecorator_CheckTagOnActor();
   UPROPERTY(EditAnywhere, Category=TagCheck)
    FBlackboardKeySelector ActorToCheck;
   UPROPERTY(EditAnywhere, Category=TagCheck)
    FName TagName;
   virtual bool CalculateRawConditionValue(UBehaviorTreeComponent& OwnerComp, uint8* NodeMemory) const override;
   virtual void InitializeFromAsset(UBehaviorTree& Asset) override;
As you can see, we will be using a Blackboard key value – the ActorToCheck one – to check whether its referred value has a tag equal to TagName. This check will be handled by the CalculateRawConditionValue() function. Additionally, we will need to initialize any asset-related data, and this is usually done in the InitializeFromAsset() function, which is inherited by the BTNode superclass.
Now, open the BTDecorator_CheckTagOnActor.cpp file to start implementing the functions. Let’s start by adding the needed #include files:
#include "BehaviorTree/BlackboardComponent.h"
#include "BehaviorTree/Blackboard/BlackboardKeyType_Object.h"
Next, let’s implement the constructor:
UBTDecorator_CheckTagOnActor::UBTDecorator_CheckTagOnActor()
{
    NodeName = "Tag Condition";
    ActorToCheck.AddObjectFilter(this, GET_MEMBER_NAME_      CHECKED(UBTDecorator_CheckTagOnActor, ActorToCheck),         AActor::StaticClass());
    ActorToCheck.SelectedKeyName = FBlackboard::KeySelf;
}
What we are doing here, immediately after naming the node, holds significant importance. We are filtering key values to only allow Actor classes. This step ensures that only valid Blackboard keys related to actors will be accepted, maintaining the integrity and appropriateness of the inputs.
The CalculateRawConditionValue() function is going to be pretty straightforward:
bool UBTDecorator_CheckTagOnActor::CalculateRawConditionValue(UBehaviorTreeComponent& OwnerComp,
                                                              uint8* NodeMemory) const
{
    const UBlackboardComponent* BlackboardComp = OwnerComp.      GetBlackboardComponent();
    if (BlackboardComp == nullptr) return false;
   const AActor* Actor = Cast<AActor>(BlackboardComp-     >GetValue<UBlackboardKeyType_Object>(ActorToCheck.       SelectedKeyName));
    return Actor != nullptr && Actor->ActorHasTag(TagName);
}
As you can see, we retrieve the Blackboard component and get the ActorToCheck key in order to check whether there is a valid Actor instance and whether it is tagged as a target.
Now, implement the last required function:
void UBTDecorator_CheckTagOnActor::InitializeFromAsset(UBehaviorTree& Asset)
{
    Super::InitializeFromAsset(Asset);
    if (const UBlackboardData* BBAsset = GetBlackboardAsset();       ensure(BBAsset))
    {
       ActorToCheck.ResolveSelectedKey(*BBAsset);
    }
}
This function retrieves the BlackboardData asset and resolves the selected key for ActorToCheck from that asset.
In this section, you have been provided with more advanced information about decorators, including specific considerations for implementing them in C++ or Blueprints. Additionally, you have successfully created a custom decorator that will be utilized by our upcoming gunner AI agent. This custom decorator will play a crucial role in creating the behavior and decision-making capabilities of the AI gunner agent, further improving its performance and effectiveness.
In the next section, I will be presenting you with some detailed information on how to implement services.


