Modifying slide masters
What we talked about in the last recipe is how a theme allows us to have consistent background, colors, and fonts. Those are all part of the theme. However, one of the great tools that PowerPoint provides that is extremely useful to us in creating Articulate presentations is the ability to create slide masters. These slide masters are the part of the template that controls what objects show up on each page. If we want to have a title on each page, as is common in PowerPoint presentations, placing a textbox for it on the slide master ensures that it will be located in the same place and be the same size on each slide.
Getting ready
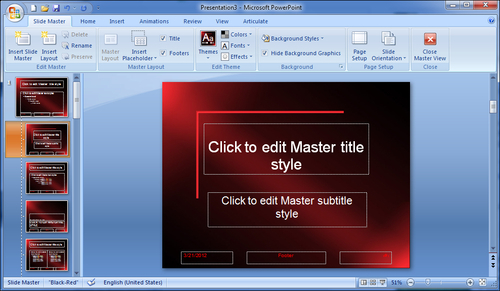
You can find the button for the slide masters by clicking on the View tab. The Slide Master button appears on the Presentation Views section of the ribbon.

When the slide master appears, it will show the first slide master in the set as in the main editable part of the screen. To the left-hand side of the pane, where the thumbnails of the slides are normally shown, you will see the thumbnails of all the slide masters in the set, one for every layout option (there are usually 10). At the same time, the Slide Master tab will appear, allowing access to the Slide Master ribbon.

To create a totally new theme, you would start by clicking the Insert Slide Master button on the ribbon. This will insert a blank master set, which includes all the layouts that are in the current set. If you do this and then delete the existing master, you will have an entire new set of slide masters.
How to do it…
Creating a slide master consists of placing the things on the master that you want to have show up in all your slides. This can be done in one of two ways so that they are all on all the slides regardless of the type, or so that they are only on one type of slide layout.

A complete slide master not only deals with the background and objects that you want to show on all the slides, but also with all the layout options for the slides. Don't forget to make the necessary modifications to all the different layouts:
The first thing you want to do on your master is to add an image in the background. This is done in the same way as inserting an image in a regular slide, using the Picture button on the Insert ribbon.
Note
This image should be 720 x 540 pixels in size. If you download background images from the Internet, they will typically be this size. If you are using your own image, you may need to resize it or crop it to these dimensions. When you insert the image, it may not show up as filling the entire page. This would indicate that the image is not 720 x 540 pixels.
Although the background image is covering the other elements in the master, it will not be covering them in the normal work view. However, if you need to work with those elements, changing them in some way, you will want to arrange the background image at the back, as we discussed in the How it Works… section in the Launching Articulate Presenter recipe.
To delete a layout from the set, select its thumbnail from the list in the left-hand side panel of the PowerPoint screen. Click on the Delete button on the Slide Master ribbon or right-click on the thumbnail and select Delete Layout from the context-sensitive menu.
You can also add another layout to the master set by clicking on the Insert Layout button on the ribbon. This allows you to create your own layout, which is totally different from the standard layouts included in PowerPoint.
Note
There are two categories of objects that can be added to the master, namely regular objects and object placeholders. Regular objects are anything that you want showing up on all the slides. Placeholders are used for inserting information, such as pictures, text, or charts later.
Regular objects are placed on the master just as they are onto individual slides. Select the object that you want to insert from the Insert ribbon and place it on the master slide.
To make these same objects show up in the same place on the title slide, as on the other slides, place them on the master, then copy them, select the Master Slide, and paste them.

Clicking on the arrow next to the Insert Placeholder legend of the Insert Placeholder button on the Slide Master ribbon opens the drop-down, which allows you to select what type of placeholder you want to place on the master. Do not use Media placeholders on your slide masters as media will be inserted in Articulate.
Once you select the type of the placeholder you wish to put on your slide master, you must place it on the slide. To do so, go to the corner of the area where you want the placeholder, click-and-hold your left mouse button, and drag it to the opposite corner, releasing the button there. This will create the placeholder.
Note
Placeholders are the dotted line boxes that you see already in place on the slide masters. They allow you to insert the content in a consistent manner across all the slides of your presentation. As you can see by looking at the master slide set, PowerPoint makes extensive use of placeholders. This is an important part of maintaining visual continuity throughout your presentation.
How it works…
Looking at the thumbnails on the left-hand side pane of the PowerPoint window, you can see that the top one is larger, with the rest of the thumbnails connected to it as in a branched directory tree. That's because the first one is the master while the others are the various layouts that exist for that master. Any changes you make to the master, such as adding an image, will show up in all the layouts. Changes made to the individual layouts will only show up in that particular layout.
The exception to this rule is when you are dealing with the title slide. Changes made to the set do not affect the title slide, as many people have different title slides, but they are similar to the other layouts in the set.
There's more…
There is an alternative way of accessing the various changes that we've made in this recipe, and that is to use the Edit Theme that is a part of the Slide Master ribbon. This provides the exact same changes to the theme as we saw in the Design ribbon.

Turning on Date, Slide number, and Footer placeholders
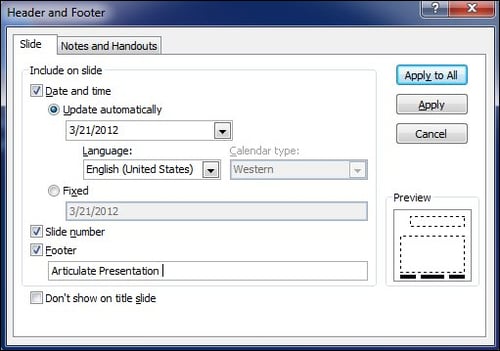
Along the bottom of every slide master are the placeholders for the date, slide number, and footer. Although these placeholders exist, they are normally hidden. To use them in your presentation, they need to be turned on. To do this, exit the slide master view by clicking on the Close Master View button on the Slide Master ribbon.
In the Insert ribbon, click on the Header & Footer button to open the Header and Footer dialog box. You can click on the radio buttons you desire for turning on the Date and time, Slide number, and Footer object placeholders. The Footer allows you a place to insert the text you want on the footer. Date and time allows you to choose between having the date automatically update to the current date or the date and time of the presentation, or to having a fixed date showing the date of your choice, such as the release date for the presentation.

Hyperlinks and the slide master
You can also add a hyperlink for any object on the slide master. This is done in the same way as in PowerPoint. The same hyperlink will show up and function on all the pages of the presentation. This would be especially useful for branching your presentation to various subjects or chapters.
You can also place an object on your slide master, which will be hyperlinked to different places on each slide. You can do this by placing the object on the slide master but creating the hyperlink on each slide.

Creating transparent hyperlinks
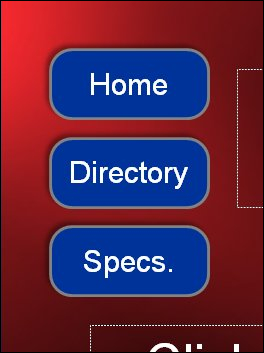
Let's say that you are creating a sales presentation demonstrating the benefits of a particular piece of technology. You want to make your presentation usable by both the general public and by engineers who will want to see the technical specifications for each feature. You can create your master slide with a series of buttons in the corner, essentially creating a button bar. Then you can create your presentation with each slide, showing a different feature for each piece of equipment.

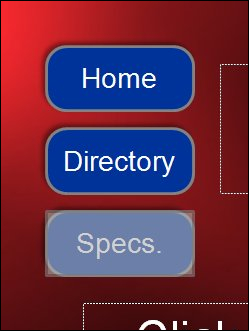
The Home and Directory buttons can be hyperlinked directly on the slide master as they will be the same for all the slides. The Specs hyperlink will be different on each slide, so it cannot be hyperlinked on the master slide. Its hyperlinks will have to be done on each individual slide. But by putting the graphic button object on the master, we can ensure that it is always in the same place.
On the individual slides, another object will need to be placed over the Specs. button, in this case, a transparent rectangle. That object can then be made transparent by giving it no fill and no outline on the Format tab. This transparent object can then be hyperlinked just like any other object. That will allow the engineers to go to the detailed specs for that particular feature.


