Getting information from your In-DB connection/query
When working with In-Database tools in Alteryx, and probably using the Visual Query Builder, queries are built from within the tools by Alteryx and sometimes we’ll need to take those queries and have somebody optimize them for us or test them outside Alteryx.
The Dynamic Output tool allows us to get a lot of information about what and how Alteryx queries our databases.
Throughout this recipe, we’ll be exploring how to get that information and how we can make use of it.
Getting ready
To practice this recipe, we created a test set that you can download from here:
https://github.com/PacktPublishing/Alteryx-Designer-Cookbook/tree/main/ch2/Recipe5
Before starting with the recipe, just make sure that you install the SQLite ODBC driver (in the \SQLITE-ODBC folder). If you are on 32-bit Windows, use sqliteodbc.exe and if you are on 64-bit Windows, use sqliteodbc_W64.exe for the installation:
- Once installed, go to the ODBC data sources corresponding to the actual version of your OS (32- or 64-bit).
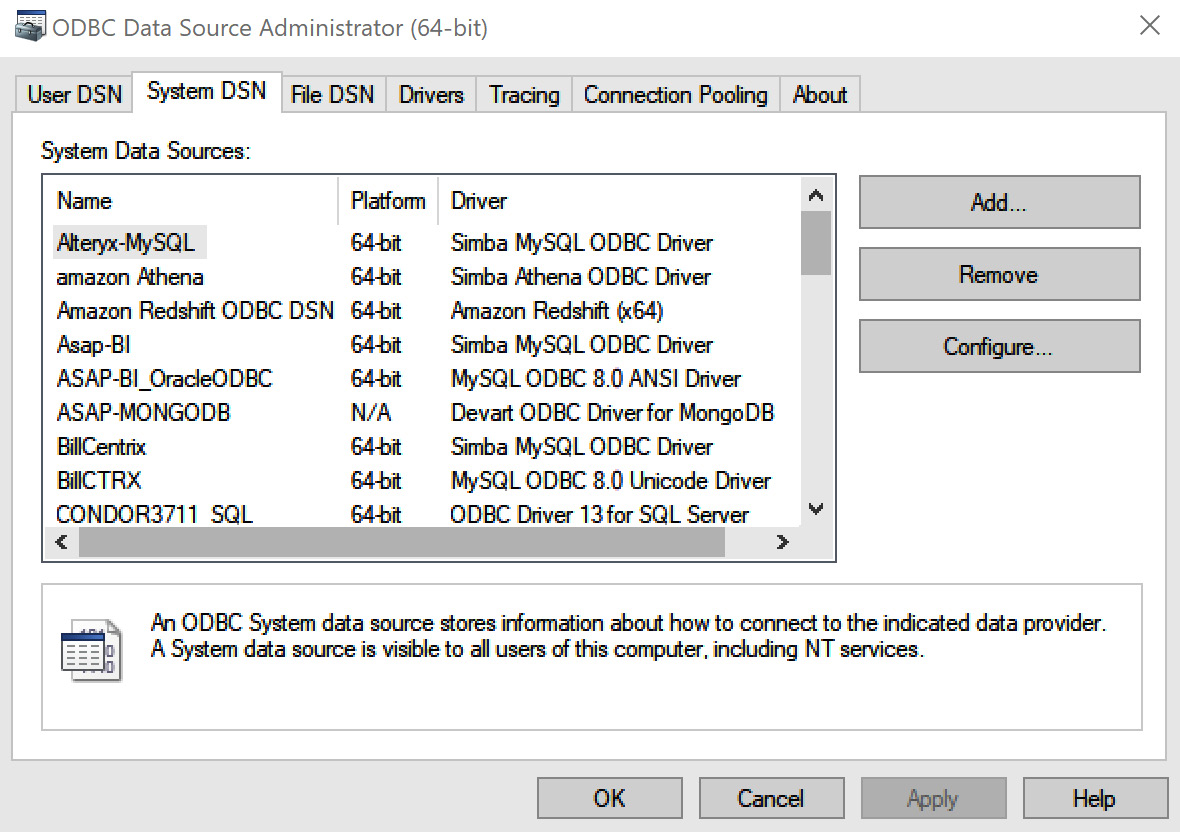
Figure 2.46: ODBC Data Source Administrator
- In the System DSN tab, click on Add….
- Navigate to SQLite3 ODBC Driver, select it, and click Finish.
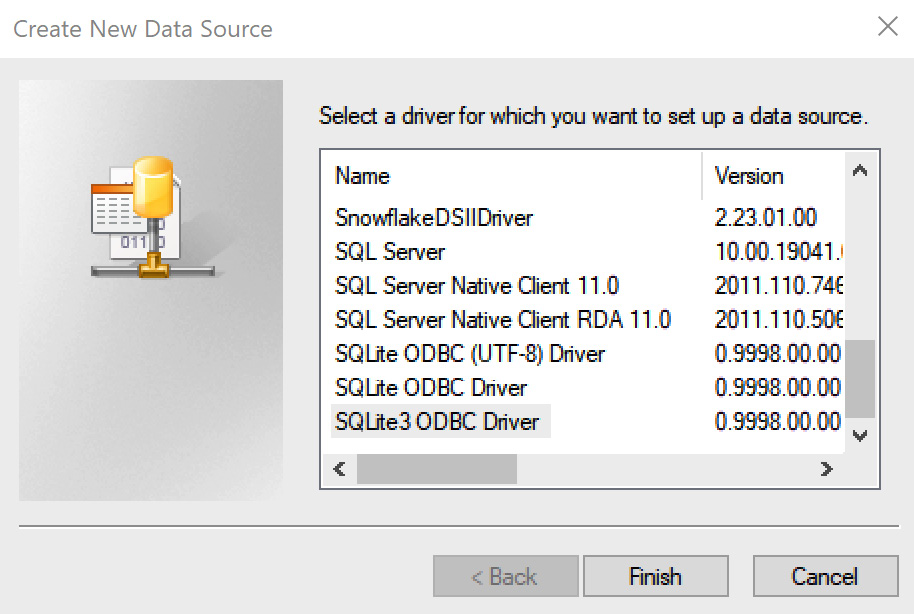
Figure 2.47: Selecting a driver for the data source
- On the new screen, give your connection a name.
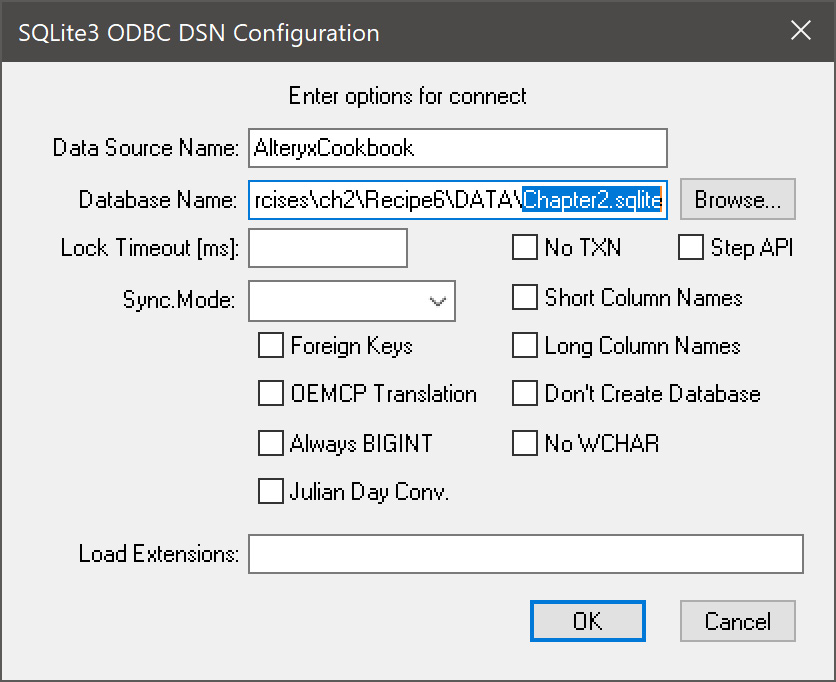
Figure 2.48: SQLite3 driver configuration
- Click on the Browse… button and select where you saved the provided SQLite database (it should be in
\DATA\Chapter2.sqlite).
For this recipe, we’ll not be touching any other settings of the driver.
If you plan to use your own data, you’ll only need to have access to a database you can query.
How to do it…
We are going to get the total billed amounts per customer. For this, we have three tables: DOCUMENTS, ARTICLES, and CUSTOMERS.
The DOCUMENTS table has all the information about the billing (including the amount in the TOTAL field) but has no details about customers or articles (just an ID). So we need to join the tables to get those details.
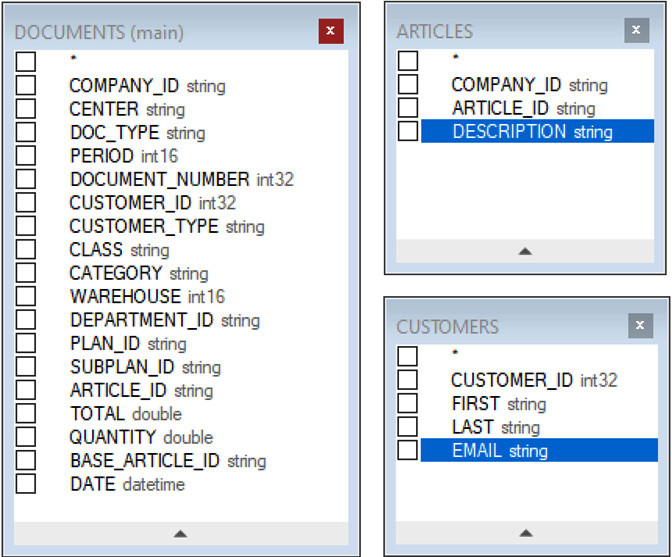
Figure 2.49: Structures of the tables
To be able to do so, we first need to connect to the database. We’ll be using In-DB connections to do i:.
- Grab a Connect In-DB tool from the In-Database category and drop it onto the canvas.
- From the tool configuration panel, click on Manage Connections to create an Alteryx In-DB connection.

Figure 2.50: In-DB connection
The Manage In-DB Connections screen will pop up, allowing you to start configuring the new connection.
- From the Data Source dropdown, select Generic ODBC (we’ll be pointing it to the ODBC data source we created earlier).
- For the Connection Type dropdown, leave it at User and click the New button for Connections. This will enable the Connection Name field, so give the connection a name (we used
SQLITEas you can see in the following figure).
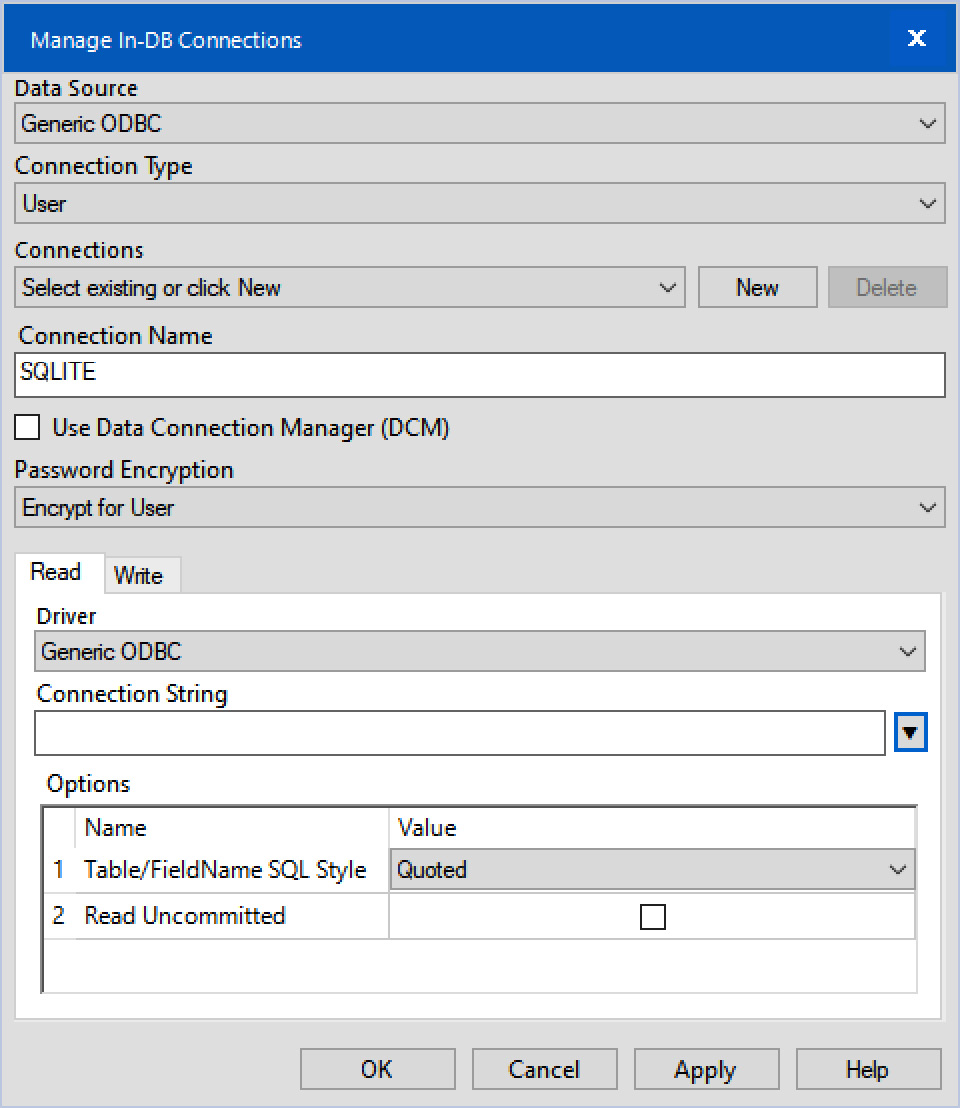
Figure 2.51: In-DB connection
- Now, on Connection String, click on the down-pointing arrow and select New database connection….

Figure 2.52: New database connection…
- This will make the ODBC Connection screen pop up. From here, select the AlteryxCookbook connection (the one we created in the Getting ready part of this recipe) and click OK.
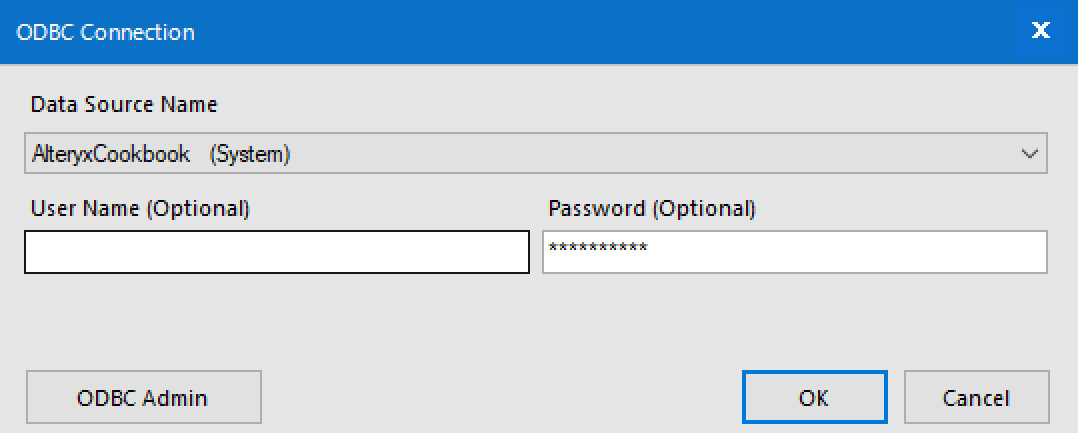
Figure 2.53: Selecting which ODBC data source to use for the current connection
- Click OK on the Manage In-DB Connections window, and the Choose Table or Specify Query window will pop up showing existing tables within the actual connection (by default, it’ll open in the Tables tab).
- Click on the Visual Query Builder tab so you can start building a query using drag and drop.
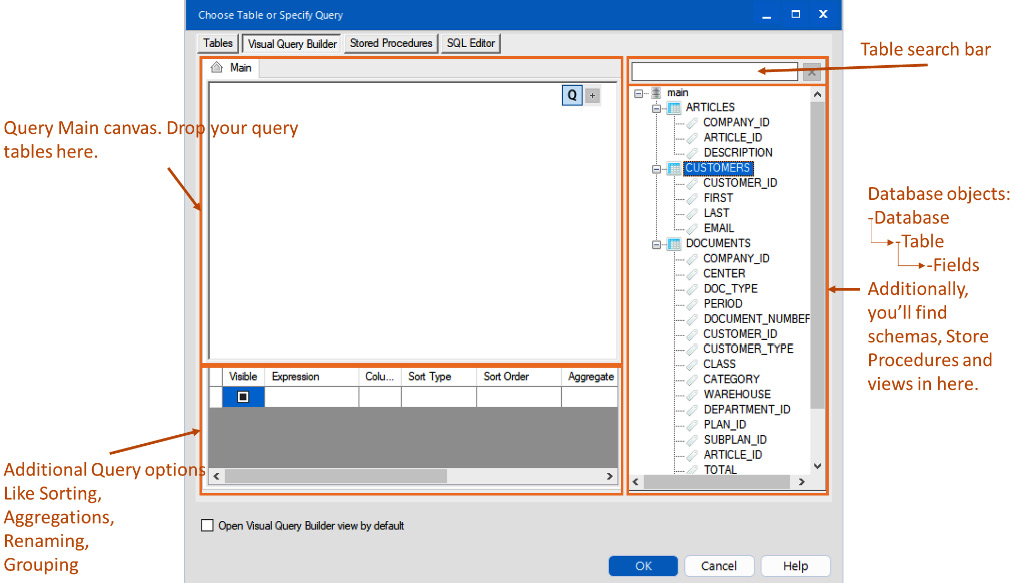
Figure 2.54: Visual Query Builder
- Drag the
DOCUMENTStable and drop it into the Main canvas. - Repeat the operation for the
ARTICLESandCUSTOMERStables.
Now, we have the three tables available, and we’ll create the relations between them.
- From the
DOCUMENTStable, drag theCOMPANY_IDfield and drop it over theARTICLEStable’sCOMPANY_IDfield.
Repeat the procedure, linking the following:
DOCUMENT.ARTICLE_IDwithARTICLES.ARTICLE_IDDOCUMENTS.CUSTOMER_IDwithCUSTOMERS.CUSTOMER_ID
- Now click on the first checkbox in the
DOCUMENTStable to select all fields from it (*), and selectARTICLES.DESCRIPTION,CUSTOMERS.FIRST,CUSTOMERS.LAST, andCUSTOMERS.EMAIL, checking the checkbox of each of these fields.
Your query should look like this:
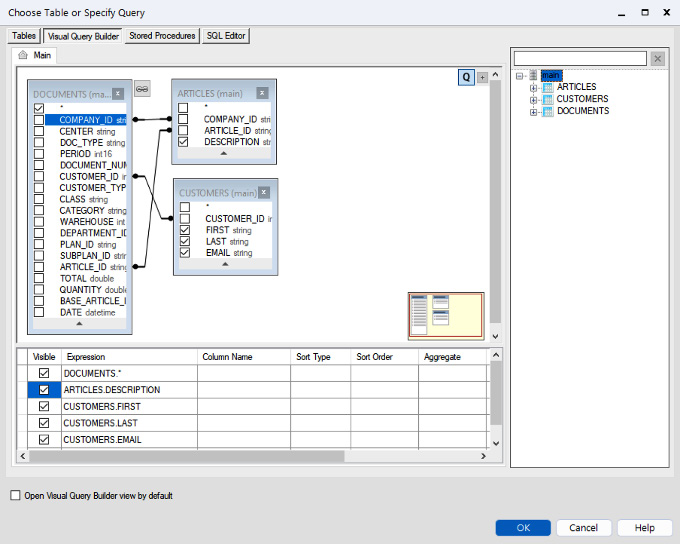
Figure 2.55: Completed query in Visual Query Builder
- Click OK and you’ll return to the Alteryx Designer canvas.
Now the tool is ready to execute the query. If you run the workflow, you’ll notice that it returns all records after joining the tables.
Now, to get the total amounts per customer, we need to summarize, grouping by CUSTOMER_ID, and get FIRST, LAST, EMAIL, and sum on TOTAL.
- Drop a Summarize In-DB tool onto the canvas, and configure it as shown in the following figure, so the tool’s configuration panel looks like this:
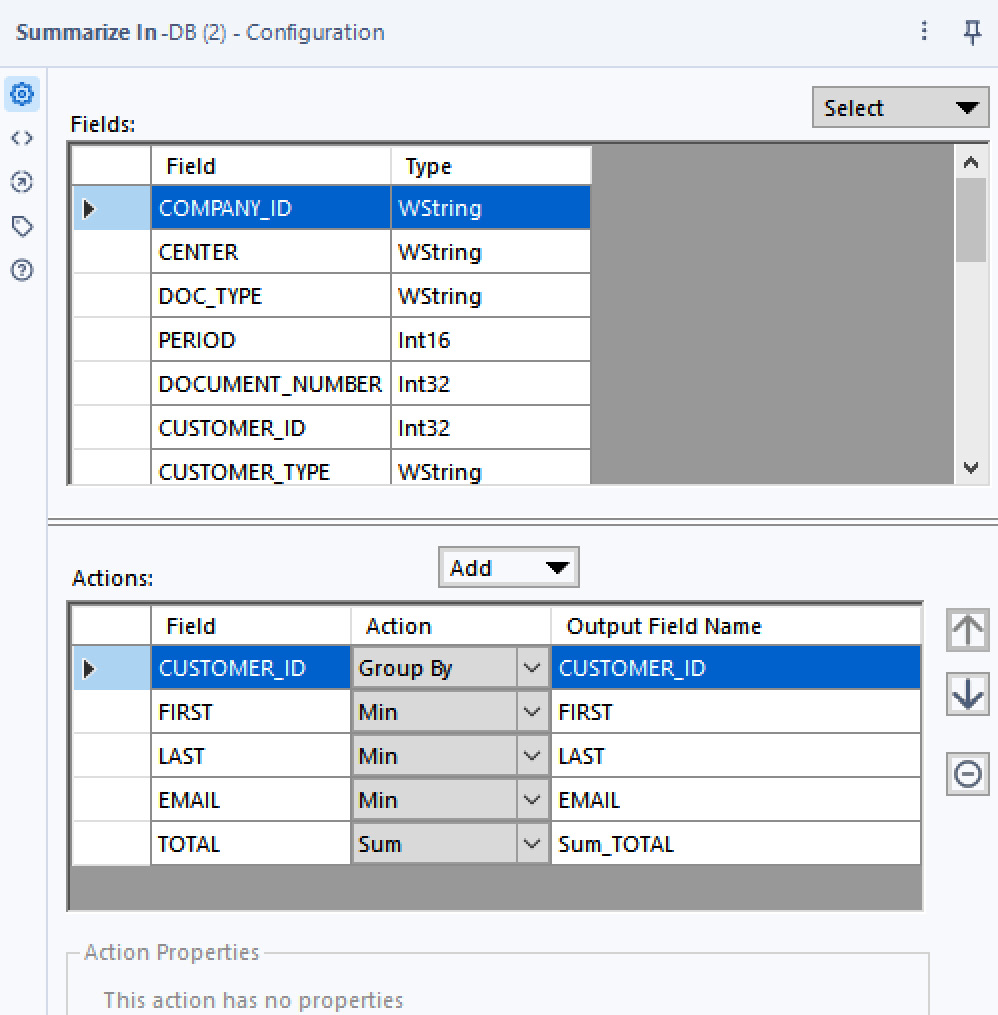
Figure 2.56: Summarize In-DB
Now, if we run the workflow, we’ll get the total amount per customer.
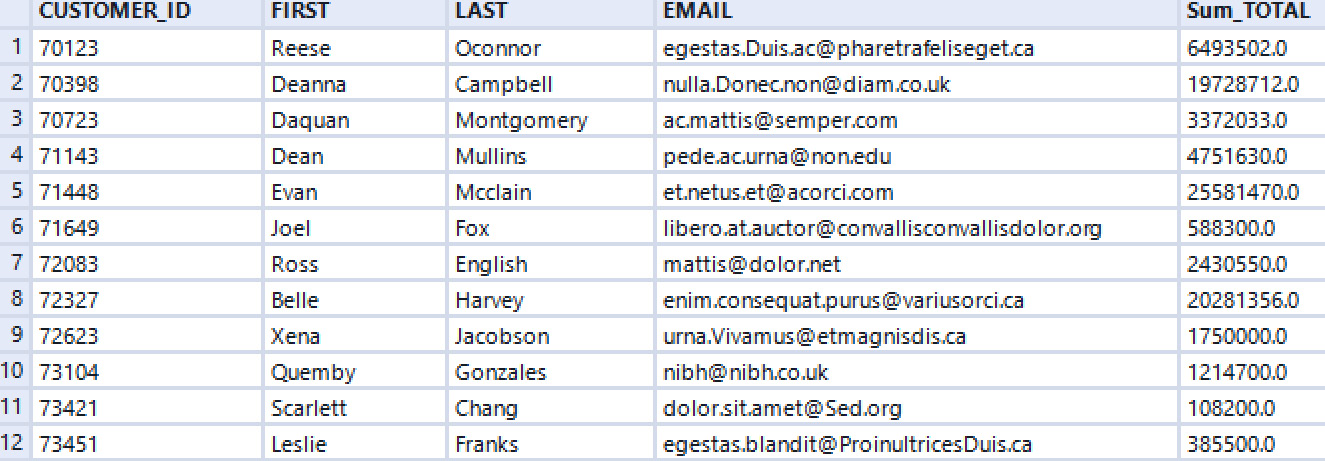
Figure 2.57: Workflow results
At this point, we need to see how Alteryx resolves the queries we created in its drag-and-drop interface, and we can extract that information using a Dynamic Output In-DB tool.
- So, connect a Dynamic Output In-DB tool to the output anchor of the Summarize In-DB tool, and a regular Browse tool to the output anchor of the Dynamic Output In-DB tool.
At this point, your workflow should look like the following figure:

Figure 2.58: Our workflow
- Click on the Dynamic Output In-DB tool and select all output fields, except for Input Connection String and Output Connection String.
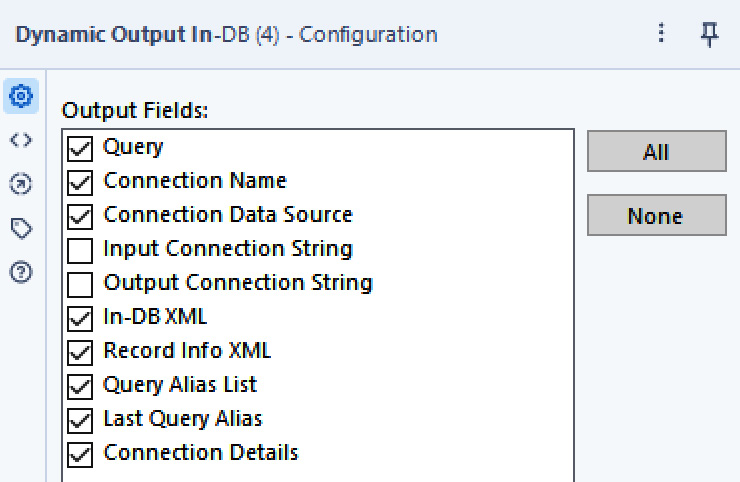
Figure 2.59: Dynamic Output In-DB output fields
- Run the workflow and review the resulting fields.

Figure 2.60: Results for Dynamic Output In-DB
The following fields can be found here:
- Query: This is the complete query generated up to this point in the workflow.
- Connection Name: The name of the Alteryx connection you’re using (comes from the name you gave it when you created it).
- Connection Data Source: This is the database type. Note that since we used a generic ODBC type of connection, that value is not available to Alteryx – that’s why we get Unknown here.
- In-DB XML: The Alteryx XML representation of the query.
- Record Info XML: The XML representation of the query fields.
- Query Alias List: This contains each segment of the query and the ID Alteryx gave to them.
- Last Query Alias: The last alias from the list.
From the Query field, you have access to the SQL query created by Alteryx Designer – in our case, the following:
WITH "Tool1_fc91" AS (select DOCUMENTS.*,
   ARTICLES.DESCRIPTION,
   CUSTOMERS.FIRST,
   CUSTOMERS.LAST,
   CUSTOMERS.EMAIL
from DOCUMENTS
   inner join ARTICLES on DOCUMENTS.COMPANY_ID = ARTICLES.COMPANY_ID and DOCUMENTS.ARTICLE_ID = ARTICLES.ARTICLE_ID
   inner join CUSTOMERS on DOCUMENTS.CUSTOMER_ID = CUSTOMERS.CUSTOMER_ID) SELECT "CUSTOMER_ID", MIN("FIRST") AS "FIRST", MIN("LAST") AS "LAST", MIN("EMAIL") AS "EMAIL", SUM("TOTAL") AS "Sum_TOTAL" FROM "Tool1_fc91" GROUP BY "CUSTOMER_ID"
Where "Tool1_fc91" is a unique ID Alteryx assigns to each tool to further reference part of the complete query (subquery).
From the Query Alias List field, we can access the different sub-queries created to that point within the workflow.
At this point, we can save or copy that information to analyze and further optimize our queries.
How it works…
Creating queries in a visual interface is easier than writing code, and not all of us are able to do SQL scripting. The Visual Query Designer gives us the ability to create complex queries without any programming knowledge, but sometimes we’ll need assistance in optimizing those queries.
The Dynamic Output In-DB tool provides us with ease of access to the generated queries that Alteryx executes against our database management systems, by registering and extracting that information for us.
There’s more…
You’ll notice Alteryx added a black connector between both fields. If you double-click on it, the Link Properties screen will appear, allowing you to configure the link.
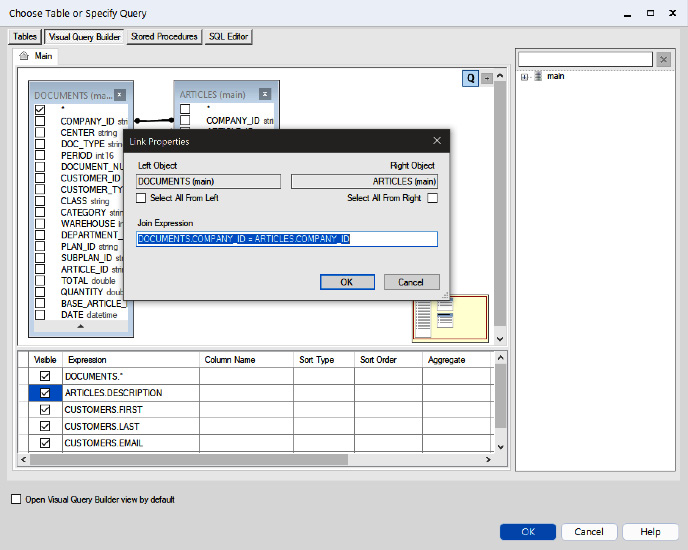
Figure 2.61: Configuring the relationships
See also (follow-up steps)
The Connection Name field and the Query or Query Alias List fields extracted from the Dynamic Output In-DB tool can be used to generate dynamic and/or batch queries using a Dynamic Input In-DB tool connected to a data stream.
Important note:
The Dynamic Input In-DB tool only supports one input record, so if you have several queries to run, maybe it’s a good idea to create a macro.


