Introducing the GameObject – All about Transform and components
Simply put, anything you want to add to your scene will be added as a GameObject. The GameObject is the base building block for everything that exists in a scene. It also acts as a container for adding functionality with components. When a GameObject is added to the Hierarchy, is it active by default but can be deactivated – “turning off” all components added to it – with the checkbox to the left of the name field (to the left of Main Camera in Figure 1.6). A component can be for either visual or functional purposes, or in some cases, both! Functional components implement Unity’s scripting API, and Unity provides components for supporting the engine’s many features. You’ll create custom component scripts using the C# language, which will be covered in Chapter 2.
In this section, you will learn how GameObjects are added to a scene, then you’ll be introduced to the Transform component, and you’ll learn how to work with components.
Adding GameObjects to the scene
New empty GameObjects and objects of a specific type are easily added to the Hierarchy with the Create menu. The Create menu is easily accessible from Unity’s top menu under GameObject, from the Hierarchy window directly with the + (plus sign) icon dropdown menu at the top, or by right-clicking anywhere in the Hierarchy window. GameObjects in the form of Prefabs and other supported types can be added to the scene View directly by dragging and dropping from the Project window – this is often the quickest way to accomplish some tasks, and we’ll be exploiting this feature while building the book’s projects.
The Transform component
GameObjects added to the scene have a default Transform component that dictates its Position, Rotation, and Scale in 3D space – a Cartesian coordinate system using three mutually perpendicular coordinate axes with Y-Up, namely X-axis, Y-axis, and Z-axis. Positioning graphics in the scene can be performed by either manipulating the Transform manually (by typing in values), with the Manipulation Tools (clicking and dragging in the Scene window), or through code by using the Unity scripting API to access the GameObject’s Transform properties and methods.
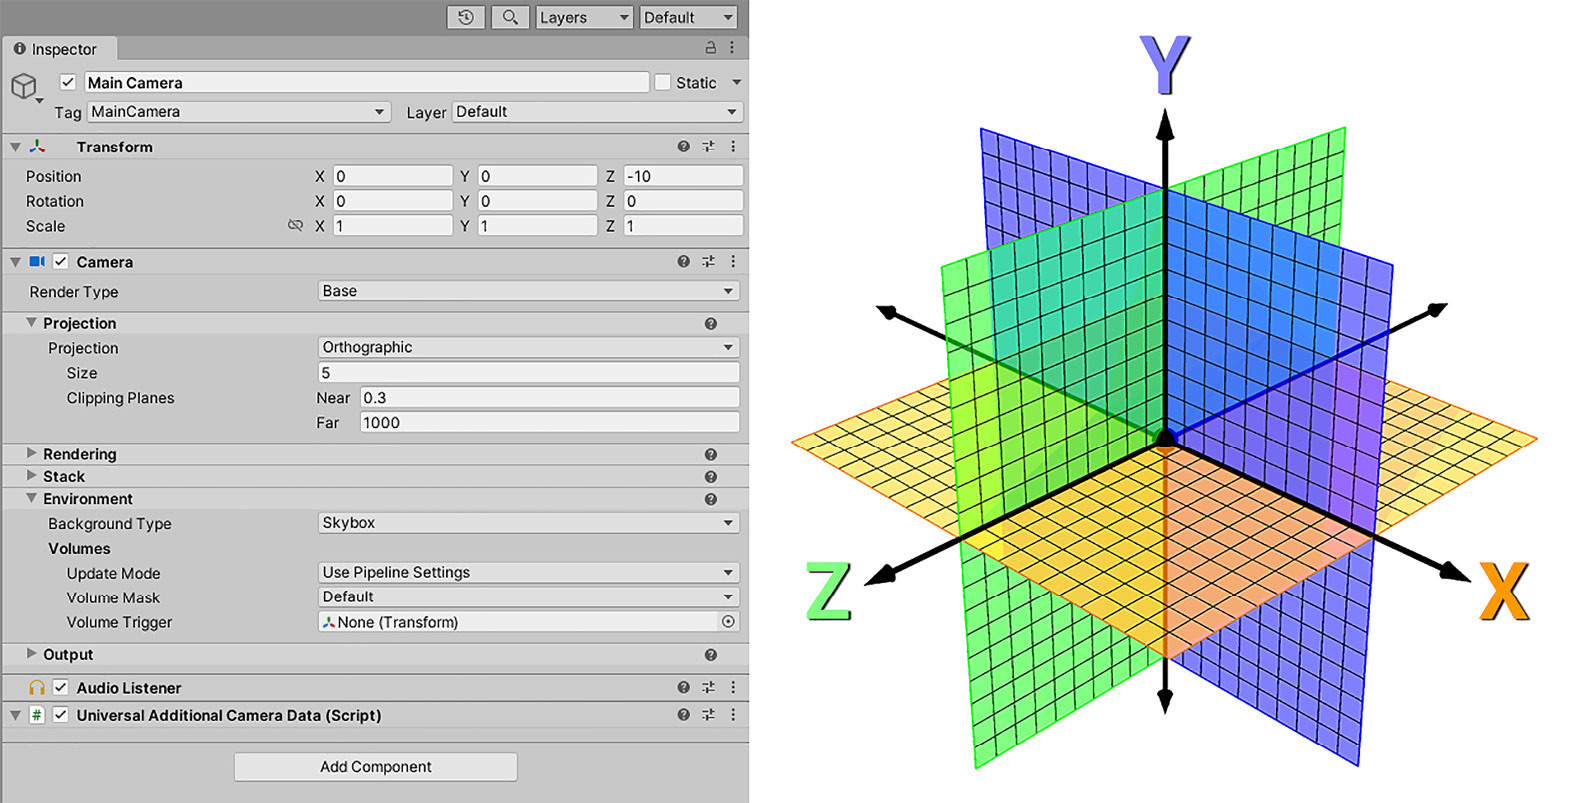
In the following screenshot, we can see the Main Camera GameObject’s Transform in the Inspector and how the Position value (Vector3) is represented in 3D space:

Figure 1.6 – Inspector Transform and related 3D coordinate system
In the preceding figure, we can see that the Main Camera (a GameObject) in the scene was selected in the Hierarchy because its name is stated at the top of the Inspector window. The following section under that is the GameObject’s Transform values indicating that Main Camera is sitting -10 units on the Z-axis from the origin (0, 0, 0 where all axes intersect). The Rotation values on all axes are at 0, meaning no rotation is applied to this GameObject. Similarly, the Scale value on all axes is at 1, meaning no scaling is applied to the default scale of this GameObject. We’ll modify these values in context while creating our player character graphics in the 2D sprites with Sprite Creator – Understanding the Sprite Renderer and draw ordering section.
Before creating our player, let’s discuss components in more detail since we’ll be directly working with them.
Components
Below the Transform section, we can see several components already added that provide functionality for the GameObject’s purpose as our scene’s main camera (cameras in our Scene Hierarchy determine what the player sees rendered in the game view). To add more functionality to this camera, click the Add Component button at the bottom of the Inspector window. You’ll be presented with a filtered and searchable list of available components to add. The components will include not only the ones provided by Unity, such as the Camera component in Figure 1.6, but also any scripts you’ve already created and added to the project. In the next chapter, we’ll tackle creating our scripts and adding them as components.
Components can be added, removed, and copied/pasted, and their values can be copied/pasted and even saved as presets! This is all accomplished via the Component header section. Click and hold the header to manually reposition a component up/down in the Inspector window or right-click for moving and other functions. All of the aforementioned functions are accessible either through the right-click dialog popup or the icons on the right side of the component header; those are Reference, Presets, and a vertical ellipsis equivalent to right-clicking in the title.
Components add powerful features to your projects, but things come together even more when components combine and work together with other components. Unity is based on this component architecture. We will be diving into how to structure your projects best to leverage Unity components in a well-structured single-responsibility design pattern that is easy to work with and friendly for both designers and developers to use.
In this section, you learned about the importance of components and how to work with them in Inspector. We’ll be working with components throughout the book, starting with the Sprite Renderer in the next section.


