Search icon CANCEL
Arrow left icon
Explore Products
Best Sellers
New Releases
Books
Videos
Audiobooks
Learning Hub
Conferences
Free Learning
Arrow right icon
Arrow up icon
GO TO TOP
Salesforce for Beginners

You're reading from   Salesforce for Beginners A step-by-step guide to creating, managing, and automating sales and marketing processes

Arrow left icon
Product type Paperback
Published in May 2020
Publisher Packt
ISBN-13 9781838986094
Length 472 pages
Edition 1st Edition
Concepts
Arrow right icon
Author (1):
Arrow left icon
Sharif Shaalan Sharif Shaalan
Author Profile Icon Sharif Shaalan
Sharif Shaalan
Arrow right icon
View More author details
Toc

Table of Contents (23) Chapters Close

Preface 1. Section 1: Salesforce for Sales, Marketing, and Customer Relationship Management
2. Getting Started with Salesforce and CRM FREE CHAPTER 3. Understanding Salesforce Activities 4. Creating and Managing Leads 5. Business Development with Accounts and Contacts 6. Using Opportunities Effectively 7. Achieving Business Goals Using Campaigns 8. Enhancing Customer Service Using Cases 9. Business Analysis Using Reports and Dashboards 10. Section 2: Salesforce Administration
11. Setup and Configuration 12. An Overview of Sharing and Visibility 13. Using Sandboxes and Change Sets 14. Configuring Objects for Your Business 15. Third-Party Applications and Salesforce Mobile 16. Section 3: Automating Business Processes Using Salesforce
17. Understanding the Workflow Rules 18. Implementing Process Builder 19. Approval Processes 20. Assignment Rules 21. Assessments 22. Other Books You May Enjoy

Using dashboards to visualize data

While reports allow you to gather and filter information, dashboards allow you to visualize various reports together through dashboard components. A dashboard is always built as an overlay to reports. We built an example report in the previous section, so now, let's add this report to a dashboard component:

  1. Click on the Dashboards tab (1) to start the process, as shown in the following screenshot:
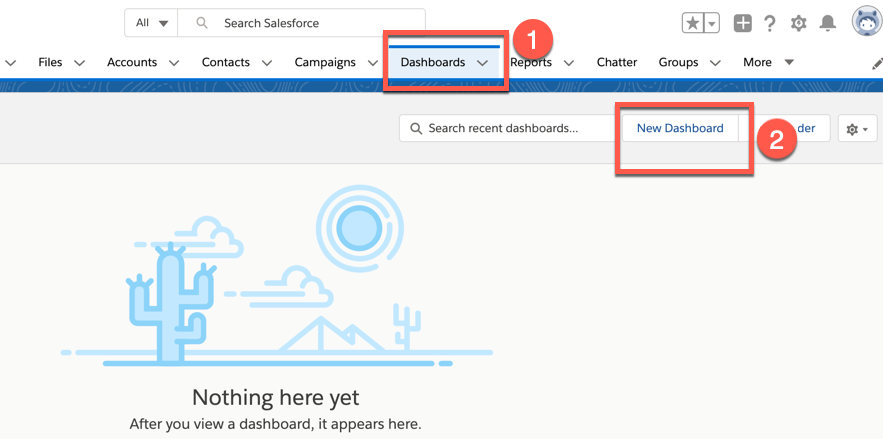
  1. Then, click on New Dashboard (2). You can name it anything you like; I have named my dashboard Account and Contact Dashboard (1).
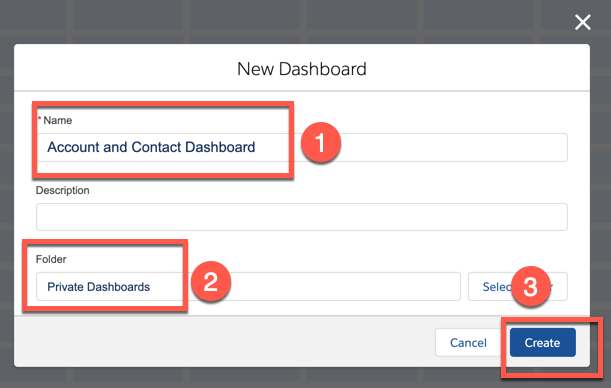
  1. This dashboard will be added to my Private Dashboards folder (2), which means it will only be visible to me. Once I've finished building it, I can choose to move it to a public folder that can be widely shared. Click on Create (3).
  2. After creating a private dashboard, we'll land on the dashboard builder...
lock icon The rest of the chapter is locked
Register for a free Packt account to unlock a world of extra content!
A free Packt account unlocks extra newsletters, articles, discounted offers, and much more. Start advancing your knowledge today.
Unlock this book and the full library FREE for 7 days
Get unlimited access to 7000+ expert-authored eBooks and videos courses covering every tech area you can think of
Renews at €18.99/month. Cancel anytime