Installation on Windows servers
This recipe teaches you how to install Redmine on Windows servers. It covers the Windows 2012 R2 Standard version and Microsoft SQL Server versions 2008 or later. However, this recipe can most certainly be applied to other Windows server versions. Also, PostgreSQL and MySQL can be used instead of Microsoft SQL Server (MSSQL).
Getting ready
Make sure that the Windows server is properly installed with all the default libraries and required drivers. This recipe is based on Microsoft SQL server, and it assumes that you already have it installed. If you need to install it, make sure that you add the proper roles to the server first and include .NET 3.5 (required for SQL server 2014). Any type of MSSQL can be used (Express, Standard, Enterprise, and so on). Prepare a database named Redmine, and create a user for it. Prior to your Redmine installation, make sure that you have enabled SQL Server's TCP IP connectivity options by following the instructions that are provided here:
This will ensure that you have prepared your SQL server successfully.

Tip
Prior to your Redmine installation, make sure you have created the SQL server's user and database for Redmine, and that you can connect via IP with your Redmine user credentials successfully, as depicted in the previous screenshot.
How to do it…
- First we need to install Ruby:
- Open your browser and navigate to http://rubyinstaller.org/.
- Download Ruby 2.0.0-p645 (x64).
- Right-click the Ruby installer that you downloaded and click Run as Administrator.
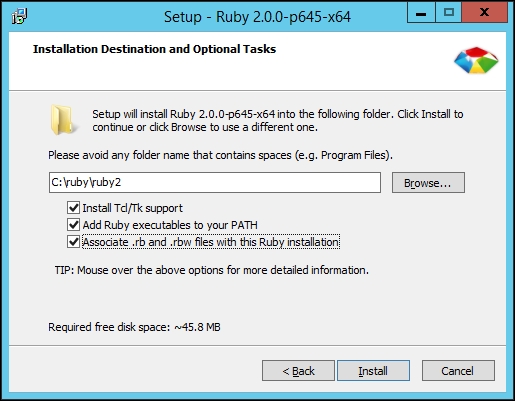
- Proceed with the installation and make sure that you don't have any spaces or special characters in the installation path due to some potential issues with some Ruby third-party libraries. So, let's choose
C:\ruby\ruby2as a path:
After a successful installation, in your Start menu, a new shortcut named Start Command Prompt with Ruby should be visible. Once clicked, you can type ruby –v and confirm that Ruby is successfully installed.
Next, we need to install the DevKit 4.7.2 minigw 64-bit version by performing the following steps:
- Download the file from http://rubyinstaller.org.
Note
Make sure you are downloading the proper DevKit, it needs to match your Ruby version and system architecture: 64-bit or 32-bit.
- Extract it to
C:\ruby\devkit. - Run Command Prompt and navigate to
C:\ruby\devkitby typing the following command:cd C:\ruby\devkit - Type the following command:
ruby dk.rb init - Review what's initialized by typing:
ruby dk.rb review - If you stumble upon a problem and get a message such as Invalid configuration. Please fix 'config.yml.', then you need to edit
C:\ruby\devkit\config.ymlwith Notepad and enter a line such asC:/ruby/ruby2so that when runningruby dk.review, you will get a screen like this:
- Type the following command:
ruby dk.rb installWhen this is done, you will be informed that DevKit is installed.
- Run the following:
devkitvars.bat - Update
gem, as follows:gem update - Install
bundlerby typing the following:gem install bundler - Download and extract Redmine to
C:\ruby\redmineNote
This recipe uses Redmine 3.1.0, which is tested with this recipe, but probably newer versions will also work.
- Rename
C:\ruby\redmine\config\database.yml.exampletodatabase.yml. - Edit
C:\ruby\redmine\config\database.yml. You will find the MSSQL sample configuration at the bottom of the file, but it's enough just to edit the first production configuration indatabase.ymlso that it looks like this:production: adapter: sqlserver database: redmine_db host: 127.0.0.1 username: redmine_ms_sql_user password: "redmine_db_password"
Replace the values in this code with configuration values that fit your server's IP address and database credentials.
- Start the installation with bundler by typing the following command:
bundle install --without development test rmagick mysql postgresql - Generate session storage encryption, as follows:
bundle exec rake generate_secret_token - To create a database tables—objects, use the following code:
set RAILS_ENV=production
bundle exec rake db:migrate
- Load the default data to the database. You can choose your language during or prior to this command. If you know that there is an existing translation of Redmine for the default language that you are choosing, you can set a two-letter country code by the Windows set command (https://en.wikipedia.org/wiki/ISO_3166-1_alpha-2):
set REDMINE_LANG=rs
bundle exec rake redmine:load_default_data
- Test the installation by typing the following:
bundle exec rails server webrick -e production
If everything is okay, you should get a screen that looks like this:

After this, Redmine should be accessible via http://localhost:3000.
How it works…
For a Windows installation to work, we need a proper Ruby version and a Microsoft SQL server. It is not obligatory to use the Microsoft SQL Server, but this recipe uses it just from the perspective of trying to stick with Microsoft technologies. First, we set up a blank database and user for Redmine on the MSSQL server, and we make sure that it is working and able to connect via TCP/IP correctly. After this, we download and install a precompiled binary Ruby and DevKit that fits our chosen Ruby version. Then, we update Ruby gems and install bundler. After downloading and configuring database parameters for Redmine, we proceed by bundling Redmine, generating a session store token, and populating the database. After this, our installation is done, and we can test it with WEBrick.
See also
Now that you have Redmine successfully installed, running it requires a different recipe. To run Redmine on Windows, there are a few options that you can use, such as Apache + Fcgi, Nginx, or Puma.
The next recipe Using Puma and IIS on Windows is a very nice and flexible way to run Redmine.


