Getting started with the BizTalk Platform Settings and Applications
This section talks about how the various BizTalk platform settings and Applications work and are configured.
BizTalk Administration Console
In this section, we will look at the BizTalk Administration Console, which is used for managing and configuring the BizTalk Server and to deploy, manage, monitor, and troubleshoot BizTalk Applications.
The Group Hub
The Group Hub window gives the user an overview of what is currently going on inside BizTalk.
To view the Group Hub window, open the BizTalk Administration Console and click on BizTalk Group.
A dashboard will appear where we get an overview of Applications that are currently running, how many running messages are currently in the MessageBox, and how many suspended messages there are.
An overview of the dashboard can be seen in the following screenshot:
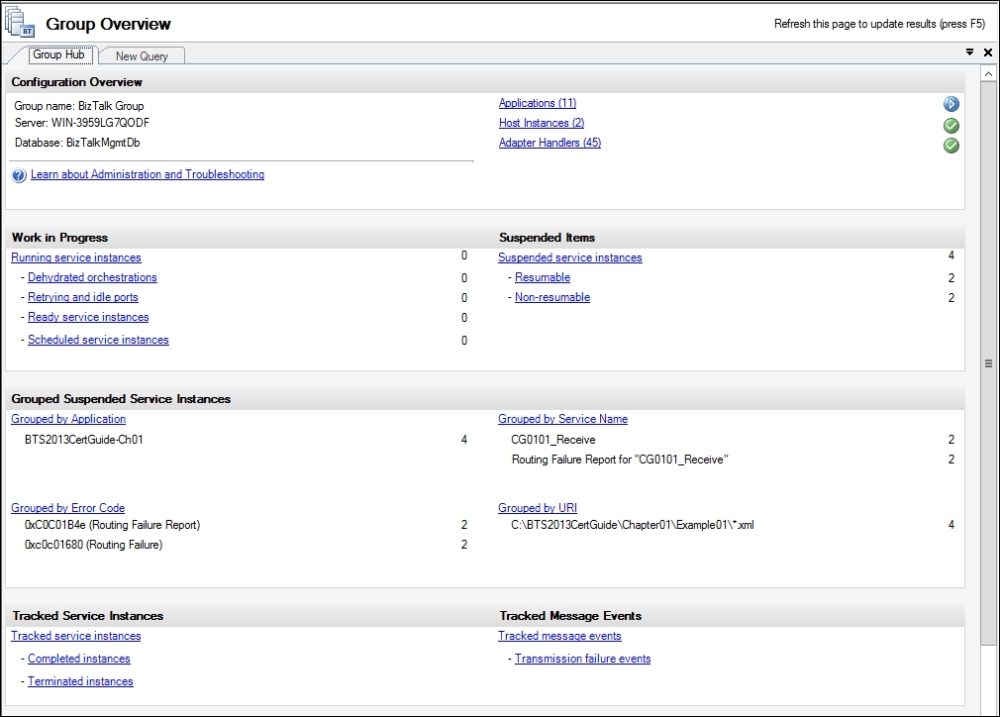
Work in progress should not be of any concern to us unless the amount of messages is large and keeps rising; in that case, we might have a bottleneck in one of the solutions that needs to be addressed.
Suspended Items, on the other hand, requires our attention, since they are messages that for some reason cannot be processed further.
Suspended Items fall into two categories:
Resumable: This contains items that can be manually resumed.
Non-resumable: This typically holds metadata and cannot be resumed. They will either disappear when the corresponding resumable instance is resumed, or in other cases they might need manual termination.
Hosts and Host Instances
For each BizTalk Group, multiple Hosts can be created. Creating a Host is merely creating a logical container where various BizTalk tasks can be assigned.
A Host can have a Host Type of either In-Process or Isolated.
The In-Process type is used for most BizTalk tasks and what In-Process means is that all the tasks performed in the Host will happen in an actual BizTalk process (Windows Service). The Isolated Host, on the other hand, will have its work done by someone other than BizTalk; for example, an IIS receiving service calls and processing the messages on its own. By using various BizTalk Modules, the IIS Host will run the received message through the same steps that would occur when using an In-Process BizTalk service, Adapter and Pipeline processing, and mapping and storing the message in the MessageBox.
Out of the box, the use of Isolated Hosts is limited to the following Adapters:
HTTP Receive
SOAP Receive
WCF-BasicHttp Receive
WCF-CustomIsolated Receive
WCF-WebHttp Receive
WCF-WSHttp Receive
What these Adapter Handlers have in common is that receiving the messages will happen through the IIS and not from a Windows Service (when BizTalk receives HTTP messages, the submitter will actually call a URL on an IIS residing on the BizTalk Server).
Each Host should have at least one corresponding Host Instance running. An In-Process Host Instance is nothing more than a Windows Service running on one or more BizTalk Servers and it performs the tasks assigned to the Host.
Creating a Host
Creating a Host can be done through the BizTalk Server Administration Console by navigating to Platform settings | Hosts | New | Host. The following screen should appear:
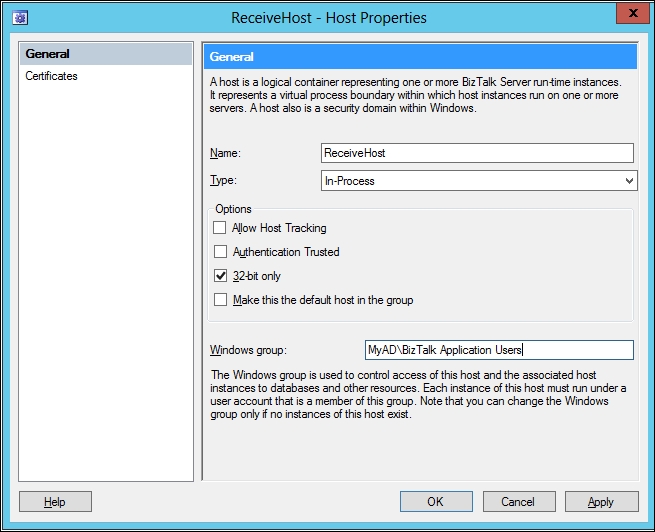
Creating a new Host will result in a new entry in the Host table inside the Management database, and also create a new Host Queue inside the MessageBox.
There are a few parameters on each Host that should be taken into consideration when creating Hosts. The parameters are as follows:
Name: The name of the Host is not without importance. When moving a BizTalk Application from one environment to another by the use of Binding files, the naming of Hosts must be the same on each environment.
Type: This is either In-Process or Isolated.
Allow Host Tracking: This checkbox, if enabled, will allow the Host Instances associated with this Host to perform tracking tasks such as moving data from the
MessageBoxto theTrackingdatabase. Only one Host per BizTalk Group should have this feature enabled.Authentication Trusted: When a Host is set to Trusted, the identification of the initial sender of a message will travel together with the message. If the identification needs to stay with the message until the Send Port (possibly for the use of Single Sign-On credential control on the Send Port), all Hosts from receive to send needs to be Trusted.
32-bit only: This flag is enabled by default. If removed, the process will run as a 64-bit process, otherwise a 32-bit process.
Make this the default host in the group: Any BizTalk Group will always have one default Host. If this checkbox is checked and disabled, the Host is already the default Host.
Windows Group: This specifies a Windows Group that will be given access to all the Host queues tables created in the
MessageBox. It is recommended that all users running Host Instances under this Host are members of this group.
There can be several reasons for creating multiple Hosts inside a BizTalk environment. There is no Host setup recommendation that will fit all environments and some considerations will need to be made based on the actual environment and the specific requirements.
Here are a few general guidelines that we must follow:
As best practice, it is recommended to have at least five Hosts:
A Receive Host: This is used for all In-Process receiving.
An Isolated Host: This is used for all IIS receive.
A Processing Host: This is used for all Orchestrations.
A Send Host: This is used for sending of all messages.
A Tracking Host: This is a dedicated Host for moving data from the
MessageBoxto theTrackingandBAMdatabases. As this task can have a performance impact, the other Hosts should not be set to Allow Host Tracking.
When using Adapters that must run in a 32-bit process, 32-bit Hosts may be needed to be created on receive and/or send side to host the 32-bit only Adapters. Another approach could be to have the Receive Hosts and Send Hosts running in the 32-bit mode. If 64-bit processing is required (typically when receiving large messages), a 64-bit Host can be created for handling the tasks where 64 bit is desired.
Some Receive Adapters should not run in a multiserver environment such as FTP, POP3, and MSMQ. In these cases, a special Host for hosting these Receive Locations might be created and only run on one server. If High Availability is required, this Host should be clustered (see more about clustering Hosts in Chapter 6, Deploying, Tracking, and Administrating a BizTalk Server 2010 Solution).
Don't just make too many Hosts. The advantages of multiple Host Instances (Windows Services) on each BizTalk Server are that they will use their own processes, have their own queue, and so on. However, each service will also consume resources (such as memory), thus creating too many Host Instances that can have a negative impact. Therefore, we need to find a balance. If we have a small BizTalk Solution with few messages running through the BizTalk environment, chances are that performance will be fine by just using one In-Process Host for everything.
Creating a Host Instance
Unlike creating a Host, creating a Host Instance will happen on both the BizTalk Server and the BizTalk databases. A new Host Instance will result in a new Windows Service running on a BizTalk Server. Only one Instance of a certain Host type can be created on each BizTalk Server in the BizTalk Group. When creating a new Host Instance, we are presented with the following screen:
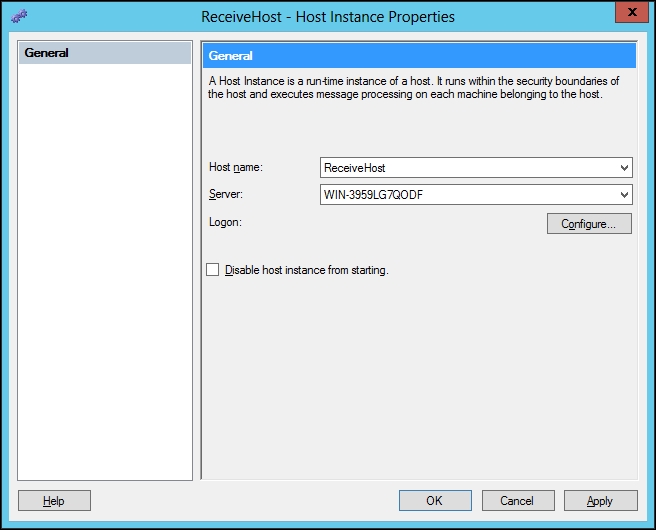
In the previous example, we are creating a new Host Instance of the Host type ReceiveHost on server WIN-3959LG7QODF.
After selecting the correct Host and server, click on Configure to specify which user the service should run as. This user will need access to the Host Queues/tables in the MessageBox, and the easiest way to grant the user these privileges is to add the user to the Windows Group that we associated with the Host when creating it.
If the recommendation of adding the user to the Host Windows Group is followed, the service will be able to do all the tasks needed towards communication with the MessageBox, but not necessarily with the outside world. The user running a Receive Location by using a FILE Adapter will be the user trying to access the source file folder, read the file, move/delete the file, and so on. When dealing with granting the BizTalk Host Instances access to various surrounding environments, the Host Windows Group and not the individual user should be used.
The following are the reasons for granting the required access to the group and not to the users:
It is usually recommended that only groups get permissions so that IT operators never have to deal with individual users, but rather just add and remove users from the relevant groups.
In a BizTalk setup, we might have three BizTalk Servers and therefore three different Host Instances of the same Host. These three Host Instances could be running under three different users. Now, let's say that we configure a FILE Receive Location to poll files from a certain folder and have it run under our Host. Any of the three Host Instances could now be getting the task of having to retrieve files from the folder, and therefore all three users need the correct set of folder permissions. If we make sure that all three users are members of the Host Windows Group and that the group is given the correct set of credentials, we needn't worry about anything else, and at some point, we might even add an additional BizTalk Server with a new Host Instance and a new user, who, as long as they are added as a member of the Host Group, will be able to access the folder immediately.
Managing Adapter Handlers
Each Adapter installed in the BizTalk Group has corresponding Receive and/or Send Handlers that are used to link the Adapter to a certain Host.
Managing the Adapter Handler is done through the BizTalk Administration Console, as shown in the following screenshot:
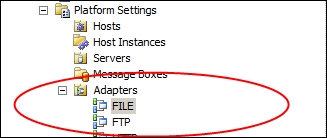
From BizTalk Administration Console, we can install new Adapters and add Receive or Send Handlers to Adapters.
In order to add a new Handler to an Adapter, click on Adapter and right-click somewhere in the blank space underneath the existing Handlers, or choose Actions | [Adapter Name] | New in the right pane of the window.
Each Handler will be the link between an Adapter and a Host. Only one Handler per Adapter and Host can be created, and only Hosts for which a Handler of the correct type exists can be chosen when choosing Adapters on either Receive Locations or Send Ports.
Some Handlers have the ability to have some basic properties configured that will be applied to all Adapter settings using that Host as default.
The SMTP Adapter is an example where we sometimes set up some basic configuration on the Handler level because these properties will often be the same for all Send Ports using the SMTP Adapter. These Handler properties can be overwritten on the specific Send Port if required, as shown in the following screenshot:
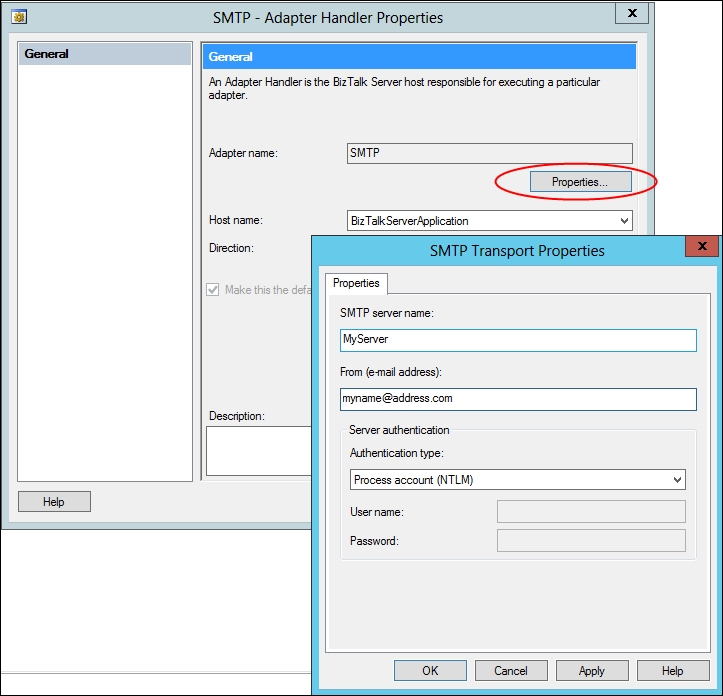
As shown in the previous screenshot, we can configure some general properties for all SMTP Adapter usage under the Host BizTalkServerApplication. For more information, see the SMTP Adapter section later in this chapter.
Applications
Applications are logical containers inside the BizTalk Server Administration Console, which allow us to group certain items together. The purpose of Applications is mainly to make planning, deployment, administration, and the general overview easier when working with BizTalk.
To create a new Application, perform the following steps:
Open the BizTalk Server Administration Console.
Right-click on Applications and choose New | Application.
Give the Application an appropriate name and click on OK.
When working inside an Application, we are only able to work directly with the other artifacts in that Application. For example, if we need to use a Pipeline in a Send Port, that Pipeline needs to be deployed in the same Application as the Port, or we need to make a reference to the Application which contains the Pipeline.
Referencing another Application
When making a reference to another Application, right-click on the Application that needs a reference to another Application, choose Properties, and perform the following steps:
Click on Reference, and then click on Add. We now get a list of all available Applications other than the current Application.
Choose the Application(s) you want to reference.
Click on OK twice.
Note
BizTalk.System is already referenced in all new Applications. As a result of this, we can work with several Pipelines as soon as the Application is created, even though these Pipelines are deployed in the BizTalk.System Application. The BizTalk.System Application is a read-only Application that can neither be deleted nor used for normal BizTalk activities, since no custom artifacts can be added to it.


