Search icon CANCEL
Subscription
0
Cart icon
Your Cart (0 item)
Close icon
You have no products in your basket yet
Save more on your purchases! discount-offer-chevron-icon
Savings automatically calculated. No voucher code required.
Arrow left icon
Explore Products
Best Sellers
New Releases
Books
Videos
Audiobooks
Learning Hub
Newsletter Hub
Free Learning
Arrow right icon
timer SALE ENDS IN
0 Days
:
00 Hours
:
00 Minutes
:
00 Seconds
Mastering Java EE Development with WildFly

Mastering Java EE Development with WildFly: Create Enterprise-grade Java applications with WildFly

eBook
€8.99 €32.99
Paperback
€41.99
Subscription
Free Trial
Renews at €18.99p/m

What do you get with Print?

Product feature icon Instant access to your digital eBook copy whilst your Print order is Shipped
Product feature icon Paperback book shipped to your preferred address
Product feature icon Download this book in EPUB and PDF formats
Product feature icon Access this title in our online reader with advanced features
Product feature icon DRM FREE - Read whenever, wherever and however you want
OR
Modal Close icon
Payment Processing...
tick Completed

Shipping Address

Billing Address

Shipping Methods
Table of content icon View table of contents Preview book icon Preview Book

Mastering Java EE Development with WildFly

Introducing Java EE and Configuring the Development Environment

WildFly 10 is an open source application server compliant with Java EE 7. Once called EJB-OSS and then JBoss, it was always one of the most used in the world. Redhat acquired JBoss and all of the community committed to it in 2005, with effect from version 5. Thanks to an internal Redhat policy, JBoss become WildFly in 2012; since version 8, WildFly is the first implementation of EE 7 by Redhat.

This application server is built with different architectures. Luckily WildFly maintains the same core architecture of the previous JBoss 7, adding some innovation from EE 7, a new set of competitive open source products and a very modular core, which simplify sharing libraries through applications.

So WildFly can be thought of as a set of sub-products all tied together by the same system.

Each of these products has its configuration in an XML file only, so we avoid redundant configurations. There is a web page for each module of these products. Moreover we can use all independent instruments provided if we want a detailed configuration.

The application server is made to maintain applications. A Java application server must be able to manage all classes from the applications; for example, it must deal with duplication classes, managing a more sophisticated class loading system. It must able to cache more frequently used objects to guarantee the fast loading of classes. Since the last enterprise specification, an application server simplifies the developing of real time services providing a wide set of instruments so the developer does not have to write voluminous code to manage asynchronous messages, concurrency, or multi-thread requests.

WildFly remains the best solution as a repository of web applications. These applications become more advanced year after year thanks to a continuous upgrade of the Java enterprise specifications.

This chapter will cover the following points:

  • Introduction to the new stuff of Java EE included in WildFly 10, showing the major details in the next chapters.
  • The Java EE specification certified by WildFly 10 is Java EE 7. We will cover the main features of EE 7 and the starting points for the next chapters.
  • A step by step guide to install the examples.

In WildFly, across configurations, it is very important to be able to develop applications. Many books explain the patterns and strategies of programming, and the user must be able to choose the right developing strategy according the need of the client. Each chapter will get its downloadable examples of web apps and enterprise components, and step by step we will strive to use them.

JSON and HTML5

Good news from EE 7! JSON is included in the specification. HTTP always becomes more default, not only for writing web applications but also for services! REST through JSON confirms the HTML 5 approach and becomes the guideline for not only the frontend but also the service tier.

Undertow is the new substitute for Tomcat, becoming not only a servlet container but the infrastructure that manages all Java EE 7 web technologies as JSON, REST, and WebSockets.

WebSockets

Finally the asynchronous messaging system available through a browser becomes the standard. It's the WebSocket. Each site has its own chat available. For example, banking applications have online support through chat, with an operator ready to help. All this can be used without boring authentications and waits. We will dedicate Chapter 7, Implementing WebSockets to it.

Simplified JMS 2.0 API

JMS APIs provide an interface to send, receive, and authenticate asynchronous messages through Java. They let you develop a client connecting to a message engine. The message engine used in WildFly is Active MQ Artemis, a substitute for the deprecated JBoss Messaging. The difference between this specification and the older one is simplicity of use and development thanks to the new annotations. These annotations will be covered in detail in Chapter 8, Working with Messaging.

Groundwork for Cloud environments

Every new feature and update is done here to get free access to the Cloud. By guaranteeing much simplicity to an interface, the interface becomes a candidate to be used in a Cloud system.

Standard paths or the simplest JNDI names too help to implement this. Infinispan is a distributed cache product and contributes to configuring a cluster better in a Cloud system. Clustering will be analyzed in Chapter 15, Sharing the Web Sessions and Chapter 16, Wildly in Cloud.

Batch applications

A very important contribution in these years is from workflows. With a workflow, you can develop complex systems in very little time.

An air reservation application is a workflow, for example. There are steps such as the choice of a flight, booking, and confirming the flight that can be configured and then executed without developing much code. Java EE 7 gets a new role for the Java enterprise, giving the opportunity to work with XML files to configure steps to add in web applications.

Schedulers too are part of it and they are finally standard. Frontend technologies now include flows with a strategy very similar to the workflows. Schedulers and flows will be discussed in Chapter 12, Batches and Workflows.

Updated web profiles

JBoss 5 introduced the web profile. A web profile is a configuration including only the technology base representing the Web. Java EE 7 included WebSockets and JSON together with old technologies as servlets, JSF, and CDI. Web profiles are a good mode to simply configure an application server in a Cloud machine.

Concurrency utilities

Java EE always gives an alternative to the developer instead of working with threads. Threads are always denied in Java EE because they are dangerous. They risk compromising the correct execution of a Java enterprise component, especially concurrent components. With these utilities, we can use threads with more simplicity, minus the dangers concerning stability of our applications.

Context dependency injection

Many new features are provided by interfaces and annotations in our context dependency injection container. New scopes and new Service Provider Interface (SPI) were added to guarantee much stability to our injected objects. Chapter 2, Working with Dependency Injection will analyze the new features provided by Weld.

Java API for RESTful web services (JAX-RS) 2.0

As for JMS, REST APIs are very flexible and simple to use. Get and post calls become more simple using the annotations. REST is now asynchronous too! RESTEasy is the product candidate to implement these APIs. REST will be seen in detail in Chapter 6, Creating REST Services as synchronous services and in Chapter 10, Asynchronous REST as asynchronous ones.

Servlet 3.1

Java servlet technologies were made for the web developers as an extension to the functionalities of the web server functionality using Java and as access to business systems. There are new good features that we will show, for example the non-blocking I/O, an HTTP protocol upgrade mechanism, and new updates to security. Servlets and how WildFly implements them will explored seen in Chapter 13, Working with Servlets and JSP.

JNDI

JNDI is the protocol for resolving names in WildFly. This is a standard specification ready since the birth of Java. All enterprise components can be called through JNDI. Here is the syntax to call an EJB:

java:global[/<app-name>]/<module-name>/<bean-name>[!<fully-qualified-interface-name>]

The java:global JNDI reference is used for the shared name. A name inside this path is accessible by all components inside the same application server.

Other paths include java: app to specify the path for a web or backend application and java: module to specify the path for a module. A module is a simple JAR file that has no lifecycle of its own, so it needs to be used by a third component.

Asynchronous invocation

The increase in asynchronous features is very high in Java EE 7. Each component can now be invoked in an asynchronous manner. With it, EJB and servlets add some major power, which will be seen in Part 3 - Asynchronous and real time of this book.

Timers

Now we can use our annotations to schedule events and processes. In any part of our component, we can create a timer and configure its time execution, configure the date and time to start it, and implement a set of operations. We will cover these in detail in Chapter 11, Asynchronous EJB.

EJB Lite

EJB's are very complex architectures, including different EE technologies such as transactions, persistence, remote interfaces, security, and CORBA. Never in a web application do we need all of the stack that an EJB takes with itself.

To make the business logic less bulky, EJB Lite is introduced and can be used in lighter applications. It excludes the following technologies:

  • Message-driven beans
  • 2.x remote home components
  • 2.x local home components
  • 3.x remote home components
  • Timers
  • RMI-IIOP

We will explore globally these components in detail in Chapter 4, Implementing Business Logic.

Development in WildFly

In this section, we will look at the mandatory inventory used to start development with WildFly 10.

Operating system

WildFly is open source. Open source is a vast world of applications and ideas. So an open source operating globally system will get a regard point by us. In this book, we will work with Linux, a very important open source operating system. So we will guide you through bash console samples. Bash is the most used command line tool for managing an operative system, mainly Linux. Of course, any OS can work.

Java

Usually Java EE and Java Standard globally follow the same path. For example Java EE 7 specifications recommend Java standard 7 as the JDK but none denies to use a major version of Java. A JDK version greater than 7 respect the EE never gave problems, even WildFly recommends using the last version of Java 8 and WildFly 10 denies to use Java 7. So we assume in our exercises that Java standard 8 is installed in your machine.

Application server

Of course, we will use the latest version of WildFly to work with enterprise components and web applications. WildFly, as an application server, provides a deploy system that you can install inside your application and use. It can be done through a filesystem, adding a package in the deploy directory, or through the console. The deployment system will be seen in detail in Chapter 18, Deployment.

The new version is 10.1.0. It can be downloaded from http://download.jboss.org/wildfly/10.1.0.Final/wildfly-10.1.0.Final.zip . The installation is very simple. Just extract the downloaded ZIP and put it in your preferred folder.

Before we start the application server, we need to create a default admin user so that we can use the management web console. Through the command line, go to the WildFly root folder under the bin directory and execute this command:

./add-user.sh

After you will get the following output:

What type of user do you wish to add?
a) Management User (mgmt-users.properties)
b) Application User (application-users.properties)
(a): a
Enter the details of the new user to add.
Using realm 'ManagementRealm' as discovered from the existing property files.
Username : admin
The username 'admin' is easy to guess
Are you sure you want to add user 'admin' yes/no? yes
Password recommendations are listed below. To modify these restrictions edit the add-user.properties configuration file.
- The password should be different from the username
- The password should not be one of the following restricted values {root, admin, administrator}
- The password should contain at least 8 characters, 1 alphabetic character(s), 1 digit(s), 1 non-alphanumeric symbol(s)
Password : admin
WFLYDM0098: The password should be different from the username
Are you sure you want to use the password entered yes/no? yes
Re-enter Password : admin
What groups do you want this user to belong to? (Please enter a comma separated list, or leave blank for none)[ ]:
About to add user 'admin' for realm 'ManagementRealm'
Is this correct yes/no? yes
Added user 'admin' to file '/Users/lucastancapiano/wildfly-10.1.0.Final/standalone/configuration/mgmt-users.properties'
Added user 'admin' to file '/Users/lucastancapiano/wildfly-10.1.0.Final/domain/configuration/mgmt-users.properties'
Added user 'admin' with groups to file '/Users/lucastancapiano/wildfly-10.1.0.Final/standalone/configuration/mgmt-groups.properties'
Added user 'admin' with groups to file '/Users/lucastancapiano/wildfly-10.1.0.Final/domain/configuration/mgmt-groups.properties'
Is this new user going to be used for one AS process to connect to another AS process?
e.g. for a slave host controller connecting to the master or for a Remoting connection for server to server EJB calls.
yes/no? yes
To represent the user add the following to the server-identities definition <secret value="YWRtaW4=" />

Now you have an admin user with credentials--,user: admin and password: admin

Once you have created the user you can start WildFly with the following command inside the bin directory of the root of WildFly:

./standalone.sh

When you log in, the console will show the row:

INFO  [org.jboss.as] (Controller Boot Thread) WFLYSRV0025: WildFly Full 10.1.0.Final (WildFly Core 2.2.0.Final) started in 20718ms - Started 580 of 816 services (405 services are lazy, passive or on-demand)

This means that the WildFly application server has started.

The web management console can be used by connecting from http://localhost:9990/console.

In the next chapter, we will see how to work with it.

Build system

Many tools can be used in Java to build applications. Open source products are Ant, Ivy, Maven, and the more recent Gradle. For convenience, as Maven the most popular in this book we will use it to build our examples.

Apache Maven is a software project management and comprehension tool. Based on the concept of project object model (POM), Maven can manage a project's build, reporting, and documentation from a central piece of information.

We will use Maven to manage our projects. With Maven we will get a simple starting point to build, execute, and test our projects. Maven 3.3.9 is downloadable from https://maven.apache.org/download.cgi.

Since we have installed JDK 8 in our machine, we can extract the downloaded Maven ZIP and put it in any folder that we prefer. After that, we will need a system variable, MAVEN_HOME, for our system. In Linux, you can set MAVEN_HOME by editing the .bash_profile file in your home directory:

vi $USER_HOME/.bash_profile
export MAVEN_HOME=/$your_home_path/apache-maven-3.3.9
export path:$MAVEN_HOME/bin

The second row lets you use Maven in any folder path. So, for example, in /etc, you can run the Maven command mvn. A Maven guide is not given in this book, but for those who don’t know Maven, we will use only three commands:

  • mvn clean: Used to clean the project
  • mvn install: Used to build, install, and test the project and create the packages to deploy in WildFly
  • mvn test: Used only to execute test cases

All the commands can be used together. For example:

The mvn clean install command will execute both the commands, first cleaning the project and then installing it. If you avoid tests it's enough add the property:

mvn clean install -DskipTests

Maven can be used only in the folder for Maven projects. A Maven project is recognized by a file contained in the root of the folder, pom.xml. It is the key descriptor of the Maven projects. For example in this POM file you put the dependency libraries of the projects. When you install a project, it automatically downloads the mandatory dependencies if they are not present and it compiles with them.

Structure of the exercises

This book provides different examples structured by projects divided by part and chapter. Each chapter excluding the introduction has its own project Maven sample. The exercises can be downloaded from the link provided in the Preface of this book.

Once you have downloaded the project, you will notice a tree similar to this:

Wildfly-book
Business-components
Injection
pom.xml
Persistence
pom.xml

pom.xml
Class-loading

pom.xml

pom.xml

If you are interested only in testing the examples inside the Chapter 3, Persistence, you need only to go in the persistence folder and start the Maven commands seen before.

Tests

All our examples are testable inside WildFly containers. A good test framework to execute the tests inside components is Arquillian. Arquillian is the official test framework of WildFly. With Arquillian, by starting simple JUnit integration tests by command line or an IDE, we can see the execution inside a container. So in a hide mode, Arquillian starts the WildFly containers, deploys the components, and in the end executes the tests inside the containers. It's a very important product for the integration tests.

Arquillian is configured through Maven in the pom.xml files. Now, we see the details of the wildfly-book root pom.xml and see the dependencies introduced before in the build system paragraph:

<dependency>
<groupId>junit</groupId>
<artifactId>junit</artifactId>
<scope>test</scope>
</dependency>
<dependency>
<groupId>org.jboss.arquillian.junit</groupId>
<artifactId>arquillian-junit-container</artifactId>
<scope>test</scope>
</dependency>
<dependency>
<groupId>org.wildfly.arquillian</groupId>
<artifactId>wildfly-arquillian-container-managed</artifactId>
</dependency>

There are three important dependencies to work with Arquillian and integration tests:

  • JUnit is one of the most important frameworks used to write repeatable tests. It is the first Java framework that introduces test-driven development. It uses assertion concepts and Java annotations as configuration. Here's a basic test case:
public class MyTestCase {
@Test
public void shouldSumMyNumbers() {
Assert.assertEquals(10, Numbers.sum(8,2));
}
}

This class can be executed directly through Maven or the IDE using its instruments:

  • The Arquillian JUnit container provides the components to hook to JUnit. It provides the Arquillian class configuration. Simply add this configuration to your JUnit test case and it will work inside a container:
@RunWith(Arquillian.class)
public class MyTestCase {
….
}

  • The Arquillian WildFly container manager tells Arquillian what container to start when the unit test is launched. Through system or Maven properties, it automatically starts a WildFly instance if the deployment is configured. Here a sample deploy configuration in our test:
@Deployment
public static WebArchive createWebDeployment() {
final WebArchive war = ShrinkWrap.create(WebArchive.class, "resource-injection-test.war");
war.addAsWebInfResource(MyTestCase.class.getPackage(), "web.xml", "web.xml");
return war;
}

Through the @Deployment annotation, we ask Arquillian to create an empty enterprise package to deploy. Once the JUnit test is launched, Arquillian automatically deploys the enterprise package and puts it inside the test class so that it can be executed inside the WildFly container exposed in the type of package, in this case, a WAR (web archive).

Although the idea of a framework test working inside a container can be applied to any application server, Arquillian limits its scope to inside WildFly. So it never works in an application server different from JBoss or WildFly.

IDE

Three IDEs are recommended.

Netbeans IDE

You can quickly and easily develop desktop, mobile, and web applications with Java, JavaScript, HTML5, PHP, C/C++, and very importantly Java EE 7 support.

NetBeans IDE is free, open source, and has a worldwide community of users and developers.

IntelliJ IDEA

Each aspect of IntelliJ IDEA is exclusively organized to enhance the productivity of the developer. It provides a complete support for Java EE 7.
Moreover, the analysis and the design of the code make development a comfortable experience and very productive.

Eclipse IDE

Eclipse is a moduleable open source IDE written in Java to work in Java and other languages thanks to a good plugin management. It was started by IBM and later donated to the community. It manages all the Java EE components with good graphics tools. In this book, we will use Eclipse, the Neon.2a Release (4.6.2) version. It can be downloaded from https://www.eclipse.org/downloads/.

Importing exercises

Now, see how to import the exercises inside Eclipse. Eclipse works with a workspace and working sets. The workspace is a physical directory where we put our projects.

Working sets are logical folders used inside Eclipse as collectors of projects usually organized by argument.

For example, a set of projects that describe a forum can all be put together in a working set and we can call it forum. Another set of projects can be used for an air reservation application, so we can put them in another working set called air-reservation.

The exercises projects, as we mentioned before, are written as a modular tree structure with parents and children. The parent folders are used as collectors of chapters, so they are not important in our system environment. We now create two Eclipse working sets, one for the children (book) and one for the parents (book-parent).

So, when we start Eclipse for the first time, we should set the workspace by choosing the directory we want to use:

Okay, the workspace is ready. Now configure the view with the working sets. Click on the little down arrow near the Project Explorer title and choose Working Sets:


A new window will be opened. In this window, choose the following dialog so we can start to create the working sets:


After that click on the New... button and choose the working set type:


Java is the better type for us. After you have done this, click on the Next > button and create the new book working set:


Repeat the same operations for the second working set: book-parent:

Now select all the created working sets and click on OK to end the configuration of the working sets:

Now we have to import the exercises. Click on File | Import:


We are importing a Maven project so select Maven | Existing Maven Projects:

Click on Next; you should select the root directory for the exercises that you have downloaded. Once you have selected it, you will see a list of all sub- projects. By default the first working set you have created is selected, so choose child projects to add to it and click on Next >:


The same operation must be done with the parent projects. So now select the book-parent working set and click on Next >:

Once done, go to the Select Working Set screen again and click on OK to refresh:

Now we will see a list of working sets:


If we open the working set we can see all ordered parent and child projects:

Debug exercises

With this environment, we can debug our components too. It would be very useful to see how our components work inside the WildFly container. To start the debug process, simply enter the sub-project you want to test and enter, for example, the following command:

mvn test -Djboss.options="-Xdebug -Xrunjdwp:transport=dt_socket,address=8001,server=y,suspend=y"

Jboss.options is a property used by the Arquillian container managed subproject to add external properties to the start of WildFly startup process. So you can pass Java properties to set the debug environment.

In our case, we force WildFly to use the following parameters:

  • debug: This activates debug mode. If set to false, the next parameters will not be considered.
  • runjdwp: transport JDWP is the common communication protocol used to start the debug. The transport can be of type DT_SOCKET used in Linux or DT_SHMEM used in Windows.

Other parameters to add in the transport are:

  • Address: The client/server connection URL. It can be valorized as 8001. Adding only the port we presume the transport running on localhost, the same machine we will start the debug. When WildFly starts, after setting these properties, a JDWP server automatically starts on the specified port:
  • Server: It must be set to y or else no server can be started:
  • Suspend: If set to y, WildFly will wait for one connection by a JDWP client; otherwise it will be waiting. If set to n, WildFly will start anyway, leaving the connections free to start at another time.

Here is the complete command you need to start the debug:

-Xdebug -Xrunjdwp:transport=dt_socket,address=8001,server=y,suspend=n

Once the test starts, thanks to the suspend property. WildFly will be suspended till we start the JPDA client. This client is ready to work in Eclipse. Here's how to configure and start it.

Click on the row near the debug figure and select Debug Configurations...:


On, the item remote Java debugger right-click and select New:


You will see a new window. Fill in the fields like this:


The field port must be the same as the one used in jboss.options so that the client can connect to the JPDA server that was started in the test. The Project field can be one of the subprojects inside our exercises.

Now close the window. We need to put in a breakpoint, so we show the debugger at work. Simply, take a code class of the project you would like to test and click twice on a row, for example:
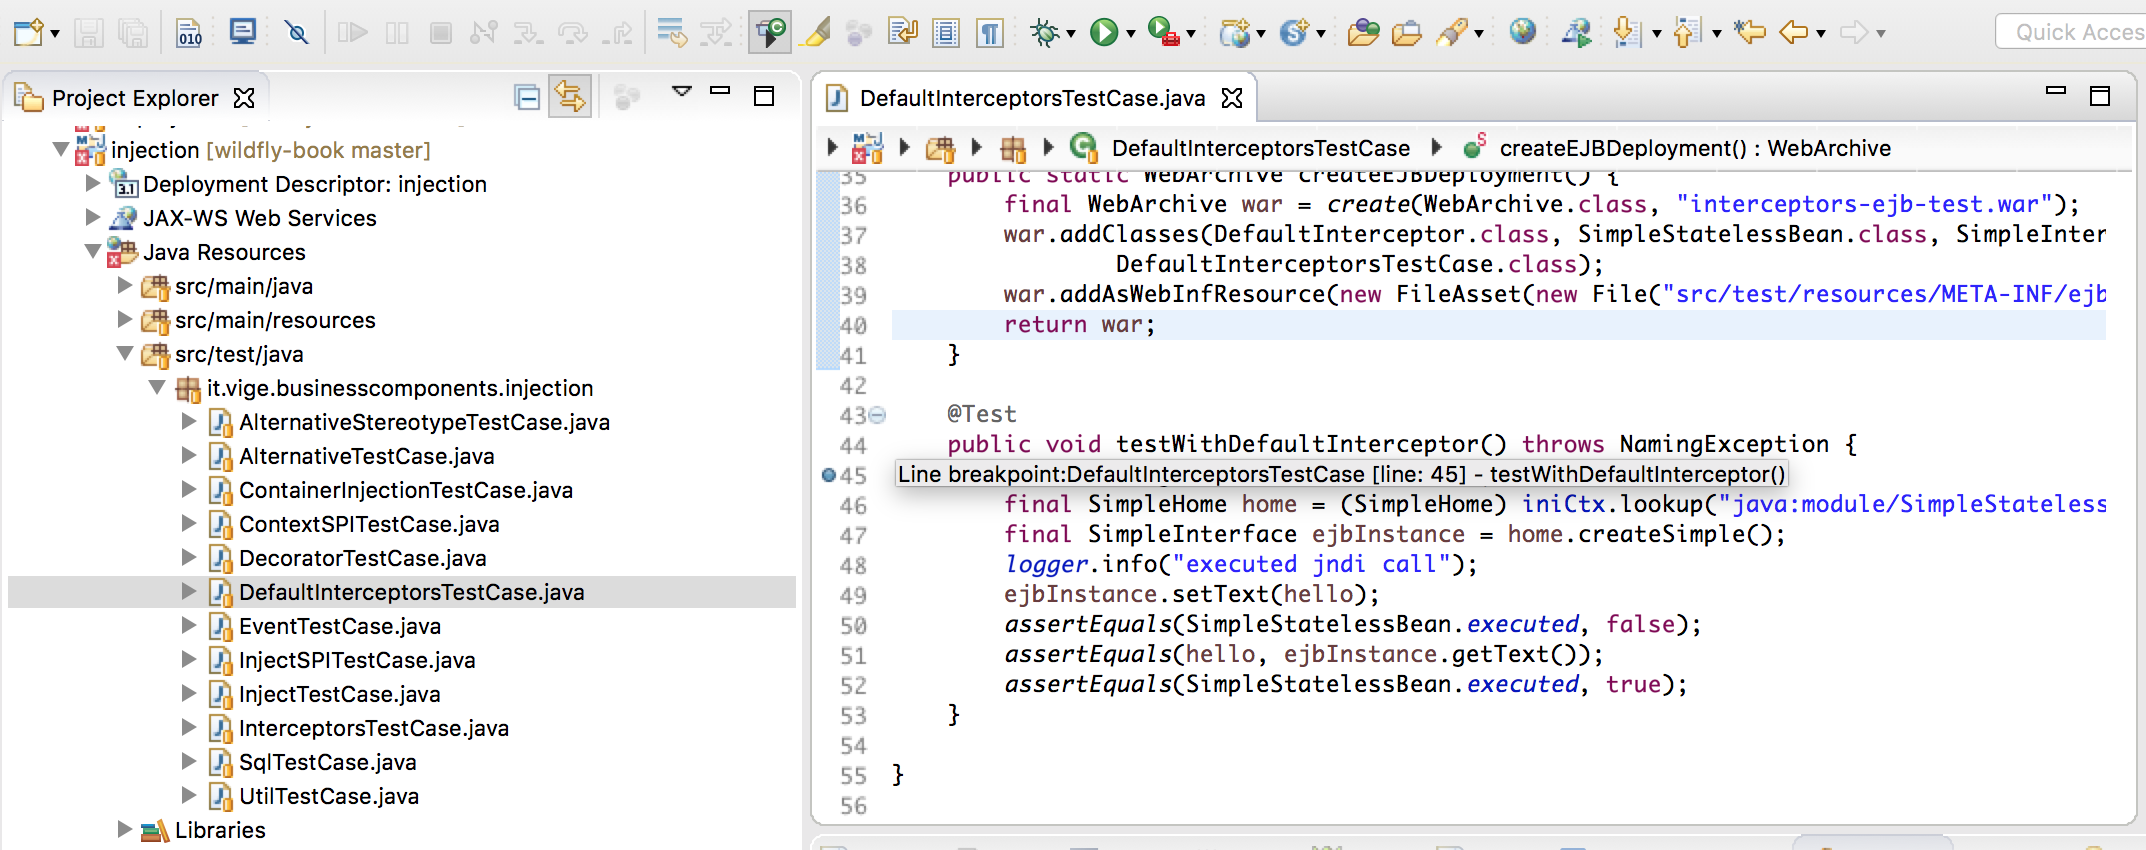
Again launch Debug Configurations and start the debugger:

Your breakpoint is now active!

Now we have all of the environment ready to work. In the next chapter, we will see tests and how to start them depending on the argument.

In other samples, you will find that Arquillian uses an annotation called @RunAsClient that lets you start test cases outside the container as remote clients. In that case, you cannot use jboss.options to start the debug because it starts the debug only inside the container.

To debug remote clients annotated with the @RunAsClient annotation, use this script:

mvn test -Dmaven.surefire.debug

And configure your JPDA client with the default port, 5005.

Summary

We have finished the configuration of our examples. We now know all the focal points of WildFly that we will explore in subsequent chapters. We are ready to start the examples while working through this book. In the next chapter we will start the first focal point in WildFly 10: injection. Read it well and practice!

Left arrow icon Right arrow icon
Download code icon Download Code

Key benefits

  • Master Java EE development with the latest WildFly 10 application server.
  • Integrate with JSF and JMS and use efficient load balancing techniques to create real-time apps
  • Integrate your backend JavaScript code seamlessly into Java applications

Description

Packed with rich assets and APIs, Wildfly 10 allows you to create state-of-the-art Java applications. This book will help you take your understanding of Java EE to the next level by creating distributed Java applications using Wildfly. The book begins by showing how to get started with a native installation of WildFly and it ends with a cloud installation. After setting up the development environment, you will implement and work with different WildFly features, such as implementing JavaServer Pages. You will also learn how you can use clustering so that your apps can handle a high volume of data traffic. You will also work with enterprise JavaBeans, solve issues related to failover, and implement Java Message Service integration. Moving ahead, you will be working with Java Naming and Directory Interface, Java Transaction API, and use ActiveMQ for message relay and message querying. This book will also show you how you can use your existing backend JavaScript code in your application. By the end of the book, you’ll have gained the knowledge to implement the latest Wildfly features in your Java applications.

Who is this book for?

If you are a Java developer with at least basic knowledge of Java EE, then this book is for you. No previous knowledge of WildFly is required.

What you will learn

  • Configure the development environment along with native and cloud installation of WildFly
  • Write a DB schema and the relative entities and how to use the relationships between the entities
  • Analyze with examples all the java annotations to manage the EJB and the configuration to get better performances
  • Write different REST services through the EJB
  • Implement Web sockets 1.0 and know why and when use the web sockets
  • Work with Active MQ and write JMS clients to manage the authentication and authorization in the clients
  • Configure the mail server through the wildfly console
  • Learn how and when to use a new feature JAX-RS 2.0, which is the asynchronous call through REST
  • Use the new JSF features of Wildfly 10 such as Mojarra 2.2, JSF 2.2, Richfaces 4.5
Estimated delivery fee Deliver to Estonia

Premium delivery 7 - 10 business days

€25.95
(Includes tracking information)

Product Details

Country selected
Publication date, Length, Edition, Language, ISBN-13
Publication date : Jun 20, 2017
Length: 468 pages
Edition : 1st
Language : English
ISBN-13 : 9781787287174
Category :
Languages :
Tools :

What do you get with Print?

Product feature icon Instant access to your digital eBook copy whilst your Print order is Shipped
Product feature icon Paperback book shipped to your preferred address
Product feature icon Download this book in EPUB and PDF formats
Product feature icon Access this title in our online reader with advanced features
Product feature icon DRM FREE - Read whenever, wherever and however you want
OR
Modal Close icon
Payment Processing...
tick Completed

Shipping Address

Billing Address

Shipping Methods
Estimated delivery fee Deliver to Estonia

Premium delivery 7 - 10 business days

€25.95
(Includes tracking information)

Product Details

Publication date : Jun 20, 2017
Length: 468 pages
Edition : 1st
Language : English
ISBN-13 : 9781787287174
Category :
Languages :
Tools :

Packt Subscriptions

See our plans and pricing
Modal Close icon
€18.99 billed monthly
Feature tick icon Unlimited access to Packt's library of 7,000+ practical books and videos
Feature tick icon Constantly refreshed with 50+ new titles a month
Feature tick icon Exclusive Early access to books as they're written
Feature tick icon Solve problems while you work with advanced search and reference features
Feature tick icon Offline reading on the mobile app
Feature tick icon Simple pricing, no contract
€189.99 billed annually
Feature tick icon Unlimited access to Packt's library of 7,000+ practical books and videos
Feature tick icon Constantly refreshed with 50+ new titles a month
Feature tick icon Exclusive Early access to books as they're written
Feature tick icon Solve problems while you work with advanced search and reference features
Feature tick icon Offline reading on the mobile app
Feature tick icon Choose a DRM-free eBook or Video every month to keep
Feature tick icon PLUS own as many other DRM-free eBooks or Videos as you like for just €5 each
Feature tick icon Exclusive print discounts
€264.99 billed in 18 months
Feature tick icon Unlimited access to Packt's library of 7,000+ practical books and videos
Feature tick icon Constantly refreshed with 50+ new titles a month
Feature tick icon Exclusive Early access to books as they're written
Feature tick icon Solve problems while you work with advanced search and reference features
Feature tick icon Offline reading on the mobile app
Feature tick icon Choose a DRM-free eBook or Video every month to keep
Feature tick icon PLUS own as many other DRM-free eBooks or Videos as you like for just €5 each
Feature tick icon Exclusive print discounts

Frequently bought together


Stars icon
Total 125.97
Mastering Java EE Development with WildFly
€41.99
Architecting Modern Java EE Applications
€41.99
Java EE 8 Application Development
€41.99
Total 125.97 Stars icon
Banner background image

Table of Contents

19 Chapters
Introducing Java EE and Configuring the Development Environment Chevron down icon Chevron up icon
Working with Dependency Injection Chevron down icon Chevron up icon
Persistence Chevron down icon Chevron up icon
Implementing Business Logic Chevron down icon Chevron up icon
Working with Distributed Transactions Chevron down icon Chevron up icon
Creating REST Services Chevron down icon Chevron up icon
Implementing WebSockets Chevron down icon Chevron up icon
Working with Messaging Chevron down icon Chevron up icon
Implementing a Mail Client Chevron down icon Chevron up icon
Asynchronous REST Chevron down icon Chevron up icon
Asynchronous EJB Chevron down icon Chevron up icon
Batches and Workflows Chevron down icon Chevron up icon
Working with Servlets and JSP Chevron down icon Chevron up icon
Writing a JSF Application Chevron down icon Chevron up icon
Sharing the Web Sessions Chevron down icon Chevron up icon
WildFly in Cloud Chevron down icon Chevron up icon
Share your Data Chevron down icon Chevron up icon
Deployment Chevron down icon Chevron up icon
Working with OSGi Chevron down icon Chevron up icon

Customer reviews

Rating distribution
Full star icon Full star icon Half star icon Empty star icon Empty star icon 2.3
(3 Ratings)
5 star 33.3%
4 star 0%
3 star 0%
2 star 0%
1 star 66.7%
David Sep 28, 2017
Full star icon Full star icon Full star icon Full star icon Full star icon 5
This book is a very good source of informations on the the most recent JavaEE and Web technologies.The author, using a clear and effective language, starts with the basics and then gradually moves to the advanced topics, covering most of the technologies included in Wildfly.
Amazon Verified review Amazon
Salvatore Apr 08, 2018
Full star icon Empty star icon Empty star icon Empty star icon Empty star icon 1
Devo dire che non mi è piaciuto per niente.E' scritto male (a livello semantico molte frasi non si capiscono), e gli argomenti vengono trattati in maniera molto superficiale e blanda.Altra cosa negativa è che gli esempi di codice non hanno un minimo senso, non sono esempi di utlizzo reale. Questa cosa è veramente negativa perchè non ti fa capire il perchè devo usare una determinata feature.Bocciato.
Amazon Verified review Amazon
Gaurav Srivastva Oct 14, 2017
Full star icon Empty star icon Empty star icon Empty star icon Empty star icon 1
This book is a joke if you bought it to learn. It briefly touches on topics with no depth.
Amazon Verified review Amazon
Get free access to Packt library with over 7500+ books and video courses for 7 days!
Start Free Trial

FAQs

What is the delivery time and cost of print book? Chevron down icon Chevron up icon

Shipping Details

USA:

'

Economy: Delivery to most addresses in the US within 10-15 business days

Premium: Trackable Delivery to most addresses in the US within 3-8 business days

UK:

Economy: Delivery to most addresses in the U.K. within 7-9 business days.
Shipments are not trackable

Premium: Trackable delivery to most addresses in the U.K. within 3-4 business days!
Add one extra business day for deliveries to Northern Ireland and Scottish Highlands and islands

EU:

Premium: Trackable delivery to most EU destinations within 4-9 business days.

Australia:

Economy: Can deliver to P. O. Boxes and private residences.
Trackable service with delivery to addresses in Australia only.
Delivery time ranges from 7-9 business days for VIC and 8-10 business days for Interstate metro
Delivery time is up to 15 business days for remote areas of WA, NT & QLD.

Premium: Delivery to addresses in Australia only
Trackable delivery to most P. O. Boxes and private residences in Australia within 4-5 days based on the distance to a destination following dispatch.

India:

Premium: Delivery to most Indian addresses within 5-6 business days

Rest of the World:

Premium: Countries in the American continent: Trackable delivery to most countries within 4-7 business days

Asia:

Premium: Delivery to most Asian addresses within 5-9 business days

Disclaimer:
All orders received before 5 PM U.K time would start printing from the next business day. So the estimated delivery times start from the next day as well. Orders received after 5 PM U.K time (in our internal systems) on a business day or anytime on the weekend will begin printing the second to next business day. For example, an order placed at 11 AM today will begin printing tomorrow, whereas an order placed at 9 PM tonight will begin printing the day after tomorrow.


Unfortunately, due to several restrictions, we are unable to ship to the following countries:

  1. Afghanistan
  2. American Samoa
  3. Belarus
  4. Brunei Darussalam
  5. Central African Republic
  6. The Democratic Republic of Congo
  7. Eritrea
  8. Guinea-bissau
  9. Iran
  10. Lebanon
  11. Libiya Arab Jamahriya
  12. Somalia
  13. Sudan
  14. Russian Federation
  15. Syrian Arab Republic
  16. Ukraine
  17. Venezuela
What is custom duty/charge? Chevron down icon Chevron up icon

Customs duty are charges levied on goods when they cross international borders. It is a tax that is imposed on imported goods. These duties are charged by special authorities and bodies created by local governments and are meant to protect local industries, economies, and businesses.

Do I have to pay customs charges for the print book order? Chevron down icon Chevron up icon

The orders shipped to the countries that are listed under EU27 will not bear custom charges. They are paid by Packt as part of the order.

List of EU27 countries: www.gov.uk/eu-eea:

A custom duty or localized taxes may be applicable on the shipment and would be charged by the recipient country outside of the EU27 which should be paid by the customer and these duties are not included in the shipping charges been charged on the order.

How do I know my custom duty charges? Chevron down icon Chevron up icon

The amount of duty payable varies greatly depending on the imported goods, the country of origin and several other factors like the total invoice amount or dimensions like weight, and other such criteria applicable in your country.

For example:

  • If you live in Mexico, and the declared value of your ordered items is over $ 50, for you to receive a package, you will have to pay additional import tax of 19% which will be $ 9.50 to the courier service.
  • Whereas if you live in Turkey, and the declared value of your ordered items is over € 22, for you to receive a package, you will have to pay additional import tax of 18% which will be € 3.96 to the courier service.
How can I cancel my order? Chevron down icon Chevron up icon

Cancellation Policy for Published Printed Books:

You can cancel any order within 1 hour of placing the order. Simply contact customercare@packt.com with your order details or payment transaction id. If your order has already started the shipment process, we will do our best to stop it. However, if it is already on the way to you then when you receive it, you can contact us at customercare@packt.com using the returns and refund process.

Please understand that Packt Publishing cannot provide refunds or cancel any order except for the cases described in our Return Policy (i.e. Packt Publishing agrees to replace your printed book because it arrives damaged or material defect in book), Packt Publishing will not accept returns.

What is your returns and refunds policy? Chevron down icon Chevron up icon

Return Policy:

We want you to be happy with your purchase from Packtpub.com. We will not hassle you with returning print books to us. If the print book you receive from us is incorrect, damaged, doesn't work or is unacceptably late, please contact Customer Relations Team on customercare@packt.com with the order number and issue details as explained below:

  1. If you ordered (eBook, Video or Print Book) incorrectly or accidentally, please contact Customer Relations Team on customercare@packt.com within one hour of placing the order and we will replace/refund you the item cost.
  2. Sadly, if your eBook or Video file is faulty or a fault occurs during the eBook or Video being made available to you, i.e. during download then you should contact Customer Relations Team within 14 days of purchase on customercare@packt.com who will be able to resolve this issue for you.
  3. You will have a choice of replacement or refund of the problem items.(damaged, defective or incorrect)
  4. Once Customer Care Team confirms that you will be refunded, you should receive the refund within 10 to 12 working days.
  5. If you are only requesting a refund of one book from a multiple order, then we will refund you the appropriate single item.
  6. Where the items were shipped under a free shipping offer, there will be no shipping costs to refund.

On the off chance your printed book arrives damaged, with book material defect, contact our Customer Relation Team on customercare@packt.com within 14 days of receipt of the book with appropriate evidence of damage and we will work with you to secure a replacement copy, if necessary. Please note that each printed book you order from us is individually made by Packt's professional book-printing partner which is on a print-on-demand basis.

What tax is charged? Chevron down icon Chevron up icon

Currently, no tax is charged on the purchase of any print book (subject to change based on the laws and regulations). A localized VAT fee is charged only to our European and UK customers on eBooks, Video and subscriptions that they buy. GST is charged to Indian customers for eBooks and video purchases.

What payment methods can I use? Chevron down icon Chevron up icon

You can pay with the following card types:

  1. Visa Debit
  2. Visa Credit
  3. MasterCard
  4. PayPal
What is the delivery time and cost of print books? Chevron down icon Chevron up icon

Shipping Details

USA:

'

Economy: Delivery to most addresses in the US within 10-15 business days

Premium: Trackable Delivery to most addresses in the US within 3-8 business days

UK:

Economy: Delivery to most addresses in the U.K. within 7-9 business days.
Shipments are not trackable

Premium: Trackable delivery to most addresses in the U.K. within 3-4 business days!
Add one extra business day for deliveries to Northern Ireland and Scottish Highlands and islands

EU:

Premium: Trackable delivery to most EU destinations within 4-9 business days.

Australia:

Economy: Can deliver to P. O. Boxes and private residences.
Trackable service with delivery to addresses in Australia only.
Delivery time ranges from 7-9 business days for VIC and 8-10 business days for Interstate metro
Delivery time is up to 15 business days for remote areas of WA, NT & QLD.

Premium: Delivery to addresses in Australia only
Trackable delivery to most P. O. Boxes and private residences in Australia within 4-5 days based on the distance to a destination following dispatch.

India:

Premium: Delivery to most Indian addresses within 5-6 business days

Rest of the World:

Premium: Countries in the American continent: Trackable delivery to most countries within 4-7 business days

Asia:

Premium: Delivery to most Asian addresses within 5-9 business days

Disclaimer:
All orders received before 5 PM U.K time would start printing from the next business day. So the estimated delivery times start from the next day as well. Orders received after 5 PM U.K time (in our internal systems) on a business day or anytime on the weekend will begin printing the second to next business day. For example, an order placed at 11 AM today will begin printing tomorrow, whereas an order placed at 9 PM tonight will begin printing the day after tomorrow.


Unfortunately, due to several restrictions, we are unable to ship to the following countries:

  1. Afghanistan
  2. American Samoa
  3. Belarus
  4. Brunei Darussalam
  5. Central African Republic
  6. The Democratic Republic of Congo
  7. Eritrea
  8. Guinea-bissau
  9. Iran
  10. Lebanon
  11. Libiya Arab Jamahriya
  12. Somalia
  13. Sudan
  14. Russian Federation
  15. Syrian Arab Republic
  16. Ukraine
  17. Venezuela