Toolbars
Toolbars are positioned under the window tabs and provide shortcuts to menu options. Toolbars within Lotus Notes can be repositioned, customized, and created. The following is an example of repositioning a toolbar:

By default, many toolbars are context sensitive, which means they appear only when they are needed. For example, we see only the Editing Toolbar when we are typing text in a document. When we are in our Inbox, the Editing Toolbar is grayed out and not available to be selected. To see a list of available toolbars, right-click in the toolbar area. From this area we can select which toolbars we want to display in the toolbar area.

To customize a toolbar, right-click in the toolbar area and select Toolbar Preferences; from within here we can customize and create our own toolbars. Alternatively we can access toolbar preferences under File | Preferences | Toolbar | Customize.
Search toolbar
One toolbar which should be explored is the Search Toolbar. If we are in our mail and we want to search for a word within the subject, the body of the message, or the address fields, then simply type the word in the Search Toolbar and then select the Enter key or click the magnifying class icon. The search will occur on all documents in our Mail including our Inbox, Sent folder, Drafts, and personal folders.
We can also search our Calendar and Contacts and even do a Yahoo or Google Search. Each search that we perform is saved under Recent Searches.
To perform a search in our mail, type the words we are searching for in the Search All Mail toolbar. If we are in our Calendar, the search will be performed in the Calendar and so on. Once we have typed the word, click on the magnifying icon to start the search.

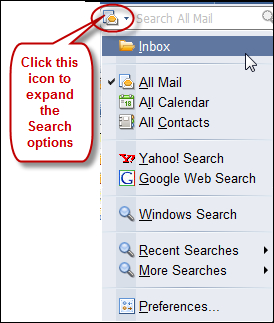
Alternatively we can click the icon in the Search Toolbar to show the drop-down menu. This option allows us to choose different places to search. In the example shown in the following screenshot, the search would be performed in All Mail as this is the option selected:

To perform the search, click the magnifying class icon or press the Enter key. A new window tab will open with the results of the search and it will also show all recent searches.
Search preferences
We can change the preferences available for searching. Go to File | Preferences | Search. In this area we can enable Search History, which is ON by default. There is also a button that we can select to clear history.
By default when we perform a web search, the results will be presented in the embedded browser in Lotus Notes. We can change this preference by deselecting Use embedded browser to display Search Center web search results. If this preference is not selected, the web search results will show in our default web browser.
We can change what is displayed in the search list. Go to File | Preferences | Search | Search List. We will see a list of what we are able to select; we can then check or uncheck the available options.
Finally, we can add our applications to the Search drop-down list. In the following screenshot, I have added Karen's Training Resources application to the Search drop-down list. To do this I opened the application, clicked the Search drop-down list in the Search toolbar, and then selected the option to Always Show in Search List. I can now, from anywhere in Lotus Notes, perform searches in the application by selecting the option in the Search toolbar.

Tip
One of the search options listed is Windows Search. This option searches our local drives and returns to the search view in Lotus Notes, links to the files it has found.


