Building, sharing, and running containers
Build, ship, and run: you might have heard or read this quote years ago. Docker Inc. used it to promote the ease of using containers. When creating container-based applications, we can use Docker to build container images, share these images within environments, move the content from our development workstations to testing and staging environments, execute them as containers, and finally use these packages in production. Only a few changes are required throughout, mainly at the application’s configuration level. This workflow ensures application usage and immutability between the development, testing, and staging stages. Depending on the container runtime and container orchestrator chosen for each stage, Docker could be present throughout (Docker Engine and Docker Swarm). Either way, most people still use the Docker command line to create container images due to its great, always-evolving features that allow us, for example, to build images for different processor architectures using our desktop computers.
Adding continuous integration (CI) and continuous deployment (CD) (or continuous delivery, depending on the source) to the equation simplifies developers’ lives so they can focus on their application’s architecture and code.
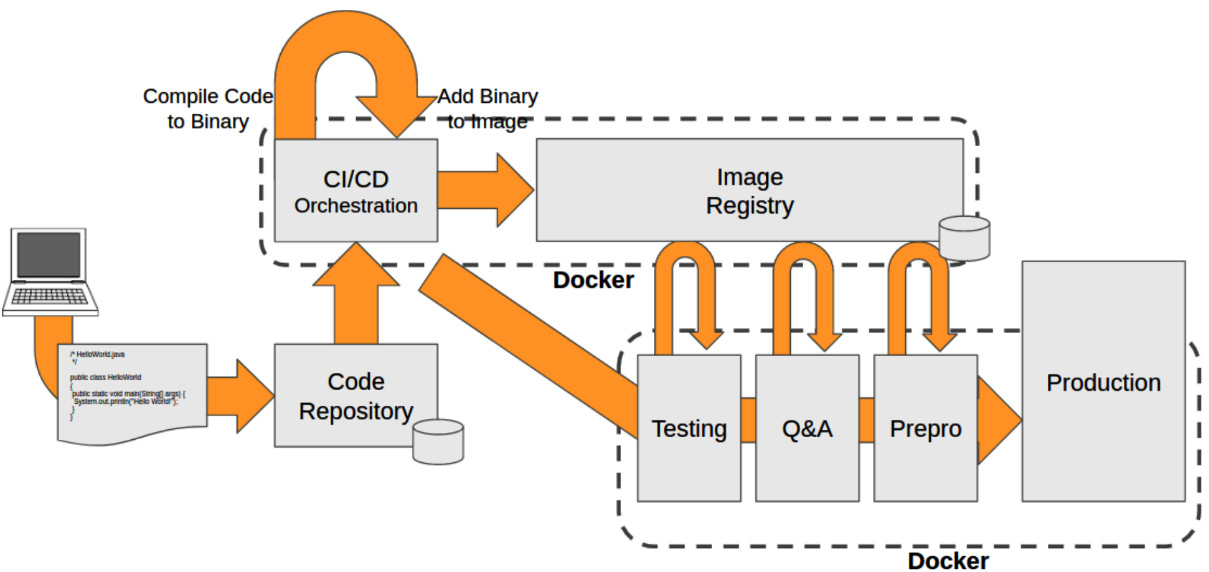
They can code on their workstations and push their code to a source code repository, and this event will trigger a CI/CD automation to build applications artifacts, compiling their code and providing the artifacts in the form of binaries or libraries. This automation can also include these artifacts inside container images. These become the new application artifacts and are stored in image registries (the backends that store container images). Different executions can be chained to test this newly compiled component together with other components in the integration phase, achieve verification via some tests in the testing phase, and so on, passing through different stages until it gets to production. All these chained workflows are based on containers, configuration, and the images used for execution. In this workflow, developers never explicitly create a release image; they only build and test development ones, but the same Dockerfile recipe is used on their workstations and in the CI/CD phases executed on servers. Reproducibility is key.
Developers can run multiple containers on their developer workstations as if they were using the real environment. They can test their code along with other components in their environment, allowing them to evaluate and discover problems faster and fix them even before moving their components to the CI/CD pipelines. When their code is ready, they can push it to their code repository and trigger the automation. Developers can build their development images, test them locally (be it a standalone component, multiple components, or even a full application), prepare their release code, then push it, and the CI/CD orchestrator will build the release image for them.
In these contexts, images are shared between environments via the use of image registries. Shipping images from server to server is easy as the host’s container runtime will download the images from the given registries – but only those layers not already present on the servers will be downloaded, hence the layer distribution within container images is key.
The following schema outlines this simplified workflow:

Figure 1.7 – Simplified schema representing a CI/CD workflow example using software containers to deliver applications to production
Servers running these different stages can be either standalone servers, pools of nodes from orchestrated clusters, or even more complex dedicated infrastructures, including in some cases cloud-provided hosts or whole clusters. Using container images ensures the artifact’s content and infrastructure-specific configurations will run in the custom application environment in each case.
With this in mind, we can imagine how we could build a full development chain using containers. We talked about Linux kernel namespaces already, so let’s continue by understanding how these isolation mechanisms work on Microsoft Windows.


