Search icon CANCEL
Subscription
0
Cart icon
Your Cart (0 item)
Close icon
You have no products in your basket yet
Save more on your purchases now! discount-offer-chevron-icon
Savings automatically calculated. No voucher code required.
Arrow left icon
Explore Products
Best Sellers
New Releases
Books
Videos
Audiobooks
Learning Hub
Conferences
Free Learning
Arrow right icon
Arrow up icon
GO TO TOP
Oracle Primavera P6 Version 8: Project and Portfolio Management

You're reading from   Oracle Primavera P6 Version 8: Project and Portfolio Management For project managers and consultants, this book will help you master the main elements of Primavera P6, together with the new features in Version 8. Lots of screenshots and clear explanations make for an easy ride.

Arrow left icon
Product type Paperback
Published in Aug 2012
Publisher Packt
ISBN-13 9781849684682
Length 348 pages
Edition 1st Edition
Arrow right icon
Toc

Table of Contents (25) Chapters Close

Oracle Primavera P6 Version 8: Project and Portfolio Management
Credits
About the Authors
About the Reviewers
www.PacktPub.com
Preface
1. Getting Started with Oracle Primavera P6 FREE CHAPTER 2. Getting Around: Understanding and Customizing the P6 Interface 3. Organizing your Projects with EPS, OBS, and WBS 4. Creating a New Project and Work Breakdown Structure 5. Adding Activities and Relationships 6. Resources 7. Scheduling and Constraints 8. Issues and Risks 9. Baselines and Statusing 10. Project Templates 11. Portfolios 12. Portfolio Analysis 13. Measuring and Scoring Projects 14. Capacity Planning and ROI 15. Dashboards 16. Resource Management Integrations Reporting Index

Screen overview


When you log into P6 the first time, you should be presented with a screen similar to the following screenshot:
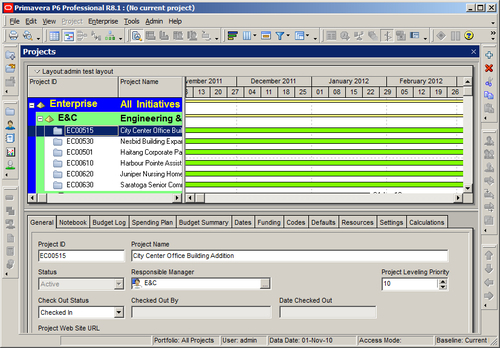
At the very top is the set of application menus that are standard to most Windows applications, such as File, Edit, View, and Help, plus a few that are specific to P6: Project, Enterprise, and Tools.

In the Professional Client, there is also an Admin menu:

The main screen also contains toolbars across the top, left, and right-hand sides. These toolbars contain icons which provide quick ways to access parts of the program. They are highly customizable. You can move any set of tools to any other toolbar, create a toolbar across the bottom of the page, or even detach a toolbar from the side and make it float!
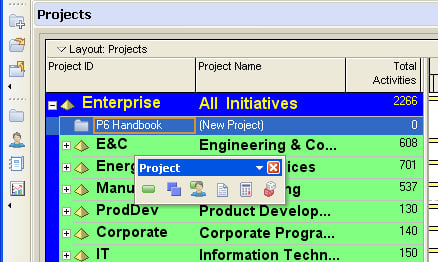
Floating toolbar: This toolbar will remain on top of the screen while you work on the main screen, and can be moved around as desired.

The central portion of the screen is filled with a set of screens which appear as tabs as you open up different modules. These are...

lock icon The rest of the chapter is locked
Register for a free Packt account to unlock a world of extra content!
A free Packt account unlocks extra newsletters, articles, discounted offers, and much more. Start advancing your knowledge today.
Unlock this book and the full library FREE for 7 days
Get unlimited access to 7000+ expert-authored eBooks and videos courses covering every tech area you can think of
Renews at $19.99/month. Cancel anytime