The basic Zendesk setup
Once you have created a new account, Zendesk will present you a button labeled Get Started. If clicked, it will guide you through the following steps:
- Set up email.
- Invite your team.
- Set up Help Center.
- What's next?
This is meant to give you a quick overview of Zendesk's core functionality and point you into the right direction for further customization. While the first few steps are of little significance to us, step 4 provides us with a great overview over the basic elements of Zendesk. We will use this overview to quickly cover the basics and to freshen up our memory about the basic Zendesk setup.
Channels
Channels allow customers to contact us using different methods of communication.
Before adding any extra channels, the standard setup will allow users to create tickets via e-mail only. Out of the box, this e-mail will be support@yourcompany.zendesk.com.
Zendesk allows us to add a variety of channels, such as the following:
- Voice
- Chat

Self-service
Zendesk also allows us to set up self-service for our customers. The Help Center, for instance, can be a great tool in order to reduce customer queries by providing an open knowledge base for our customers.
All the Self-Service options have to be set up manually before they can be used:

Apps and integrations
Apps are a great way to add functionality to your Zendesk environment. You may choose one of the many apps available or decide to program your own and create more individual solutions.
While Zendesk is a powerful tool, for most companies, it is likely one among a few tools within their ecosystem. Having the option to integrate Zendesk within that ecosystem can be very helpful.
Some of the more common tools Zendesk allows to be integrated are:
- JIRA
- Salesforce
- MailChimp
Ticketing workflows and efficiency
With the ticket system being at the core of Zendesk, it comes as no surprise that a great range of options are provided when it comes to tickets and the different workflows associated with them. The following elements can be used to create efficient workflows:
- Triggers and automations
- Views
- Macros
- Service Level Agreements
- Groups
- Organizations
Triggers and automations
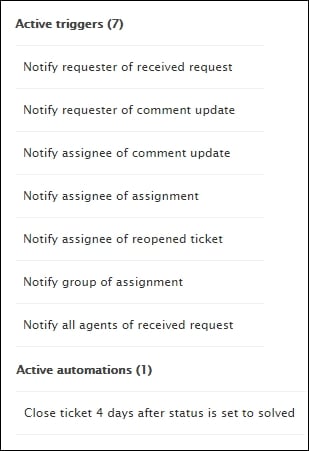
Triggers and automations are part of the Zendesk business rules. While triggers take action when a ticket has been updated or created, automations take action after a specified amount of time. Out of the box, there are seven active triggers and one active automation.
Serving as examples, they also cover the most basic business rules for a functioning setup:

Views
Views are a pool of tickets, filtered by a list of set criteria. They are a crucial part when it comes to managing your ticket workflow. For example, if you offer different levels of support, views can be used to divide your tickets in Tier 1 and Tier 2 support.
Macros
A macro is a templated response for agents, that can be used to answer customers. Mainly used to ensure the same level of support by providing macros for your agents, macros are more than just text modules. Creating macros, you can choose specific ticket properties that you would like to change upon use. Good examples are, adding a predefined tag, changing the status of a ticket, and setting custom fields whenever an agent uses a macro.
Service Level Agreements
A Service Level Agreement (SLA) can be seen as a contract between you as a service provider and your customers, outlining the level of service that can be expected in a certain time frame. This feature is also helpful when using reports to review your team's performance.
Groups
Groups can come very handy when defining and implementing workflows. For instance, a trigger could check a ticket for the keyword "lawyer". If the keyword is found, the ticket is pushed to the group "supervisors". Now, only agents in that group can access that specific ticket.
Organizations
Each user (including end users) can be assigned to an organization. This can be useful in a handful of different scenarios such as restricting certain content in your help center to only one organization. Like a lot of Zendesk's options, you may come up with your own purpose of use.
Zendesk categorizes all the preceding elements under the Ticketing Workflows and Efficiency heading:

Performance reporting
While Zendesk provides options for performance reports, most Zendesk admins make use of the GoodData integration. GoodData is a powerful reporting and analytics tool working with Zendesk right out of the box.
If the provided reporting options are sufficient for you, Zendesk allows you to get detailed snapshots in different areas of support, as shown in the following screenshot:

Localization and branding
Being able to offer support in more than just one language is important for most international companies. Hence, it comes as no surprise that Zendesk also offers the necessary options to do so.
Most importantly, Zendesk allows you to create dynamic content, which can be referenced by a placeholder within your macros or business rules. A placeholder would look something like this:
{{dc.example_placeholder}}
Using dynamic content means that Zendesk will automatically display the right language text depending on the user's language settings.
Zendesk classes this feature as part of their localization options:

Note
It is important to note that Zendesk does not guide you through every possible setting. While they do cover the basics, there are many options hidden within the Settings tab. I highly recommend that you browse all your settings in order to get a better understanding of the actual scope of settings and customization.


