Search icon CANCEL
Arrow left icon
Explore Products
Best Sellers
New Releases
Books
Videos
Audiobooks
Learning Hub
Conferences
Free Learning
Arrow right icon
Arrow up icon
GO TO TOP
Mastering UI Development with Unity

You're reading from   Mastering UI Development with Unity An in-depth guide to developing engaging user interfaces with Unity 5, Unity 2017, and Unity 2018

Arrow left icon
Product type Paperback
Published in Apr 2018
Publisher Packt
ISBN-13 9781787125520
Length 468 pages
Edition 1st Edition
Languages
Tools
Concepts
Arrow right icon
Author (1):
Arrow left icon
Dr. Ashley Godbold Dr. Ashley Godbold
Author Profile Icon Dr. Ashley Godbold
Dr. Ashley Godbold
Arrow right icon
View More author details
Toc

Table of Contents (12) Chapters Close

Preface 1. Designing User Interfaces 2. Canvases, Panels, and Basic Layouts FREE CHAPTER 3. Automatic Layouts 4. The Event System and Programming for UI 5. Buttons 6. Text, Images, and TextMesh Pro-Text 7. Masks and Other Inputs 8. Animations and Particles in the UI 9. World Space UI 10. Mobile-Specific UI 11. Other Books You May Enjoy

Resolution and aspect ratio

The resolution of a game is the pixel dimension of the screen. For example, a game could run at 1024x768. This means that the game is 1024 pixels wide and 768 pixels tall. The aspect ratio of a game is the ratio between the width and height (expressed width:height). This aspect ratio of a game is determined by dividing the resolution width by resolution height and then simplifying the fraction. So, for example, if your game has a resolution of 1024x768, the aspect ratio would be as follows:

Here, the fraction 4/3 is the aspect ratio 4:3.

The following diagram provides a list of common aspect ratios and related resolutions:
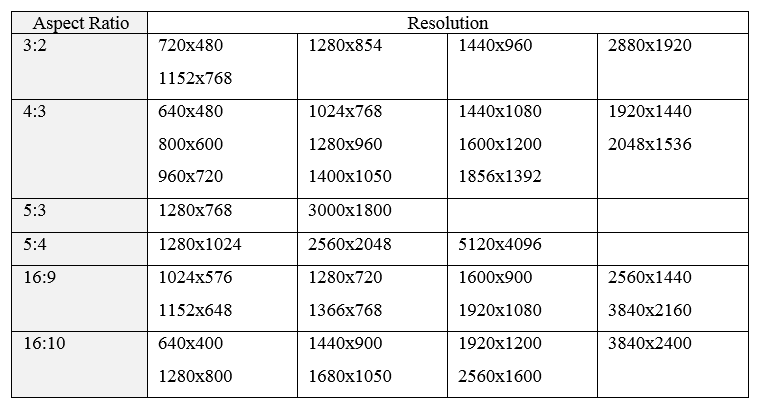

The following website provides a list of common resolutions specific to iOS devices:
http://iosres.com/. Note that not all the aspect ratios are simplified fractions. For example, 16:10 is not simplified, as the simplified fraction would be 8:5.

When it comes to UI, the resolution of your game will be incredibly important. If you'll build to a single resolution/aspect ratio, the UI will be much easier to deal with. However, if you'll build a game that you want to run on multiple resolutions/aspect ratios (for example, a mobile project), you want your UI to scale appropriately, and you want to be able to easily change the resolution of your game so that you can test that it is scaling properly.

You can check out https://developer.android.com/guide/practices/screens_support.html#testing for a list of common resolutions specific to Android devices.

Even if you will allow your resolution and aspect ratio to vary, you should still decide on a default resolution. This default resolution represents the resolution of your ideal design. This will be the resolution that your initial design and UI layout is based on, so if the resolution or aspect ratio varies, the UI will try to maintain the same design best as it can.

Changing the aspect ratio and resolution of the game view

You can easily switch between different resolutions and aspect ratios in the Game tab. This will allow you to see how your UI scales at the different resolutions and aspect ratios:

  1. If you navigate to your Game tab, you will see the words Free Aspect. Clicking on Free Aspect will reveal a menu that shows various aspect ratios and a single 1024x768 resolution that is labeled Standalone:

Free Aspect means that the window will scale to whatever resolution you set by changing the size of the game window. So by moving the frame around on the game window, you will change the aspect ratio. You can see this in effect easily by setting your Editor layout to one that shows both the Screen and Game tabs open simultaneously. For example, setting the Layout to 2 by 3 will do this.

  1. You can change the layout by selecting the word Default that appears in the upper-right hand corner of the Unity Editor.
  2. Now the Game and Scene tabs will both be visible on the left-hand side of your screen. Zoom out of your scene tab very far so that the square representing the camera looks small, as shown:
  1. Now, reduce the size of the game tab so that it is a very small thin rectangle. You will see that the main camera is now also displaying as a very small thin rectangle, because we are in Free Aspect ratio mode:
  1. You can select another aspect ratio, like 5:4, and you will see that as you rescale the game window, the blue area representing the actual game will maintain a 5:4 ratio and black bars to fill in any extra spacing. The camera will also maintain that ratio:
  1. Standalone (1024x768) will attempt to emulate the 1024x768 resolution. It's pretty likely that the window you have set for the Game tab is not big enough to support 1024x768 pixels; if so, it will be scaled as indicated in the following screenshot:

If the resolution or aspect ratio you want to use is not available in the resolution drop-down menu, you can add your own item to this menu by selecting the plus sign. If you want to create a set resolution item, set Type to Fixed Resolution. If you want to create a set aspect ratio item, set Type to Aspect Ratio:

For example, if I wanted to have a resolution item that represented the iPhone 6, add an item with the settings displayed in the following screenshot:

Once you hit OK, the iphone 6 item will be displayed at the bottom of the list. When you select it, the camera and visible area of the Game tab will maintain the aspect ratio created by a 1334x750 resolution:

Building for a single resolution

If you are creating a game that you plan to build on the PC, Mac, & Linux Standalone target platform, you can force the resolution to always be the same. To do so, go to Edit | Project Settings | Player. Your Inspector should now display the following:

You may have more or fewer platforms displayed here; it depends on the modules you have installed with Unity.

To force a specific resolution on a PC, Mac, & Linux Standalone game, deselect Default is Native Resolution. Then, the options for inputting Default Screen Width and Default Screen Height will be made available to you, and you can enter the desired resolution values. You must also set Display Resolution Dialog to Disabled. Then, when you build your game, it will build play in a window of the size you specified.

The following screenshot shows the settings for forcing your game to display at 1024x768 in the Player Settings for PC, Mac, & Linux Standalone:

You can also force a specific resolution with a WebGL build. There are a few less options to worry about, but the general concept is the same. The following screenshot shows the settings for forcing your game to display at 1024x768 in the Player Settings for WebGL:

Resetting the resolution

Annoyingly, if you build and run a PC, Mac, & Linux Standalone game with one set of resolution settings, and then try to rebuild with a different set of resolution settings, your new settings will not update and the game will still build with the previous resolution. This may seem like a bug, but it is not. The Unity application is saving the screen settings under the PlayerPref save data.

If you find that you are unable to manually set your resolution settings, there are two methods you can attempt:

  • Deleting the PlayerPrefs with PlayerPrefs.DeleteAll();
  • Physically deleting the PlayerPrefs files from the computer

I will outline the two methods for you.

Method 1 – PlayerPrefs.DeleteAll()

You can create a menu item within the Unity Editor that will delete all of your PlayerPrefs for you. This is helpful for this issue as well as helping you delete saved data in other scenarios.

To create a menu item within the Unity Editor that will delete all of your PlayerPrefs, complete the following steps:

  1. Create a new folder in your Assets folder called Editor.
  2. Create a new C# Script and name it DeletePrefs.cs within the Editor folder. It will not work unless it is placed in a folder called Editor, so be sure to do that:
  1. Open the DeletePrefs.cs script and give it the following code:
using UnityEditor;
using UnityEngine;

public class DeletePrefs : EditorWindow {

[MenuItem("Edit/Delete All PlayerPrefs")]

public static void DeletePlayerPrefs(){
PlayerPrefs.DeleteAll();
Debug.Log("delete prefs");
}
}
  1. Save the script.
  2. A new option, Delete All PlayerPrefs, will now be at the very bottom of the Edit menu. Select Delete All PlayerPrefs. If performed correctly, you should see delete prefs in the Console log.
  1. Rebuild the game and see whether the new resolution settings "stick".

Method 2 – Deleting PlayerPref files

I have found that Method 1 doesn't always work for me and sometimes my resolution settings are not reset. If you are unable to get Method 1 to work for you (or you just feel like doing it another way), you can find the PlayerPref files on your computer and delete them manually. To delete the files manually, complete the following steps:

  1. Determine Company Name and Product Name from PlayerSettings by navigating to Edit | Preferences | Player Settings:
  1. Now, select (Windows) Start and type regedit. Select the regedit program when it becomes available to you:
  1. The Registry Editor should now be open. Navigate to the folders that represent the Company Name and Product Name you found in step 1, by the following path:
  • Computer
  • HKEY_CURRENT_USER
  • Software
  • The Company Name Found In Step 1 (DefaultCompany)
  • The Project Name Found In Step 1 (Mastering Unity UI Project):
  1. Once you select the appropriate folder, you should see the following items on the right-hand side of the Registry Editor:
  • Screenmanager Is Fullscreen
  • Screenmanager Resolution Height
  • Screenmanager Resolution Width
  1. Select all three of the listed items and delete them:
  1. Rebuild the game, and the new resolution settings should now be displaying.
The steps outlined in the previous text demonstrate how to delete the files from a Windows machine. If you have a different operating system, consult the following website for the location of the PlayerPref files: https://docs.unity3d.com/ScriptReference/PlayerPrefs.html.

Building for a single aspect ratio

Forcing a specific aspect ratio is possible in PC, Mac, & Linux Standalone builds. To do so, enable Display Resolution Dialog and check the aspect ratio you wish to use in the Supported Aspect Ratios setting.

The following screenshot shows a game being built with a 4:3 aspect ratio:

When you build and run your game with the preceding settings, a dialog option will open and the player will be allowed to choose from multiple resolutions that fit that setting. The following screenshot shows the resolution dialog window with multiple 4:3 resolutions available:

Setting the orientation

When building for mobile devices, you can't specify resolution and aspect ratio. However, you can choose between screen orientations in mobile devices. There are two different orientations: Landscape and Portrait.

Games built so that they are wider than they are tall are said to have landscape resolution. Games build that are taller than they are wide are said to have portrait resolution. For example, a 16:9 aspect ratio would be a landscape resolution, and a 9:16 aspect ratio would be a portrait resolution, as illustrated:

So, while you can't choose the exact aspect ratio of a mobile game, you can choose the orientation, which forces the aspect ratio to be either wider or taller. You can set the orientation by navigating to Edit | Preferences | Player Settings and selecting the mobile device. If you are building for both iOS and Android, you will not have to set these properties for both. As you can see from the following screenshot, the asterisk next to the property of Default Orientation states that the settings are shared between multiple platforms:

You can set the Default Orientation to either Auto Rotation, or one of the other rotations, as shown:

Unity defines the following orientations as the following rotations:

When you select a rotation other than Auto Rotation as the Default Orientation, the game will only play at that orientation on the device. If you select Auto Rotation, you will have the option to select between multiple orientations:

In most cases, it is best to choose only the Landscape orientations or only the Portrait orientations, but not all four. Generally, allowing all four orientations will cause issues with the game's UI.

Players tend to prefer to be able to rotate their games (especially if they're like me and like to play games in bed while their phone is charging), so unless you have a good reason to stop rotation, it's best to enable both Portrait and Portrait Upside Down or Landscape Right and Landscape Left.

lock icon The rest of the chapter is locked
Register for a free Packt account to unlock a world of extra content!
A free Packt account unlocks extra newsletters, articles, discounted offers, and much more. Start advancing your knowledge today.
Unlock this book and the full library FREE for 7 days
Get unlimited access to 7000+ expert-authored eBooks and videos courses covering every tech area you can think of
Renews at $19.99/month. Cancel anytime