Essential prerequisites
In this section, we will prepare the following:
- The Cloud9 environment
- The S3 bucket
- The synthetic dataset, which will be generated using a deep learning model
Let’s get started.
Creating the Cloud9 environment
One of the more convenient options when performing ML experiments inside a virtual private server is to use the AWS Cloud9 service. AWS Cloud9 allows developers, data scientists, and ML engineers to manage and run code within a development environment using a browser. The code is stored and executed inside an EC2 instance, which provides an environment similar to what most developers have.
Important note
It is recommended to use an Identity and Access Management (IAM) user with limited permissions instead of the root account when running the examples in this book. We will discuss this along with other security best practices in detail in Chapter 9, Security, Governance, and Compliance Strategies. If you are just starting to use AWS, you may proceed with using the root account in the meantime.
Follow these steps to create a Cloud9 environment where we will generate the synthetic dataset and run the AutoGluon AutoML experiment:
- Type
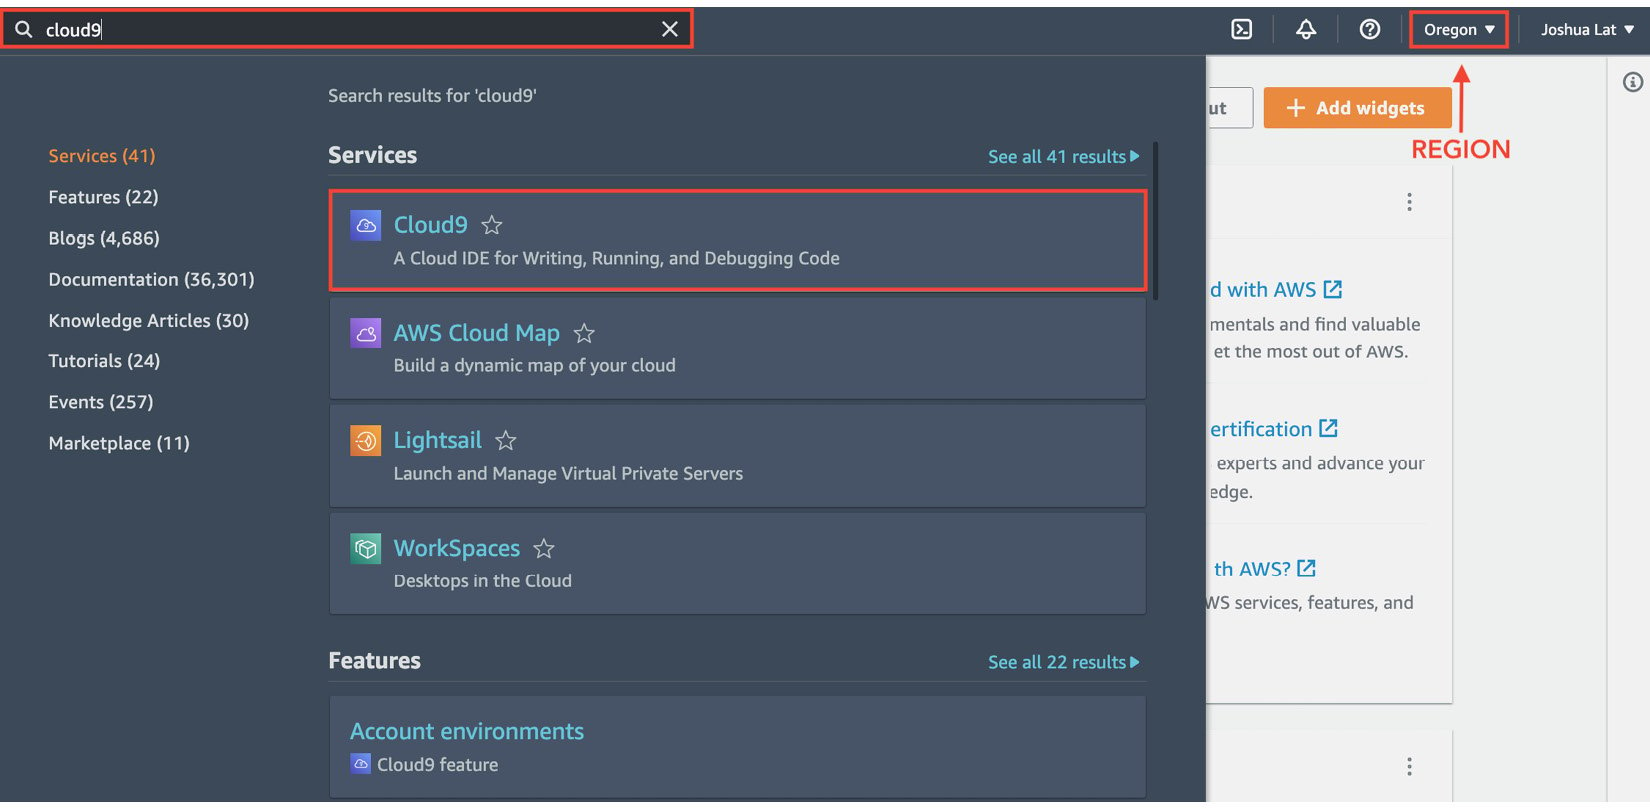
cloud9in the search bar. Select Cloud9 from the list of results:

Figure 1.3 – Navigating to the Cloud9 console
Here, we can see that the region is currently set to Oregon (us-west-2). Make sure that you change this to where you want the resources to be created.
- Next, click Create environment.
- Under the Name environment field, specify a name for the Cloud9 environment (for example,
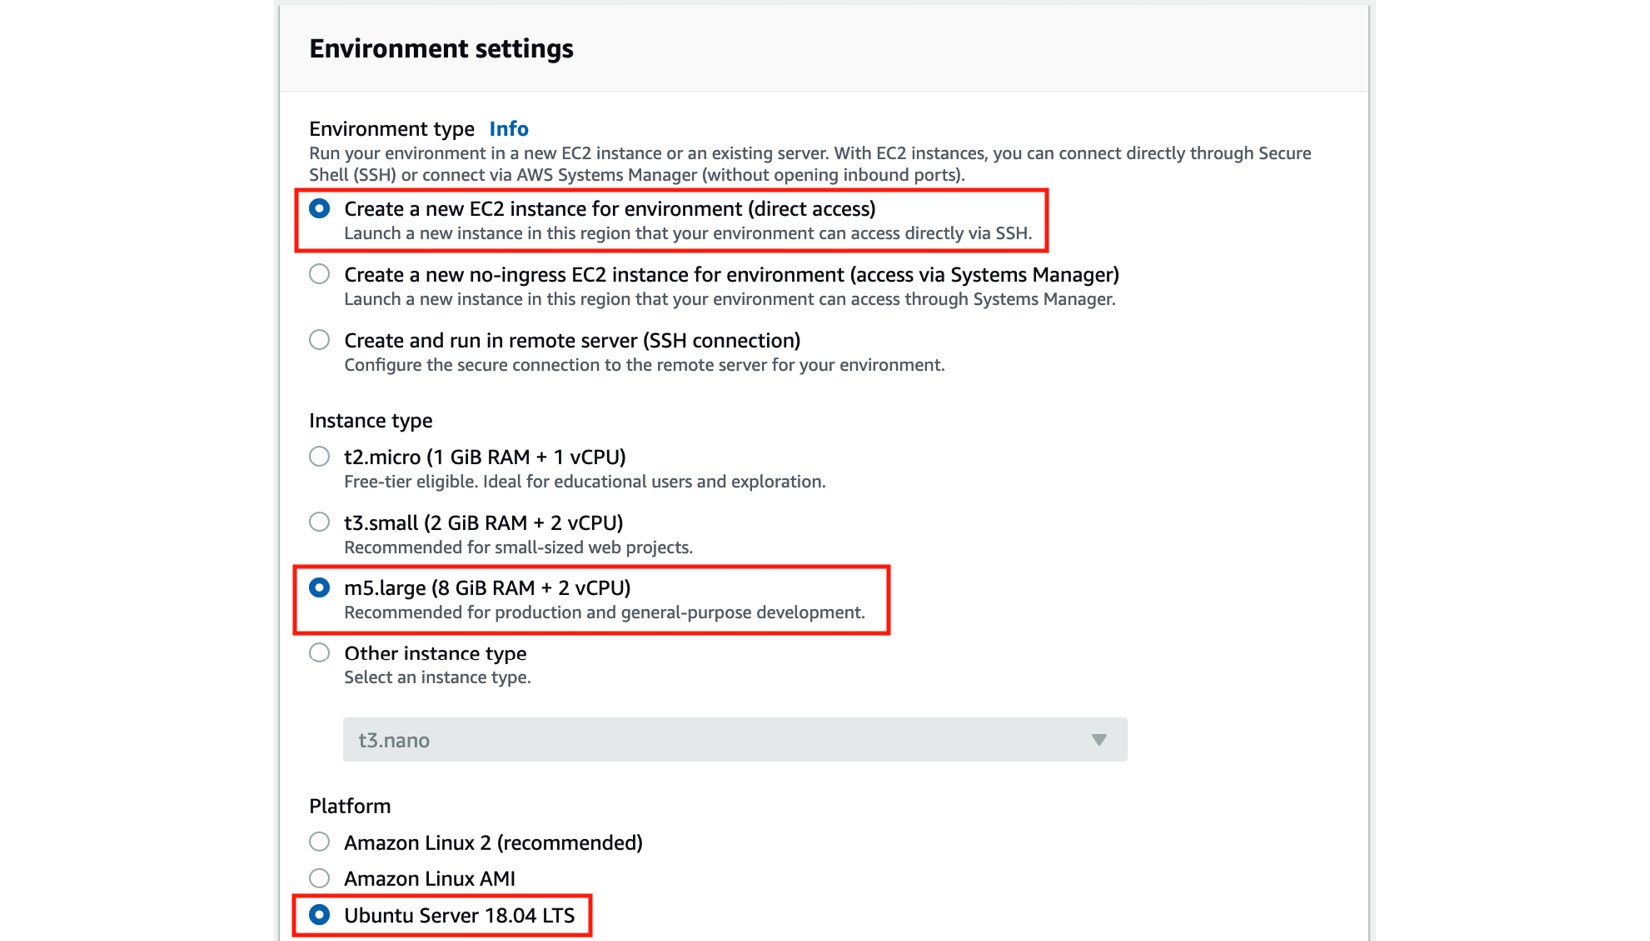
mle-on-aws) and click Next step. - Under Environment type, choose Create a new EC2 instance for environment (direct access). Select m5.large for Instance type and then Ubuntu Server (18.04 LTS) for Platform:

Figure 1.4 – Configuring the Cloud9 environment settings
Here, we can see that there are other options for the instance type. In the meantime, we will stick with m5.large as it should be enough to run the hands-on solutions in this chapter.
- For the Cost-saving setting option, choose After four hours from the list of drop-down options. This means that the server where the Cloud9 environment is running will automatically shut down after 4 hours of inactivity.
- Under Network settings (advanced), select the default VPC of the region for the Network (VPC) configuration. It should have a format similar to
vpc-abcdefg (default). For the Subnet option, choose the option that has a format similar tosubnet-abcdefg | Default in us-west-2a.
Important note
It is recommended that you use the default VPC since the networking configuration is simple. This will help you avoid issues, especially if you’re just getting started with VPCs. If you encounter any VPC-related issues when launching a Cloud9 instance, you may need to check if the selected subnet has been configured with internet access via the route table configuration in the VPC console. You may retry launching the instance using another subnet or by using a new VPC altogether. If you are planning on creating a new VPC, navigate to https://go.aws/3sRSigt and create a VPC with a Single Public Subnet. If none of these options work, you may try launching the Cloud9 instance in another region. We’ll discuss Virtual Private Cloud (VPC) networks in detail in Chapter 9, Security, Governance, and Compliance Strategies.
- Click Next Step.
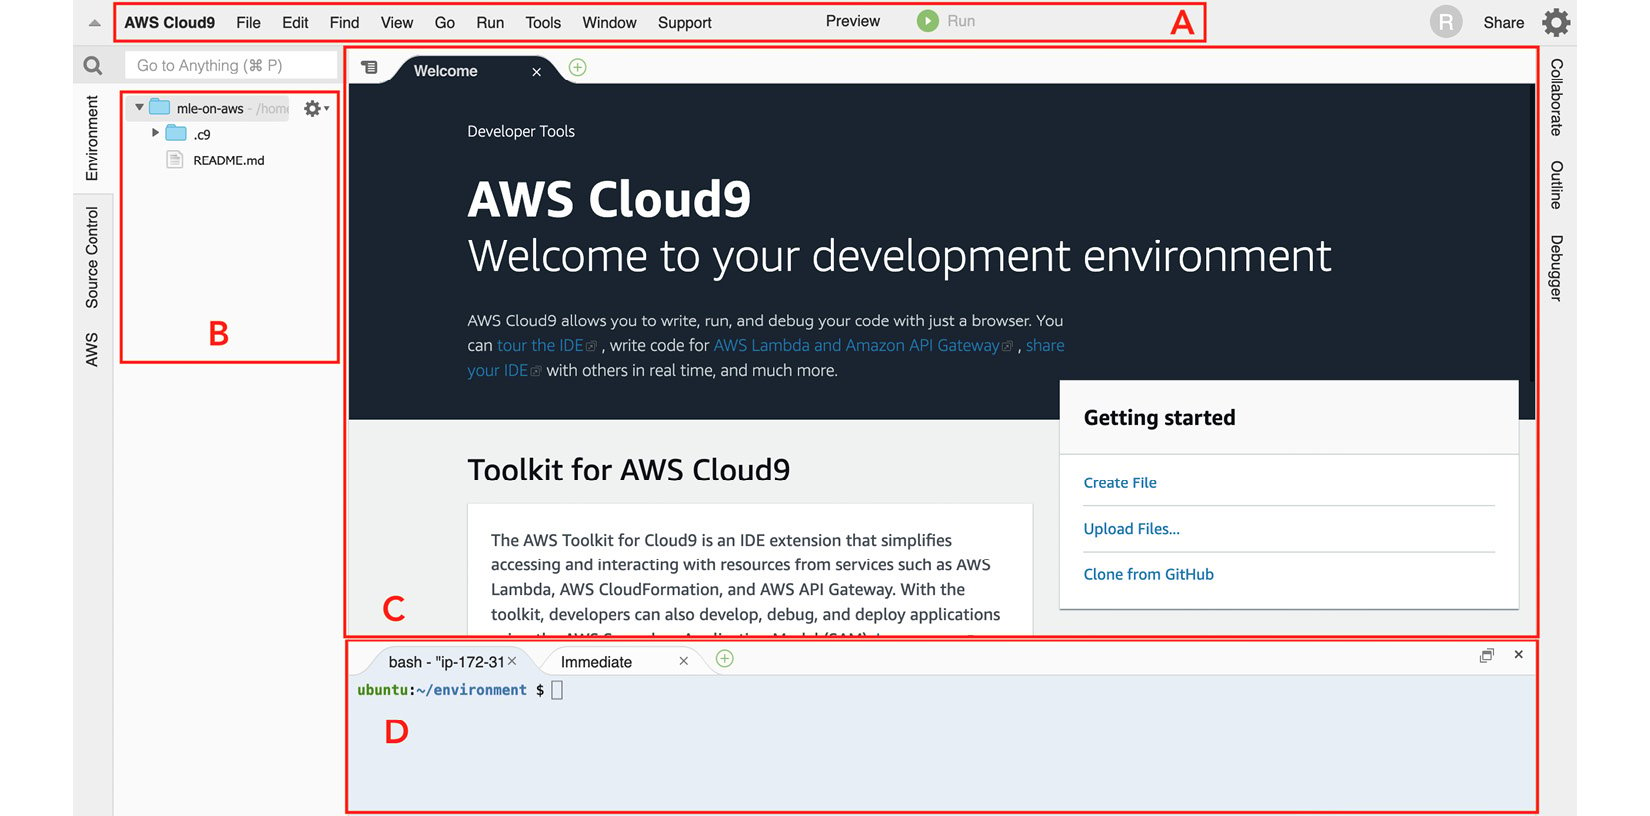
- On the review page, click Create environment. This should redirect you to the Cloud9 environment, which should take a minute or so to load. The Cloud9 IDE is shown in the following screenshot. This is where we can write our code and run the scripts and commands needed to work on some of the hands-on solutions in this book:

Figure 1.5 – AWS Cloud9 interface
Using this IDE is fairly straightforward as it looks very similar to code editors such as Visual Studio Code and Sublime Text. As shown in the preceding screenshot, we can find the menu bar at the top (A). The file tree can be found on the left-hand side (B). The editor covers a major portion of the screen in the middle (C). Lastly, we can find the terminal at the bottom (D).
Important note
If this is your first time using AWS Cloud9, here is a 4-minute introduction video from AWS to help you get started: https://www.youtube.com/watch?v=JDHZOGMMkj8.
Now that we have our Cloud9 environment ready, it is time we configure it with a larger storage space.
Increasing Cloud9’s storage
When a Cloud9 instance is created, the attached volume only starts with 10GB of disk space. Given that we will be installing different libraries and frameworks while running ML experiments in this instance, we will need more than 10GB of disk space. We will resize the volume programmatically using the boto3 library.
Important note
If this is your first time using the boto3 library, it is the AWS SDK for Python, which gives us a way to programmatically manage the different AWS resources in our AWS accounts. It is a service-level SDK that helps us list, create, update, and delete AWS resources such as EC2 instances, S3 buckets, and EBS volumes.
Follow these steps to download and run some scripts to increase the volume disk space from 10GB to 120GB:
- In the terminal of our Cloud9 environment (right after the
$sign at the bottom of the screen), run the following bash command:wget -O resize_and_reboot.py https://bit.ly/3ea96tW
This will download the script file located at https://bit.ly/3ea96tW. Here, we are simply using a URL shortener, which would map the shortened link to https://raw.githubusercontent.com/PacktPublishing/Machine-Learning-Engineering-on-AWS/main/chapter01/resize_and_reboot.py.
Important note
Note that we are using the big O flag instead of a small o or a zero (0) when using the wget command.
- What’s inside the file we just downloaded? Let’s quickly inspect the file before we run the script. Double-click the
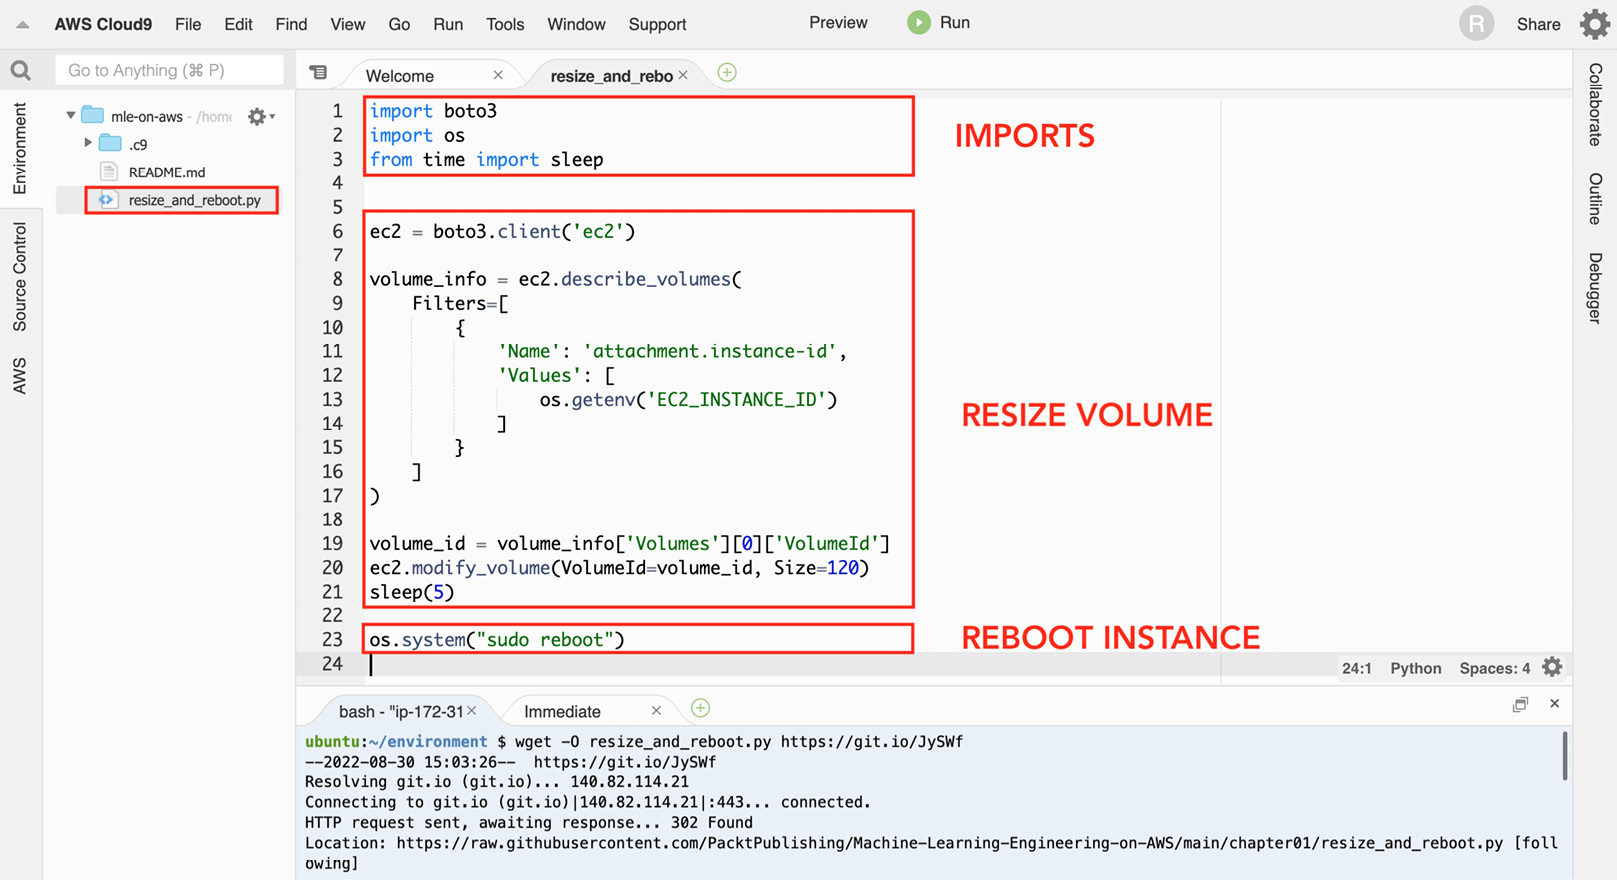
resize_and_reboot.pyfile in the file tree (located on the left-hand side of the screen) to open the Python script file in the editor pane. As shown in the following screenshot, theresize_and_reboot.pyscript has three major sections. The first block of code focuses on importing the prerequisites needed to run the script. The second block of code focuses on resizing the volume of a selected EC2 instance using theboto3library. It makes use of thedescribe_volumes()method to get the volume ID of the current instance, and then makes use of themodify_volume()method to update the volume size to 120GB. The last section involves a single line of code that simply reboots the EC2 instance. This line of code uses theos.system()method to run thesudo rebootshell command:

Figure 1.6 – The resize_and_reboot.py script file
You can find the resize_and_reboot.py script file in this book’s GitHub repository: https://github.com/PacktPublishing/Machine-Learning-Engineering-on-AWS/blob/main/chapter01/resize_and_reboot.py. Note that for this script to work, the EC2_INSTANCE_ID environment variable must be set to select the correct target instance. We’ll set this environment variable a few steps from now before we run the resize_and_reboot.py script.
- Next, run the following command in the terminal:
python3 -m pip install --user --upgrade boto3
This will upgrade the version of boto3 using pip.
Important note
If this is your first time using pip, it is the package installer for Python. It makes it convenient to install different packages and libraries using the command line.
You may use python3 -m pip show boto3 to check the version you are using. This book assumes that you are using version 1.20.26 or later.
- The remaining statements focus on getting the Cloud9 environment’s
instance_idfrom the instance metadata service and storing this value in theEC2_INSTANCE_IDvariable. Let’s run the following in the terminal:TARGET_METADATA_URL=http://169.254.169.254/latest/meta-data/instance-id export EC2_INSTANCE_ID=$(curl -s $TARGET_METADATA_URL) echo $EC2_INSTANCE_ID
This should give us an EC2 instance ID with a format similar to i-01234567890abcdef.
- Now that we have the
EC2_INSTANCE_IDenvironment variable set with the appropriate value, we can run the following command:python3 resize_and_reboot.py
This will run the Python script we downloaded earlier using the wget command. After performing the volume resize operation using boto3, the script will reboot the instance. You should see a Reconnecting… notification at the top of the page while the Cloud9 environment’s EC2 instance is being restarted.
Important note
Feel free to run the lsblk command after the instance has been restarted. This should help you verify that the volume of the Cloud9 environment instance has been resized to 120GB.
Now that we have successfully resized the volume to 120GB, we should be able to work on the next set of solutions without having to worry about disk space issues inside our Cloud9 environment.
Installing the Python prerequisites
Follow these steps to install and update several Python packages inside the Cloud9 environment:
- In the terminal of our Cloud9 environment (right after the
$sign at the bottom of the screen), run the following commands to updatepip,setuptools, andwheel:python3 -m pip install -U pip python3 -m pip install -U setuptools wheel
Upgrading these versions will help us make sure that the other installation steps work smoothly. This book assumes that you are using the following versions or later: pip – 21.3.1, setuptools – 59.6.0, and wheel – 0.37.1.
Important note
To check the versions, you may use the python3 -m pip show <package> command in the terminal. Simply replace <package> with the name of the package. An example of this would be python3 -m pip show wheel. If you want to install a specific version of a package, you may use python3 -m pip install -U <package>==<version>. For example, if you want to install wheel version 0.37.1, you can run python3 -m pip install -U wheel==0.37.1.
- Next, install
ipythonby running the following command. IPython provides a lot of handy utilities that help professionals use Python interactively. We will see how easy it is to use IPython later in the Performing your first AutoGluon AutoML experiment section:python3 -m pip install ipython
This book assumes that you are using ipython – 7.16.2 or later.
- Now, let’s install
ctgan. CTGAN allows us to utilize Generative Adversarial Network (GAN) deep learning models to generate synthetic datasets. We will discuss this shortly in the Generating a synthetic dataset using a deep learning model section, after we have installed the Python prerequisites:python3 -m pip install ctgan==0.5.0
This book assumes that you are using ctgan – 0.5.0.
Important note
This step may take around 5 to 10 minutes to complete. While waiting, let’s talk about what CTGAN is. CTGAN is an open source library that uses deep learning to learn about the properties of an existing dataset and generates a new dataset with columns, values, and properties similar to the original dataset. For more information, feel free to check its GitHub page here: https://github.com/sdv-dev/CTGAN.
- Finally, install
pandas_profilingby running the following command. This allows us to easily generate a profile report for our dataset, which will help us with our exploratory data analysis (EDA) work. We will see this in action in the Exploratory data analysis section, after we have generated the synthetic dataset:python3 -m pip install pandas_profiling
This book assumes that you are using pandas_profiling – 3.1.0 or later.
Now that we have finished installing the Python prerequisites, we can start generating a realistic synthetic dataset using a deep learning model!


