Search icon CANCEL
Subscription
0
Cart icon
Your Cart (0 item)
Close icon
You have no products in your basket yet
Save more on your purchases! discount-offer-chevron-icon
Savings automatically calculated. No voucher code required.
Arrow left icon
Explore Products
Best Sellers
New Releases
Books
Videos
Audiobooks
Learning Hub
Free Learning
Arrow right icon
Linux Kernel Programming

Linux Kernel Programming: A comprehensive guide to kernel internals, writing kernel modules, and kernel synchronization

Arrow left icon
Profile Icon Kaiwan N. Billimoria
Arrow right icon
$9.99 $43.99
Full star icon Full star icon Full star icon Full star icon Half star icon 4.6 (32 Ratings)
eBook Mar 2021 754 pages 1st Edition
eBook
$9.99 $43.99
Paperback
$54.99
Subscription
Free Trial
Renews at $19.99p/m
Arrow left icon
Profile Icon Kaiwan N. Billimoria
Arrow right icon
$9.99 $43.99
Full star icon Full star icon Full star icon Full star icon Half star icon 4.6 (32 Ratings)
eBook Mar 2021 754 pages 1st Edition
eBook
$9.99 $43.99
Paperback
$54.99
Subscription
Free Trial
Renews at $19.99p/m
eBook
$9.99 $43.99
Paperback
$54.99
Subscription
Free Trial
Renews at $19.99p/m

What do you get with eBook?

Product feature icon Instant access to your Digital eBook purchase
Product feature icon Download this book in EPUB and PDF formats
Product feature icon Access this title in our online reader with advanced features
Product feature icon DRM FREE - Read whenever, wherever and however you want
Product feature icon AI Assistant (beta) to help accelerate your learning
OR
Modal Close icon
Payment Processing...
tick Completed

Billing Address

Table of content icon View table of contents Preview book icon Preview Book

Linux Kernel Programming

Kernel Workspace Setup

Hello, and welcome to this book on learning Linux kernel development. To get the most out of this book, it is very important that you first set up the workspace environment that we will be using throughout the book. This chapter will teach you exactly how to do this and get started.

We will install a recent Linux distribution, preferably as a Virtual Machine (VM), and set it up to include all the required software packages. We will also clone this book's code repository on GitHub, and learn about a few useful projects that will help along this journey.

The best way to learn something is to do so empirically – not taking anyone's word on anything at all, but trying it out and experiencing it for yourself. Hence, this book gives you many hands-on experiments and kernel code examples that you can and indeed must try out yourself; this will greatly aid in your making real progress and deeply learning and understanding various aspects of Linux kernel and driver development. So, let's begin!

This chapter will take us through the following topics, which will help us set up our environment:

  • Running Linux as a guest VM
  • Setting up the software – distribution and packages
  • A few additional useful projects

Technical requirements

You will need a modern desktop PC or laptop. Ubuntu Desktop specifies the following as "recommended system requirements" for the installation and usage of the distribution:

  • A 2 GHz dual core processor or better.
  • RAM:
    • Running on physical host: 2 GB or more system memory (more will certainly help).
    • Running as a guest VM: The host system should have at least 4 GB RAM (the more the better and the smoother the experience).
  • 25 GB of free hard drive space (I suggest more, at least double this).
  • Either a DVD drive or a USB port for the installer media (not required when setting up Ubuntu as a guest VM).
  • Internet access is definitely helpful and required at times.

As performing tasks such as building a Linux kernel from source is a very memory- and CPU-intensive process, I highly recommend that you try it out on a powerful Linux system with plenty of RAM and disk space to spare as well. It should be pretty obvious – the more RAM and CPU power the host system has, the better!

Like any seasoned kernel contributor, I would say that working on a native Linux system is best. However, for the purposes of this book, we cannot assume that you will always have a dedicated native Linux box available to you. So, we will assume that you are working on a Linux guest. Working within a guest VM also adds an additional layer of isolation and thus safety. 

Cloning our code repository: The complete source code for this book is freely available on GitHub at https://github.com/PacktPublishing/Linux-Kernel-Programming. You can clone and work on it by cloning the git tree, like so:

git clone https://github.com/PacktPublishing/Linux-Kernel-Programming.git

The source code is organized chapter-wise. Each chapter is represented as a directory – for example, ch1/ has the source code for this chapter. The root of the source tree has some code that is common to all chapters, such as the source files convenient.h, klib_llkd.c, as well as others.

For efficient code browsing, I would strongly recommend that you always index the code base with ctags(1) and/or cscope(1). For example, to set up the ctags index, just cd to the root of the source tree and type ctags -R .

Unless noted otherwise, the code output we show in the book is the output as seen on an x86-64 Ubuntu 18.04.3 LTS guest VM (running under Oracle VirtualBox 6.1). You should realize that due to (usually minor) distribution – and even within the same distributions but differing versions – differences, the output shown here may not perfectly match what you see on your Linux system.

Running Linux as a guest VM

As discussed previously, a practical and convenient alternative to using a native Linux system is to install and use the Linux distribution as a guest OS on a VM. It's key that you install a recent Linux distribution, preferably as a VM to be safe and avoid unpleasant data loss or other surprises. The fact is when working at the level of the kernel, abruptly crashing the system (and the data loss risks that arise thereof) is actually a commonplace occurrence. I recommend using Oracle VirtualBox 6.x (or the latest stable version) or other virtualization software, such as VMware Workstation.

Both of these are freely available. It's just that the code for this book has been tested on VirtualBox 6.1. Oracle VirtualBox is considered Open Source Software (OSS) and is licensed under the GPL v2 (the same as the Linux kernel). You can download it from https://www.virtualbox.org/wiki/Downloads. Its documentation can be found here: https://www.virtualbox.org/wiki/End-user_documentation.

The host system should be either MS Windows 10 or later (of course, even Windows 7 will work), a recent Linux distribution (for example, Ubuntu or Fedora), or macOS. So, let's get started by installing our Linux guest.

Installing a 64-bit Linux guest

Here, I won't delve into the minutiae of installing Linux as a guest on Oracle VirtualBox, the reason being that this installation is not directly related to Linux kernel development. There are many ways to set up a Linux VM; we really don't want to get into the details and the pros and cons of each of them here.

But if you are not familiar with this, don't worry. For your convenience, here are some excellent resources that will help you out:

Also, you can look up useful resources for installing a Linux guest on VirtualBox in the Further reading section at the end of this chapter. 

While you install the Linux VM, keep the following things in mind.

Turn on your x86 system's virtualization extension support 

Installing a 64-bit Linux guest requires that CPU virtualization extension support (Intel VT-x or AMD-SV) be turned on within the host system's basic input/output system (BIOS) settings. Let's see how to do this:

  1. Our first step is to ensure that our CPU supports virtualization:
    1. There are two broad ways to check this while on a Windows host:
      • One, run the Task Manager app and switch to the Performance tab. Below the CPU graph, you will see, among several other things, Virtualization, with Enabled or Disabled following it.
      • A second way to check on Windows systems is to open a Command window (cmd). In Command Prompt, type systeminfo and press Enter. Among the output seen will be the Virtualization Enabled in firmware line. It will be followed by either Yes or No.
    2. To check this while on a Linux host, from Terminal, issue the following commands (processor virtualization extension support: vmx is the check for Intel processors, smv is the check for AMD processors):
egrep --color "vmx|svm" /proc/cpuinfo

For Intel CPUs, the vmx flag will show up (in color) if virtualization is supported. In the case of AMD CPUs, svm will show up (in color). With this, we know that our CPU supports virtualization. But in order to use it, we need to enable it in the computer BIOS.

  1. Enter the BIOS by pressing Del or F12 while booting (the precise key to press varies with the BIOS). Please refer to your system's manual to see which key to use. Search for terms such as Virtualization or Virtualization Technology (VT-x). Here is an example for Award BIOS:

Figure 1.1 – Setting the BIOS Virtualization option to the Enabled state
If you are using an Asus EFI-BIOS, you will have to set the entry to [Enabled] if it is not set by default. Visit https://superuser.com/questions/367290/how-to-enable-hardware-virtualization-on-asus-motherboard/375351#375351.
  1. Now, choose to use hardware virtualization in VirtualBox's Settings menu for your VM. To do this, click on System and then Acceleration. After that, check the boxes, as shown in the following screenshot:

Figure 1.2 – Enabling hardware virtualization options within the VirtualBox VM settings

This is how we enable our host processor's hardware virtualization features for optimal performance.

Allocate sufficient space to the disk

For most desktop/laptop systems, allocating a gigabyte of RAM and two CPUs to the guest VM should be sufficient.

However, when allocating space for the guest's disk, please be generous. Instead of the usual/default 8 GB suggested, I strongly recommend you make it 50 GB or even more. Of course, this implies that the host system has more disk space than this available! Also, you can specify this amount to be dynamically allocated or allocated on-demand. The hypervisor will "grow" the virtual disk optimally, not giving it the entire space to begin with.

Install the Oracle VirtualBox Guest Additions

For best performance, it's important to install the Oracle VirtualBox Guest Additions as well within the guest VM. These are essentially para-virtualization accelerator software, which greatly helps with optimal performance. Let's see how to do this on an Ubuntu guest session:

  1. First, update your Ubuntu guest OS's software packages. You can do so using the following command:
sudo apt update

sudo apt upgrade
  1. On completion, reboot your Ubuntu guest OS and then install the required packages using the following command:
sudo apt install build-essential dkms linux-headers-$(uname -r)
  1. Now, from the VM menu bar, go to Devices Insert Guest Additions CD image...This will mount the Guest Additions ISO file inside your VM. The following screenshot shows what it looks like doing this: 

Figure 1.3 – VirtualBox | Devices | Insert Guest Additions CD image
  1. Now, a dialog window will pop up that will prompt you to run the installer in order to launch it. Select Run.
  2. The Guest Additions installation will now take place in a Terminal window that shows up. Once complete, hit the Enter key to close the window. Then, power off your Ubuntu guest OS in order to change some settings from the VirtualBox manager, as explained next.
  1. Now, to enable Shared Clipboard and Drag'n'Drop functionalities between the guest and host machines, go to GeneralAdvanced and enable the two options (Shared Clipboard and Drag'n'Drop) as you wish with the dropdowns:
Figure 1.4 – VirtualBox: enabling functionality between the host and guest
  1. Then, click OK to save the settings. Now boot into your guest system, log in, and test that everything is working fine.
As of the time of writing, Fedora 29 has an issue with the installation of the vboxsf kernel module required for the Shared Folders feature. I refer you to the following resource to attempt to rectify the situation: Bug 1576832 - virtualbox-guest-additions does not mount shared folder (https://bugzilla.redhat.com/show_bug.cgi?id=1576832).

If this refuses to work, you can simply transfer files between your host and guest VM over SSH (using scp(1)); to do so, install and start up the SSH daemon with the following commands:
sudo yum install openssh-server
sudo systemctl start sshd

Remember to update the guest VM regularly and when prompted. This is an essential security requirement. You can do so manually by using the following: 

sudo /usr/bin/update-manager

Finally, to be safe, please do not keep any important data on the guest VM. We will be working on kernel development. Crashing the guest kernel is actually a commonplace occurrence. While this usually does not cause data loss, you can never tell! To be safe, always back up any important data. This applies to Fedora as well. To learn how to install Fedora as a VirtualBox guest, visit https://fedoramagazine.org/install-fedora-virtualbox-guest/.

Sometimes, especially when the overhead of the X Window System (or Wayland) GUI is too high, it's preferable to simply work in console mode. You can do so by appending 3 (the run level) to the kernel command line via the bootloader. However, working in console mode within VirtualBox may not be that pleasant an experience (for one, the clipboard is unavailable, and the screen size and fonts are less than desirable). Thus, simply doing a remote login (via ssh, putty, or equivalent) into the VM from the host system can be a great way to work.

Experimenting with the Raspberry Pi

The Raspberry Pi is a popular credit card-sized Single-Board Computer (SBC), much like a small-factor PC that has USB ports, a microSD card, HDMI, audio, Ethernet, GPIO, and more. The System on Chip (SoC) that powers it is from Broadcom, and in it is an ARM core or cluster of cores. Though not mandatory, of course, in this book, we strive to also test and run our code on a Raspberry Pi 3 Model B+ target. Running your code on different target architectures is always a good eye-opener to possible defects and helps with testing. I encourage you to do the same:
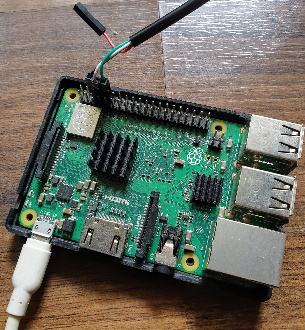
Figure 1.5 – The Raspberry Pi with a USB-to-serial adapter cable attached to its GPIO pins

You can work on the Raspberry Pi target either using a digital monitor/TV via HDMI as the output device and a traditional keyboard/mouse over its USB ports or, more commonly for developers, over a remote shell via ssh(1). However, the SSH approach does not cut it in all circumstances. Having a serial console on the Raspberry Pi helps, especially when doing kernel debugging.

I would recommend that you check out the following article, which will help you set up a USB-to-serial connection, thus getting a console login to the Raspberry Pi from a PC/laptop: WORKING ON THE CONSOLE WITH THE RASPBERRY PI, kaiwanTECH: https://kaiwantech.wordpress.com/2018/12/16/working-on-the-console-with-the-raspberry-pi/.

To set up your Raspberry Pi, please refer to the official documentation: https://www.raspberrypi.org/documentation/. Our Raspberry Pi system runs the "official" Raspbian (Debian for Raspberry Pi) Linux OS with a recent (as of the time of writing) 4.14 Linux kernel. On the console of the Raspberry Pi, we run the following commands:

rpi $ lsb_release -a
No LSB modules are available.
Distributor ID: Raspbian
Description: Raspbian GNU/Linux 9.6 (stretch)
Release: 9.6
Codename: stretch
rpi $ uname -a
Linux raspberrypi 4.14.79-v7+ #1159 SMP Sun Nov 4 17:50:20 GMT 2018 armv7l GNU/Linux
rpi $

What if you don't have a Raspberry Pi, or it's not handy? Well, there's always a way – emulation! Though not as good as having the real thing, emulating the Raspberry Pi with the powerful Free and Open Source Software (FOSS) emulator called QEMU or Quick Emulator is a nice way to get started, at least.

As the details of setting up the emulated Raspberry Pi via QEMU go beyond the scope of this book, we will not be covering it. However, you can check out the following links to find out more: Emulating Raspberry Pi on Linuxhttp://embedonix.com/articles/linux/emulating-raspberry-pi-on-linux/ and qemu-rpi-kernel, GitHubhttps://github.com/dhruvvyas90/qemu-rpi-kernel/wiki.

Also, of course, you do not have to confine yourself to the Raspberry Pi family; there are several other excellent prototyping boards available. One that springs to mind is the popular BeagleBone Black (BBB) board.

In fact, for professional development and product work, the Raspberry Pi is really not the best choice, for several reasons... a bit of googling will help you understand this. Having said that, as a learning and basic prototyping environment it's hard to beat, with the strong community (and tech hobbyist) support it enjoys.

Several modern choices of microprocessors for embedded Linux (and much more) are discussed and contrasted in this excellent in-depth article: SO YOU WANT TO BUILD AN EMBEDDED LINUX SYSTEM?, Jay Carlson, Oct 2020 : https://jaycarlson.net/embedded-linux/; do check it out.

By now, I expect that you have set up Linux as a guest machine (or are using a native "test" Linux box) and have cloned the book's GitHub code repository. So far, we have covered some information regarding setting up Linux as a guest VM (as well as optionally using boards such as the Raspberry Pi or the BeagleBone). Let's now move on to a key step: actually installing software components on our Linux guest system so that we can learn and write Linux kernel code on the system!

Setting up the software – distribution and packages

It is recommended to use one of the following or later stable version Linux distributions. As mentioned in the previous section, they can always be installed as a guest OS on a Windows or Linux host system, with the clear first choice being Ubuntu Linux 18.04 LTS Desktop. The following screenshot shows you the recommended version and the user interface:

Figure 1.6 – Oracle VirtualBox 6.1 running Ubuntu 18.04.4 LTS as a guest VM

The preceding version – Ubuntu 18.04 LTS Desktop – is the version of choice for this book, at least.  The two primary reasons for this are straightforward:

  • Ubuntu Linux is one of the, if not the, most popular Linux (kernel) development workstation environments in industry use today.
  • We cannot always, for lack of space and clarity, show the code/build output of multiple environments in this book. Hence, we have chosen to show the output as seen on Ubuntu 18.04 LTS Desktop.
Ubuntu 16.04 LTS Desktop is a good choice too (it has Long-Term Support (LTS) as well), and everything should work. To download it, visit https://www.ubuntu.com/download/desktop.

Some other Linux distributions that can also be considered include the following:

  • CentOS 8 Linux (not CentOS Stream): CentOS Linux is a distribution that's essentially a clone of the popular enterprise server distribution from RedHat (RHEL 8, in our case). You can download it from here: https://www.centos.org/download/.
  • Fedora Workstation: Fedora is a very well-known FOSS Linux distribution as well. You can think of it as being a kind of test-bed for projects and code that will eventually land up within RedHat's enterprise products. Download it from https://getfedora.org/ (download the Fedora Workstation image).
  • Raspberry Pi as a target: It's really best to refer to the official documentation to set up your Raspberry Pi (Raspberry Pi documentationhttps://www.raspberrypi.org/documentation/). It's perhaps worth noting that Raspberry Pi "kits" are widely available that come completely pre-installed and with some hardware accessories as well. 
If you want to learn how to install a Raspberry Pi OS image on an SD card, visit https://www.raspberrypi.org/documentation/installation/installing-images/.
  • BeagleBone Black as a target: The BBB is, like the Raspberry Pi, an extremely popular embedded ARM SBC for hobbyists and pros. You can get started here: https://beagleboard.org/black. The System Reference Manual for the BBB can be found here: https://cdn.sparkfun.com/datasheets/Dev/Beagle/BBB_SRM_C.pdf. Though we don't present examples running on the BBB, nevertheless, it's a valid embedded Linux system that, once properly set up, you can run this book's code on.

Before we conclude our discussion on selecting our software distribution for the book, here are a few more points to note:

  • These distributions are, in their default form, FOSS and non-proprietary, and free to use as an end user.
  • Though our aim is to be Linux distribution-neutral, the code has only been tested on Ubuntu 18.04 LTS and "lightly" tested on CentOS 8, and a Raspberry Pi 3 Model B+ running the Raspbian GNU/Linux 9.9 (stretch) Debian-based Linux OS.
  • We will, as far as is possible, use the very latest (as of the time of writing) stable LTS
    Linux kernel version 5.4 for our kernel build and code runs. Being an LTS kernel, the 5.4 kernel is an excellent choice to run on and learn with.
It is interesting to know that the 5.4 LTS kernel will indeed have a long lifespan; from November 2019 right up to December 2025! This is good news: this book's content remains current and valid for years to come!
  • For this book, we'll log in as the user account named llkd.
It's important to realize, for maximized security (with the latest defenses and fixes), that you must run the most recent Long Term Support (LTS) kernel possible for your project or product.

Now that we have chosen our Linux distribution and/or hardware boards and VMs, it's time we install essential software packages.

Installing software packages

The packages that are installed by default when you use a typical Linux desktop distribution, such as any recent Ubuntu, CentOS, or Fedora Linux system, will include the minimal set required by a systems programmer: the native toolchain, which includes the gcc compiler along with headers, and the make utility/packages.

In this book, though, we are going to learn how to write kernel-space code using a VM and/or a target system running on a foreign processor (ARM or AArch64 being the typical cases). To effectively develop kernel code on these systems, we will need to install some software packages. Read on.

Installing the Oracle VirtualBox guest additions

Make sure you have installed the guest VM (as explained previously). Then, follow along:

  1. Log in to your Linux guest VM and first run the following commands within a Terminal window (on a shell):
sudo apt update
sudo apt install gcc make perl
  1. Install the Oracle VirtualBox Guest Additions now. Refer to How to Install VirtualBox Guest Additions in Ubuntu: https://www.tecmint.com/install-virtualbox-guest-additions-in-ubuntu/.
This only applies if you are running Ubuntu as a VM using Oracle VirtualBox as the hypervisor app.

Installing required software packages

To install the packages, take the following steps:

  1. Within the Ubuntu VM, first do the following:
sudo apt update
  1. Now, run the following command in a single line:
sudo apt install git fakeroot build-essential tar ncurses-dev tar xz-utils libssl-dev bc stress python3-distutils libelf-dev linux-headers-$(uname -r) bison flex libncurses5-dev util-linux net-tools linux-tools-$(uname -r) exuberant-ctags cscope sysfsutils gnome-system-monitor curl perf-tools-unstable gnuplot rt-tests indent tree pstree smem libnuma-dev numactl hwloc bpfcc-tools sparse flawfinder cppcheck tuna hexdump openjdk-14-jre trace-cmd virt-what

The command installing gcc, make, and perl is done first so that the Oracle VirtualBox Guest Additions can be properly installed straight after. These (Guest Additions) are essentially para-virtualization accelerator software. It's important to install them for optimal performance.

This book, at times, mentions that running a program on another CPU architecture – typically ARM – might be a useful exercise. If you want to try (interesting!) stuff like this, please read on; otherwise, feel free to skip ahead to the Important installation notes section.

Installing a cross toolchain and QEMU

One way to try things on an ARM machine is to actually do so on a physical ARM-based SBC; for example, the Raspberry Pi is a very popular choice. In this case, the typical development workflow is to first build the ARM code on your x86-64 host system. But to do so, we need to install a cross toolchain – a set of tools allowing you to build software on one host CPU designed to execute on a different target CPU. An x86-64 host building programs for an ARM target is a very common case, and indeed is our use case here. Details on installing the cross compiler follow shortly.

Often, an alternate way to just trying things out is to have an ARM/Linux system emulated – this alleviates the need for hardware! To do so, we recommend using the superb QEMU project (https://www.qemu.org/).

To install the required QEMU packages, do the following:

  • For installation on Ubuntu, use the following:
sudo apt install qemu-system-arm
  • For installation on Fedora, use the following:
sudo dnf install qemu-system-arm-<version#>
To get the version number on Fedora, just type the preceding command and after typing the required package name (here, qemu-system-arm-), press the Tab key twice. It will auto-complete, providing a list of choices. Choose the latest version and press Enter.

CentOS 8 does not seem to have a simple means to install the QEMU package we require. (You could always install a cross toolchain via the source, but that's challenging; or, obtain an appropriate binary package.) Due to these difficulties, we will skip showing cross-compilation on CentOS.

Installing a cross compiler

If you intend to write a C program that is compiled on a certain host system but must execute on another target system, then you need to compile it with what's known as a cross compiler or cross toolchain. For example, in our use case, we want to work on an x86-64 host machine. It could even be an x86-64 guest VM, no issues, but run our code on an ARM-32 target:

  • On Ubuntu, you can install the cross toolchain with the following:
sudo apt install crossbuild-essential-armhf

The preceding command installs an x86_64-to-ARM-32 toolchain appropriate for ARM-32 "hard float" (armhf) systems (such as the Raspberry Pi); this is usually just fine. It results in the arm-linux-gnueabihf-<foo> set of tools being installed; where <foo> represents cross tools such as addr2line, as, g++, gcc, gcov, gprof, ld, nm, objcopy, objdump, readelf, size, strip, and so on. (The cross compiler prefix in this case is arm-linux-gnueabihf-). In addition, though not mandatory, you can install the arm-linux-gnueabi-<foo> cross toolset like this:

sudo apt install gcc-arm-linux-gnueabi binutils-arm-linux-gnueabi
  • On Fedora, you can install the cross toolchain with the following:
sudo dnf install arm-none-eabi-binutils-cs-<ver#> arm-none-eabi-gcc-cs-<ver#>
For Fedora Linux, the same tip as earlier applies – use the Tab key to help auto-complete the command.

Installing and using a cross toolchain might require some reading up for newbie users. You can visit the Further reading section where I have placed a few useful links that will surely be of great help.

Important installation notes

We will now mention a few remaining points, most of them pertaining to software installation or other issues when working on particular distributions:

  • On CentOS 8, you can install Python with the following command:
sudo dnf install python3

However, this does not actually create the (required) symbolic link (symlink), /usr/bin/python; why not? Check out this link for details: https://developers.redhat.com/blog/2019/05/07/what-no-python-in-red-hat-enterprise-linux-8/.

To manually create the symlink to, for example, python3, do the following:

sudo alternatives --set python /usr/bin/python3
  • The kernel build might fail if the OpenSSL header files aren't installed. Fix this on CentOS 8 with the following:
sudo dnf install openssl-devel
  • On CentOS 8, the lsb_release utility can be installed with the following:
sudo dnf install redhat-lsb-core
  • On Fedora, do the following:
    • Install these two packages, ensuring the dependencies are met when building a kernel on Fedora systems:
      sudo dnf install openssl-devel-1:1.1.1d-2.fc31 elfutils-libelf-devel
      (the preceding openssl-devel package is suffixed with the relevant Fedora version number (.fc31 here; adjust it as required for your system).
    • In order to use the lsb_release command, you must install the redhat-lsb-core package.

Congratulations! This completes the software setup, and your kernel journey begins! Now, let's check out a few additional and useful projects to complete this chapter. It's certainly recommended that you read through these as well.

Additional useful projects

This section brings you details of some additional miscellaneous projects that you might find very useful indeed. In a few appropriate places in this book, we refer to or directly make use of some of them, thus making them important to understand. 

Let's get started with the well-known and important Linux man pages project.

Using the Linux man pages

You must have noticed the convention followed in most Linux/Unix literature:

  • The suffixing of user commands with (1) – for example, gcc(1) or gcc.1
  • System calls with (2) – for example, fork(2) or fork().2
  • Library APIs with (3) – for example, pthread_create(3) or pthread_create().3

As you are no doubt aware, the number in parentheses (or after the period) denotes the section of the manual (the man pages) that the command/API in question belongs to. A quick check with man(1), via the man man command (that's why we love Unix/Linux!) reveals the sections of the Unix/Linux manual:

$ man man
[...]
A section, if provided, will direct man to look only in that section of
the manual. [...]

The table below shows the section numbers of the manual followed by the types of pages they contain.

1 Executable programs or shell commands
2 System calls (functions provided by the kernel)
3 Library calls (functions within program libraries)
4 Special files (usually found in /dev)
5 File formats and conventions eg /etc/passwd
6 Games
7 Miscellaneous (including macro packages and conventions), e.g.
man(7), groff(7)
8 System administration commands (usually only for root)
9 Kernel routines [Non standard]
[...]

So, for example, to look up the man page on the stat(2) system call, you would use the following:

man 2 stat # (or: man stat.2)

At times (quite often, in fact), the man pages are simply too detailed to warrant reading through when a quick answer is all that's required. Enter the tldr project – read on!

The tldr variant

While we're discussing man pages, a common annoyance is that the man page on a command is, at times, too large. Take the ps(1) utility as an example. It has a large man page as, of course, it has a huge number of option switches. Wouldn't it be nice, though, to have a simplified and summarized "common usage" page? This is precisely what the tldr pages project aims to do.

TL;DR literally means Too Long; Didn't Read.

In their own words, they provide "simplified and community-driven man pages." So, once installed, tldr ps provides a neat brief summary on the most commonly used ps command option switches to do something useful:

Figure 1.7 – A screenshot of the tldr utility in action: tldr ps
All Ubuntu repos have the tldr package. Install it with sudo apt install tldr.

It's indeed worth checking out. If you're interested in knowing more, visit https://tldr.sh/.

Earlier, recall that we said that userspace system calls fall under section 2 of the man pages, library subroutines under section 3, and kernel APIs under section 9. Given this, then, in this book, why don't we specify the, say, printk kernel function (or API) as printk(9) – as man man shows us that section 9 of the manual is Kernel routines? Well, it's fiction, really (at least on today's Linux): no man pages actually exist for kernel APIs! So, how do you get documentation on the kernel APIs and so on? That's just what we will briefly delve into in the following section.

Locating and using the Linux kernel documentation

The community has developed and evolved the Linux kernel documentation into a good state over many years of effort. The latest version of the kernel documentation, presented in a nice and modern "web" style, can always be accessed online here: https://www.kernel.org/doc/html/latest/.

Of course, as we will mention in the next chapter, the kernel documentation is always available for that kernel version within the kernel source tree itself, in the directory called Documentation/.

As just one example of the online kernel documentation, see the following partial screenshot of the page on Core Kernel Documentation/Basic C Library Functions (https://www.kernel.org/doc/html/latest/core-api/kernel-api.html#basic-c-library-functions):

Figure 1.8 – Partial screenshot showing a small part of the modern online Linux kernel documentation

As can be gleaned from the screenshot, the modern documentation is pretty comprehensive.

Generating the kernel documentation from source

You can literally generate the full Linux kernel documentation from within the kernel source tree in various popular formats (including PDF, HTML, LaTeX, EPUB, or XML), in a Javadoc or Doxygen-like style. The modern documentation system used internally by the kernel is called Sphinx. Using make help within the kernel source tree will reveal several documentation targets, among them htmldocs, pdfdocs, and more. So, you can, for example, cd to the kernel source tree and run make pdfdocs to build the complete Linux kernel documentation as PDF documents (the PDFs, as well as some other meta-docs, will be placed in Documentation/output/latex). The first time, at least, you will likely be prompted to install several packages and utilities (we don't show this explicitly).

Don't worry if the preceding details are not crystal clear yet. I suggest you first read Chapter 2Building the 5.x Linux Kernel from Source – Part 1, and Chapter 3, Building the 5.x Linux Kernel from Source – Part 2, and then revisit these details.

Static analysis tools for the Linux kernel

Static analyzers are tools that, by examining the source code, attempt to identify potential errors within it. They can be tremendously useful to you as the developer, though you must learn how to "tame" them – in the sense that they can result in false positives.

Several useful static analysis tools exist. Among them, the ones that are more relevant for Linux kernel code analysis include the following:

For example, to install and try Sparse, do the following:

sudo apt install sparse
cd <kernel-src-tree>
make C=1 CHECK="/usr/bin/sparse"

There are also several high-quality commercial static analysis tools available. Among them are the following:

clang is a frontend to GCC that is becoming more popular even for kernel builds. You can install it on Ubuntu with sudo apt install clang clang-tools.

Static analysis tools can save the day. Time spent learning to use them effectively is time well spent!

Linux Trace Toolkit next generation

A superb tool for tracing and profiling is the powerful Linux Tracing Toolkit next generation (LTTng) toolset, a Linux Foundation project. LTTng allows you to trace both userspace (applications) and/or the kernel code paths in minute detail. This can tremendously aid you in understanding where performance bottlenecks occur, as well as aiding you in understanding the overall code flow and thus in learning about how the code actually performs its tasks.

In order to learn how to install and use it, I refer you to its very good documentation here: https://lttng.org/docs​ (try https://lttng.org/download/ for installation for common Linux distributions). It is also highly recommended that you install the Trace Compass GUI: https://www.eclipse.org/tracecompass/. It provides an excellent GUI for examining and interpreting LTTng's output.

Trace Compass minimally requires a Java Runtime Environment (JRE) to be installed as well. I installed one on my Ubuntu 20.04 LTS system with sudo apt install openjdk-14-jre.

As an example (I can't resist!), here's a screenshot of a capture by LTTng being "visualized" by the superb Trace Compass GUI. Here, I show a couple of hardware interrupts (IRQ lines 1 and 130, the interrupt lines for the i8042 and Wi-Fi chipset, respectively, on my native x86_64 system.):

Figure 1.9 – Sample screenshot of the Trace Compass GUI; samples recorded by LTTng showing IRQ lines 1 and 130

The pink color in the upper part of the preceding screenshot represents the occurrence of a hardware interrupt. Underneath that, in the IRQ vs Time tab (it's only partially visible), the interrupt distribution is seen. (In the distribution graph, the y axis is the time taken; interestingly, the network interrupt handler – in red – seems to take very little time, the i8042 keyboard/mouse controller chip's handler – in blue – takes more time, even exceeding 200 microseconds!)

The procmap utility

Visualizing the complete memory map of the kernel Virtual Address Space (VAS) as well as any given process's user VAS is what the procmap utility is designed to do.

The description on its GitHub page sums it up:

It outputs a simple visualization of the complete memory map of a given process in a vertically-tiled format ordered by descending virtual address. The script has the intelligence to show kernel and userspace mappings as well as calculate and show the sparse memory regions that will be present. Also, each segment or mapping is scaled by relative size (and color-coded for readability). On 64-bit systems, it also shows the so-called non-canonical sparse region or 'hole' (typically close to 16,384 PB on the x86_64).

The utility includes options to see only kernel space or userspace, verbose and debug modes, the ability to export its output in convenient CSV format to a specified file, as well as other options. It has a kernel component as well and currently works (and auto-detects) on x86_64, AArch32, and Aarch64 CPUs.

Do note, though, that I am still working on this utility; it's currently under development... there are several caveats. Feedback and contributions are most appreciated!

Download/clone it from https://github.com/kaiwan/procmap:

Figure 1.10 – A partial screenshot of the procmap utility's output, showing only the top portion of kernel VAS on x86_64

We make good use of this utility in Chapter 7, Memory Management Internals - Essentials.

Simple Embedded ARM Linux System FOSS project

SEALS or Simple Embedded ARM Linux System is a very simple "skeleton" Linux base system running on an emulated ARM machine. It provides a primary Bash script that asks the end user what functionality they want via a menu, then accordingly proceeds to cross-compile a Linux kernel for ARM, then creates and initializes a simple root filesystem. It can then call upon QEMU ( qemu-system-arm) to emulate and run an ARM platform (the Versatile Express CA-9 is the default board emulated). The useful thing is, the script builds the target kernel, the root filesystem, and the root filesystem image file, and sets things up for boot. It even has a simple GUI (or console) frontend, to make usage a bit simpler for the end user. The project's GitHub page is here: https://github.com/kaiwan/seals/. Clone it and give it a try... we definitely recommend you have a look at its wiki section pages at https://github.com/kaiwan/seals/wiki for help.

Modern tracing and performance analysis with [e]BPF

An extension of the well-known Berkeley Packet Filter or BPFeBPF is the extended BPF. (FYI, modern usage of the term is simply to refer to it as BPF, dropping the 'e' prefix). Very briefly, BPF used to provide the supporting infrastructure within the kernel to effectively trace network packets. BPF is a very recent kernel innovation – available only from the Linux 4.0 kernel onward. It extends the BPF notion, allowing you to trace much more than just the network stack. Also, it works for tracing both kernel space as well as userspace apps. In effect, BPF and its frontends are the modern approach to tracing and performance analysis on a Linux system.

To use BPF, you will need a system with the following:

Using the BPF kernel feature directly is very hard, so there are several easier front ends to use. Among them, BCC and bpftrace are regarded as useful. Check out the following link to a picture that opens your eyes to just how many powerful BCC tools are available to help trace different Linux subsystems and hardware: https://github.com/iovisor/bcc/blob/master/images/bcc_tracing_tools_2019.png.

Important: You can install the BCC tools for your regular host Linux distro by reading the installation instructions here: https://github.com/iovisor/bcc/blob/master/INSTALL.md. Why not on our guest Linux VM? You can, when running a distro kernel (such as an Ubuntu- or Fedora-supplied kernel). The reason: the installation of the BCC toolset includes (and depends upon) the installation of the linux-headers-$(uname -r) package; this linux-headers package exists only for distro kernels (and not for our custom 5.4 kernel that we shall often be running on the guest).

The main site for BCC can be found at https://github.com/iovisor/bcc.

The LDV - Linux Driver Verification - project

The Russian Linux Verification Center, founded in 2005, is an opensource project; it has specialists in, and thus specializes in, automated testing of complex software projects. This includes comprehensive test suites, frameworks, and detailed analyses (both static and dynamic) being performed on the core Linux kernel as well as on the primarily device drivers within the kernel. This project puts a great deal of focus on the testing and verification of kernel modules as well, which many similar projects tend to skim.

Of particular interest to us here is the Online Linux Driver Verification Service page (http://linuxtesting.org/ldv/online?action=rules); it contains a list of a few verified Rules (Figure 1.11):

Figure 1.11 – Screenshot of the 'Rules' page of the Linux Driver Verification (LDV) project site

By glancing through these rules, we'll be able to not only see the rule but also instances of actual cases where these rules were violated by driver/kernel code within the mainline kernel, thus introducing bugs. The LDV project has successfully discovered and fixed (by sending in patches in the usual manner) several driver/kernel bugs. In a few of the upcoming chapters, we shall mention instances of these LDV rule violations (for example, memory leakage, Use After Free (UAF) bugs, and locking violations) having been uncovered, and (probably) even fixed.

Here are some useful links on the LDV website:

Summary

In this chapter, we covered in detail the hardware and software requirements to set up an appropriate development environment for beginning to work on Linux kernel development. In addition, we mentioned the basics and provided links, wherever appropriate, for setting up a Raspberry Pi device, installing powerful tools such as QEMU and a cross toolchain, and so on. We also threw some light on other "miscellaneous" tools and projects that you, as a budding kernel and/or device driver developer, might find useful, as well as information on how to begin looking up kernel documentation.

In this book, we definitely recommend and expect you to try out and work on kernel code in a hands-on fashion. To do so, you must have a proper kernel workspace environment set up, which we have successfully done in this chapter.

Now that our environment is ready, let's move on and explore the brave world of Linux kernel development! The next two chapters will teach you how to download, extract, configure, and build a Linux kernel from source.

Questions

Further reading

Left arrow icon Right arrow icon
Download code icon Download Code

Key benefits

  • Discover how to write kernel code using the Loadable Kernel Module framework
  • Explore industry-grade techniques to perform efficient memory allocation and data synchronization within the kernel
  • Understand the essentials of key internals topics such as kernel architecture, memory management, CPU scheduling, and kernel synchronization

Description

Linux Kernel Programming is a comprehensive introduction for those new to Linux kernel and module development. This easy-to-follow guide will have you up and running with writing kernel code in next-to-no time. This book uses the latest 5.4 Long-Term Support (LTS) Linux kernel, which will be maintained from November 2019 through to December 2025. By working with the 5.4 LTS kernel throughout the book, you can be confident that your knowledge will continue to be valid for years to come. You’ll start the journey by learning how to build the kernel from the source. Next, you’ll write your first kernel module using the powerful Loadable Kernel Module (LKM) framework. The following chapters will cover key kernel internals topics including Linux kernel architecture, memory management, and CPU scheduling. During the course of this book, you’ll delve into the fairly complex topic of concurrency within the kernel, understand the issues it can cause, and learn how they can be addressed with various locking technologies (mutexes, spinlocks, atomic, and refcount operators). You’ll also benefit from more advanced material on cache effects, a primer on lock-free techniques within the kernel, deadlock avoidance (with lockdep), and kernel lock debugging techniques. By the end of this kernel book, you’ll have a detailed understanding of the fundamentals of writing Linux kernel module code for real-world projects and products.

Who is this book for?

This book is for Linux programmers beginning to find their way with Linux kernel development. If you’re a Linux kernel and driver developer looking to overcome frequent and common kernel development issues, or understand kernel intervals, you’ll find plenty of useful information. You’ll need a solid foundation of Linux CLI and C programming before you can jump in.

What you will learn

  • Write high-quality modular kernel code (LKM framework) for 5.x kernels
  • Configure and build a kernel from source
  • Explore the Linux kernel architecture
  • Get to grips with key internals regarding memory management within the kernel
  • Understand and work with various dynamic kernel memory alloc/dealloc APIs
  • Discover key internals aspects regarding CPU scheduling within the kernel
  • Gain an understanding of kernel concurrency issues
  • Find out how to work with key kernel synchronization primitives

Product Details

Country selected
Publication date, Length, Edition, Language, ISBN-13
Publication date : Mar 19, 2021
Length: 754 pages
Edition : 1st
Language : English
ISBN-13 : 9781789955927
Vendor :
Linux Foundation
Languages :
Tools :

What do you get with eBook?

Product feature icon Instant access to your Digital eBook purchase
Product feature icon Download this book in EPUB and PDF formats
Product feature icon Access this title in our online reader with advanced features
Product feature icon DRM FREE - Read whenever, wherever and however you want
Product feature icon AI Assistant (beta) to help accelerate your learning
OR
Modal Close icon
Payment Processing...
tick Completed

Billing Address

Product Details

Publication date : Mar 19, 2021
Length: 754 pages
Edition : 1st
Language : English
ISBN-13 : 9781789955927
Vendor :
Linux Foundation
Languages :
Tools :

Packt Subscriptions

See our plans and pricing
Modal Close icon
$19.99 billed monthly
Feature tick icon Unlimited access to Packt's library of 7,000+ practical books and videos
Feature tick icon Constantly refreshed with 50+ new titles a month
Feature tick icon Exclusive Early access to books as they're written
Feature tick icon Solve problems while you work with advanced search and reference features
Feature tick icon Offline reading on the mobile app
Feature tick icon Simple pricing, no contract
$199.99 billed annually
Feature tick icon Unlimited access to Packt's library of 7,000+ practical books and videos
Feature tick icon Constantly refreshed with 50+ new titles a month
Feature tick icon Exclusive Early access to books as they're written
Feature tick icon Solve problems while you work with advanced search and reference features
Feature tick icon Offline reading on the mobile app
Feature tick icon Choose a DRM-free eBook or Video every month to keep
Feature tick icon PLUS own as many other DRM-free eBooks or Videos as you like for just $5 each
Feature tick icon Exclusive print discounts
$279.99 billed in 18 months
Feature tick icon Unlimited access to Packt's library of 7,000+ practical books and videos
Feature tick icon Constantly refreshed with 50+ new titles a month
Feature tick icon Exclusive Early access to books as they're written
Feature tick icon Solve problems while you work with advanced search and reference features
Feature tick icon Offline reading on the mobile app
Feature tick icon Choose a DRM-free eBook or Video every month to keep
Feature tick icon PLUS own as many other DRM-free eBooks or Videos as you like for just $5 each
Feature tick icon Exclusive print discounts

Frequently bought together


Stars icon
Total $29.97 $117.97 $88.00 saved
Mastering Embedded Linux Programming
$54.99
Linux Kernel Programming
$54.99
Linux Kernel Programming Part 2 - Char Device Drivers and Kernel Synchronization
$38.99
Total $29.97$117.97 $88.00 saved Stars icon
Banner background image

Table of Contents

18 Chapters
Section 1: The Basics Chevron down icon Chevron up icon
Kernel Workspace Setup Chevron down icon Chevron up icon
Building the 5.x Linux Kernel from Source - Part 1 Chevron down icon Chevron up icon
Building the 5.x Linux Kernel from Source - Part 2 Chevron down icon Chevron up icon
Writing Your First Kernel Module - LKMs Part 1 Chevron down icon Chevron up icon
Writing Your First Kernel Module - LKMs Part 2 Chevron down icon Chevron up icon
Writing Your First Kernel Module - LKMs Part 2
Technical requirements
A "better" Makefile template for your kernel modules
Configuring a "debug" kernel
Cross-compiling a kernel module
Setting up the system for cross-compilation
Attempt 1 – setting the "special" environment variables
Attempt 2 – pointing the Makefile to the correct kernel source tree for the target
Attempt 3 – cross-compiling our kernel module
Attempt 4  – cross-compiling our kernel module
Gathering minimal system information
Being a bit more security-aware
Licensing kernel modules
Emulating "library-like" features for kernel modules
Performing library emulation via multiple source files
Understanding function and variable scope in a kernel module
Understanding module stacking
Trying out module stacking
Passing parameters to a kernel module
Declaring and using module parameters
Getting/setting module parameters after insertion
Module parameter data types and validation
Validating kernel module parameters
Overriding the module parameter's name
Hardware-related kernel parameters
Floating point not allowed in the kernel
Auto-loading modules on system boot
Module auto-loading – additional details
Kernel modules and security – an overview
Proc filesystem tunables affecting the system log
The cryptographic signing of kernel modules
Disabling kernel modules altogether
Coding style guidelines for kernel developers
Contributing to the mainline kernel
Getting started with contributing to the kernel
Summary
Questions
Further reading
Section 2: Understanding and Working with the Kernel Chevron down icon Chevron up icon
Kernel Internals Essentials - Processes and Threads Chevron down icon Chevron up icon
Memory Management Internals - Essentials Chevron down icon Chevron up icon
Kernel Memory Allocation for Module Authors - Part 1 Chevron down icon Chevron up icon
Kernel Memory Allocation for Module Authors - Part 1
Technical requirements
Introducing kernel memory allocators
Understanding and using the kernel page allocator (or BSA)
The fundamental workings of the page allocator
Freelist organization
The workings of the page allocator
Working through a few scenarios
The simplest case
A more complex case
The downfall case
Page allocator internals – a few more details
Learning how to use the page allocator APIs
Dealing with the GFP flags
Freeing pages with the page allocator
Writing a kernel module to demo using the page allocator APIs
Deploying our lowlevel_mem_lkm kernel module
The page allocator and internal fragmentation
The exact page allocator APIs
The GFP flags – digging deeper
Never sleep in interrupt or atomic contexts
Understanding and using the kernel slab allocator
The object caching idea
Learning how to use the slab allocator APIs
Allocating slab memory
Freeing slab memory
Data structures – a few design tips
The actual slab caches in use for kmalloc
Writing a kernel module to use the basic slab APIs
Size limitations of the kmalloc API
Testing the limits – memory allocation with a single call
Checking via the /proc/buddyinfo pseudo-file
Slab allocator – a few additional details
Using the kernel's resource-managed memory allocation APIs
Additional slab helper APIs
Control groups and memory
Caveats when using the slab allocator
Background details and conclusions
Testing slab allocation with ksize() – case 1
Testing slab allocation with ksize() – case 2
Interpreting the output from case 2
Graphing it
Slab layer implementations within the kernel
Summary
Questions
Further reading
Kernel Memory Allocation for Module Authors - Part 2 Chevron down icon Chevron up icon
Kernel Memory Allocation for Module Authors - Part 2
Technical requirements
Creating a custom slab cache
Creating and using a custom slab cache within a kernel module
Creating a custom slab cache
Using the new slab cache's memory
Destroying the custom cache
Custom slab – a demo kernel module
Understanding slab shrinkers
The slab allocator – pros and cons – a summation
Debugging at the slab layer
Debugging through slab poisoning
Trying it out – triggering a UAF bug
SLUB debug options at boot and runtime
Understanding and using the kernel vmalloc() API
Learning to use the vmalloc family of APIs
A brief note on memory allocations and demand paging
Friends of vmalloc()
Specifying the memory protections
Testing it – a quick Proof of Concept
Why make memory read-only?
The kmalloc() and vmalloc() APIs – a quick comparison
Memory allocation in the kernel – which APIs to use when
Visualizing the kernel memory allocation API set
Selecting an appropriate API for kernel memory allocation
A word on DMA and CMA
Stayin' alive – the OOM killer
Reclaiming memory – a kernel housekeeping task and OOM
Deliberately invoking the OOM killer
Invoking the OOM killer via Magic SysRq
Invoking the OOM killer with a crazy allocator program
Understanding the rationale behind the OOM killer
Case 1 – vm.overcommit set to 2, overcommit turned off
Case 2 – vm.overcommit set to 0, overcommit on, the default
Demand paging and OOM
Understanding the OOM score
Summary
Questions
Further reading
The CPU Scheduler - Part 1 Chevron down icon Chevron up icon
The CPU Scheduler - Part 2 Chevron down icon Chevron up icon
Section 3: Delving Deeper Chevron down icon Chevron up icon
Kernel Synchronization - Part 1 Chevron down icon Chevron up icon
Kernel Synchronization - Part 2 Chevron down icon Chevron up icon
About Packt Chevron down icon Chevron up icon
Other Books You May Enjoy Chevron down icon Chevron up icon

Customer reviews

Top Reviews
Rating distribution
Full star icon Full star icon Full star icon Full star icon Half star icon 4.6
(32 Ratings)
5 star 75%
4 star 15.6%
3 star 3.1%
2 star 3.1%
1 star 3.1%
Filter icon Filter
Top Reviews

Filter reviews by


Andreas Hecht May 31, 2021
Full star icon Full star icon Full star icon Full star icon Full star icon 5
This book covers the vast field that is Linux Kernel Programming with sufficient amount of detail needed for module/driver development. The book is a hands-on guide as each chapter features example code, designed to illustrate the presented topics, which you can try out for yourself. Along with the code come questions (with solutions), exercises and a very well composed 'Further Reading' list, all of which you can download from the books GitHub repository. The book starts with fundamentals such as 'Building the Linux Kernel from Source' and 'Writing Your First Kernel Module' and leads to advanced topics such as memory management, scheduling and synchronization/concurrency. Thanks to the easy to follow instructions, this book is for anyone with a minimal amount of experience with Linux, C and embedded-/low-level-programming. Aside from the sound technical expertise this book brings to the table, it is written in a style that is inspiring and motivational. This book is actually fun to read and I would recommend it to anyone who would like to learn the skills and knowledge needed to become a Linux Kernel developer.
Amazon Verified review Amazon
David Conteh May 19, 2022
Full star icon Full star icon Full star icon Full star icon Full star icon 5
Great book. Well written and easy to follow.
Amazon Verified review Amazon
Swaran May 30, 2021
Full star icon Full star icon Full star icon Full star icon Full star icon 5
I was trying to find out a book with latest linux kernel development. Most of the available books are outdated. Finally found this book. This book provide the study material for which I was waiting since long. Book is written in clear and precise manner and guide the reader for "learning by doing" methodology.Complete book is divide into three sections1. First section explains about setting up the development environment, how to build linux kernel(of-course kernel 5.x) from source, how to write the kernel module2. Second section give in-depth understanding about kernel internals, processes, threads, memory management internals, kernel memory allocation, and deep understanding of CPU Schedulers.3. Third section goes even more deeper and explain about kernel synchronisation- critical sections, mutex and spinlock, debugging of locks in kernel.
Amazon Verified review Amazon
Shashank Apr 06, 2021
Full star icon Full star icon Full star icon Full star icon Full star icon 5
I met this guy and he is the most genuine person who has knowledge on kernel in depth. Read his book and helps me to brush the concepts and gives more charity on various topics such as memory management, cpu scheduling, interrupts, task structure, driver related concepts and many things. you will find the latest information as compare to other LDD books.definetly recommend this book to all who wants to deep dive into coding level, kernel concepts.
Amazon Verified review Amazon
Nayana Rao Mar 23, 2021
Full star icon Full star icon Full star icon Full star icon Full star icon 5
If you are looking for a comprehensive guide to Linux kernel and it’s configuration for a custom platform, I highly recommend this book. The book is very detailed and comes with the Github source base with a lot of sample codes to assist you.Disclaimer: I have helped with the technical review of this book.
Amazon Verified review Amazon
Get free access to Packt library with over 7500+ books and video courses for 7 days!
Start Free Trial

FAQs

How do I buy and download an eBook? Chevron down icon Chevron up icon

Where there is an eBook version of a title available, you can buy it from the book details for that title. Add either the standalone eBook or the eBook and print book bundle to your shopping cart. Your eBook will show in your cart as a product on its own. After completing checkout and payment in the normal way, you will receive your receipt on the screen containing a link to a personalised PDF download file. This link will remain active for 30 days. You can download backup copies of the file by logging in to your account at any time.

If you already have Adobe reader installed, then clicking on the link will download and open the PDF file directly. If you don't, then save the PDF file on your machine and download the Reader to view it.

Please Note: Packt eBooks are non-returnable and non-refundable.

Packt eBook and Licensing When you buy an eBook from Packt Publishing, completing your purchase means you accept the terms of our licence agreement. Please read the full text of the agreement. In it we have tried to balance the need for the ebook to be usable for you the reader with our needs to protect the rights of us as Publishers and of our authors. In summary, the agreement says:

  • You may make copies of your eBook for your own use onto any machine
  • You may not pass copies of the eBook on to anyone else
How can I make a purchase on your website? Chevron down icon Chevron up icon

If you want to purchase a video course, eBook or Bundle (Print+eBook) please follow below steps:

  1. Register on our website using your email address and the password.
  2. Search for the title by name or ISBN using the search option.
  3. Select the title you want to purchase.
  4. Choose the format you wish to purchase the title in; if you order the Print Book, you get a free eBook copy of the same title. 
  5. Proceed with the checkout process (payment to be made using Credit Card, Debit Cart, or PayPal)
Where can I access support around an eBook? Chevron down icon Chevron up icon
  • If you experience a problem with using or installing Adobe Reader, the contact Adobe directly.
  • To view the errata for the book, see www.packtpub.com/support and view the pages for the title you have.
  • To view your account details or to download a new copy of the book go to www.packtpub.com/account
  • To contact us directly if a problem is not resolved, use www.packtpub.com/contact-us
What eBook formats do Packt support? Chevron down icon Chevron up icon

Our eBooks are currently available in a variety of formats such as PDF and ePubs. In the future, this may well change with trends and development in technology, but please note that our PDFs are not Adobe eBook Reader format, which has greater restrictions on security.

You will need to use Adobe Reader v9 or later in order to read Packt's PDF eBooks.

What are the benefits of eBooks? Chevron down icon Chevron up icon
  • You can get the information you need immediately
  • You can easily take them with you on a laptop
  • You can download them an unlimited number of times
  • You can print them out
  • They are copy-paste enabled
  • They are searchable
  • There is no password protection
  • They are lower price than print
  • They save resources and space
What is an eBook? Chevron down icon Chevron up icon

Packt eBooks are a complete electronic version of the print edition, available in PDF and ePub formats. Every piece of content down to the page numbering is the same. Because we save the costs of printing and shipping the book to you, we are able to offer eBooks at a lower cost than print editions.

When you have purchased an eBook, simply login to your account and click on the link in Your Download Area. We recommend you saving the file to your hard drive before opening it.

For optimal viewing of our eBooks, we recommend you download and install the free Adobe Reader version 9.